How to grow the best crop of cucumber ever?

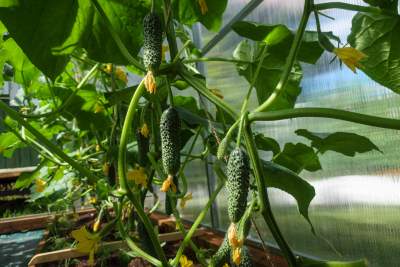
Cucumber is one of the best vegetables which grows in high temperature and plenty of water resource. It is a refreshing vegetable, especially who picked up fresh. It loves the sun and water. It grows quickly if it receives sufficient water and warmth and it is popular for its refreshing taste and crunchiness. 

Cucumbers can be eaten in a variety of ways cooked, raw in salads, and pickled. 

You have to raise healthy productive plants then you can end up with all of those delicious cucumber treats.

Learn about the simple cucumber growing secrets below.

How to grow cucumbers-with the simple secrets to success

 So, it all begins with great soil which is used for the growing of cucumber. It is top-secret for the successiveness of cucumber yield or production.

Cucumber can be flourishing on rich in nutrients, well-drained, and fertile soil. Addition of a generous amount of compost to the soil at planting time, which provides better results. 

Compost is an ideal soil supplement for growing healthy cucumber plants as it is rich in nutrients and humus that help the plants to grow quickly. But it is really helpful to retain moisture to the soil of cucumber plants.

Combine 3 to 4 cups of compost in every hole of the cucumber plant is planted and also add half a cup of casting to planting holes to boost the soil fertility and structure even more.

This organic compost and worm casting help roots absorb plenty of nutrients and retain moisture too.

After completion of planting add a few amounts of mulch on the bottom of the plant to repel weeds and conserve moisture, therefore it will slowly fertilize plants and it breaks down.

Don’t be forgotten, be better the soil than better the crop!

Also Read: How to use Epsom salt for cucumbers

Plant with morning sun in mind

Cucumber performs at peak level productions which need a generous amount of early morning sunlight. 

The rays of sunlight can help to dry off the dew of cucumber plants which keeps mold and mildew away. It will help to ripen fruits at a faster rate.

Add more mulch for plants quick growth

When it involves developing cucumbers with large success, mulching closely is any other massive key. And meaning mulching extra than simply with the little compost ring referred to above.

Place some inches of straw or shredded leaves 12″ to 18″ across the base of every plant.

Mulching cucumber vegetation has numerous massive blessings in your crop. Not handiest does it assist preserve competing weeds at bay, some inches of mulch additionally allows manage fluctuations with inside the soil temperature.

And the blessings don’t forestall there.

It additionally allows preserving soil-borne ailment at bay. The protecting mulch layer maintains soil from splashing up on leaves while watering, or throughout heavy rainfalls. Soil could include mold and mildew spores to harm or even kill plant life.

But perhaps most significantly of all, mulch allows the roots of cucumber vegetation to maintain moisture. Moisture is prime to staying productive!

Prevent plant overload

This is a secret that gardeners often overlook. To keep your harvest at its peak, you need to harvest your cucumbers regularly. 

Plants overloaded with too many cucumbers will stop sprouting and blooming. This will completely stop the production of the plant. 

When the plant becomes overwhelmed, it begins to channel all its energy into the ripening of the crop and does not produce many flowers.

How to grow cucumber?

The main two types of cucumber plant varieties can be grown as vining or bush, but the fruits can be used for slicing or pickling.

What do you plant and where you plant and how should you plant cucumber can be determined by few guidelines to follow for each.

Bush varieties are contained in smaller spaces because they are compact plants. Vining style they lend to trellising or even small fences or cages. It will take 2 to 3 feet of space to spread their foliage. Both of them are suited to make slices or making pickles or canning.

Also Read: Easy to grow the Fresh and Pure Cucumbers

How to plant cucumber?

When growing in the garden, it is best to plant small mounds.

 Planting the cucumber on a small hill helps prevent water from accumulating at the base of the plant. Create mounds several inches high and 12 to 18 inches in diameter. 

When planting, leave approximately 3 feet between embankments for vining varieties and 18 inches for bush cucumbers. 

In the garden, the cucumber vines must have enough room to grow. 

Climbing plants can be thrown several times or using a rope or trellis. However, shrubs do not require much support. 

For potted plants, fertilize regularly every few weeks. Once the soil must remain rich in nutrients. Both compost tea and worm tea are perfect choices. They are also ideal for stimulating garden plants. 

This is the best harvest of cucumbers of the year!

8 Amazing Onion Skin Uses and Benefits for Gardening

Learn about 8 amazing onion skin uses and benefits. They are so important that you will never waste them again.

 Did you know that onion skins are rich in antioxidants and quercetin, which are effective for obesity? A number of clinical trials and studies have confirmed its usefulness, and clinical trials involving 72 men and women in South Korea have shown positive results. Studies have shown that after 12 weeks of use, BMI and body fat percentage will decrease.

Onion is the most common vegetable in kitchens to make most dishes in a day. Imagine how many onions are used around the world and how many onion skins are thrown away. What if we tell you those paper onion skins that you thought were useless are? Now, if you’re wondering what the hell those insignificant onion skins can do after their vital components have been removed, you will be in for a great surprise – if some previous research is to be believed, onion skins are actually more nutritious than one! Onion itself!

When you’ve digested this amazing news, let’s see what makes onion peels so useful. Many studies have claimed that onion peels are very high in antioxidants, fiber, vitamins A, C, E, and environmentally friendly flavonoids. Onion peels are said to boost immunity, promote heart health, and help maintain blood sugar levels.

 Onion skins are usually thrown away. Using onion skins will open your eyes.

Uses and Benefits of Onion Skin

1. Discard them in the compost bin

 You can compost the peels and peels of onions, and the result is nutritious compost. To get rid of their rancid smell, bury them a few inches deep in the compost pile. Do not put them in the earthworm droppings box.

2. Cut the onion

The dried peel will quickly decompose, adding potassium and calcium to the soil.

3. Fertilizing onion skin

Don’t throw away onion skins. Use them to make potassium-rich organic fertilizers for all your indoor and outdoor plants. It will increase your disease resistance, growth, strong stems and yield. This onion skin fertilizer is also rich in calcium, iron, magnesium and copper.

To prepare, take 2-3 handfuls of onion skins or a bowl of onion skins and soak them in 1 litre of water for the next 24 hours. Strain into a glass. The fertilizer for onion skin tea is ready. Feed your plants 3-4 times a month, experiment and share the results.

Also Read: Growing Spring Onions From Seeds

4. Making onion skin tea

Use flawless onion skins and peels to make healthy onion skin tea. This research shows that you can suppress obesity. In addition, due to the high content of quercetin, onion skin tea can help relieve allergies, high blood pressure and infection-related problems.

 5. Get rid of leg cramps

Although there is no specific evidence or research showing that onion skin can heal calf cramps, you can still try this home remedy, which can work due to the anti-inflammatory properties of surgery. Soak in water for 10-15 minutes, take out only the soaked water or tea, and drink it before going to bed. Keep it for at least a week to see the difference.

6. Dye Easter Eggs with Onion Skin

Onion skins are the best natural way to colour Easter eggs. The dyeing process is simple and almost free.

7. Dye Your Fabric and Wool

Onion peel is not only suitable for eggs, but also for the natural dyeing of yarns, fabrics and wool.

Also Read: Garlic Farming: Planting, Care, Harvesting-A complete Guide

8. You can use onion skins in broth and soup recipes

With onion skins, you can darken the broth and add a bright colour to your soups and sauces. The peels may not affect the taste, but they will improve the appearance of the product to be cooked. And don’t forget the nutrients, the onion peel is richer in antioxidants than the onion itself.

How to Grow Spinach in Pots?

Are you crazy about spinach? Do you know how to grow spinach? You could be yields your own spinach tasty leaves in your garden within six to eight weeks.

Spinach leaves are rich in nutrients such as vitamin A, vitamin c, iron, and calcium. They are several varieties of spinach and it is easy to grow. Once you sow the spinach seeds successfully, you can enjoy the leaves the entire year.

You can enjoy these spinach leaves in a multitude of dishes such as salads, stews, soups, and pasta dishes, etc.

Also Read: How to grow spinach hydroponically?

How to grow spinach in pots?

There are several ways to grow spinach but here you learn about how to grow spinach in pots and it can be placed outdoors, indoors, terrace or courtyard.

There are two ways to grow spinach: the seeds can be transplanted from the root. If you are growing spinach from seed, you can plant the seeds directly in the pot or use the pre-seeding tray. Choose a pot with a wide mouth of 6 to 8 inches deep. You can also use a garden crate, wooden crate, or even a spinach growing container.

Sow the seeds into the soil ½ inch deep. After sowing, they should germinate within 5 to 14 days. However, the time it takes for spinach seeds to germinate will depend on growing conditions and variety.

If you are using a seeding tray, you should wait 2-3 days for the plant to sprout true leaves. Once the actual leaves have grown, the spinach is ready to be transplanted. Spinach loves bright light, although it will grow well in partial shade.

Protect spinach from the midday sun to avoid burns. We recommend growing spinach from seed in early summer as it is a fast-growing plant. Thus, you can simply transplant the spinach along with the rest of the heat-resistant plants. It will grow in a variety of soil types but prefers moist, well-drained clay that is rich in compost.

How to take care of spinach?

It is important to organize the space for the plants because you want the spinach to have enough room to grow. Since spinach has larger leaves, you should place each plant 3-5 inches apart. Of course, you can leave less space if you want to harvest young spinach. If you plan on harvesting earlier, you can continue to grow the spinach along with other vegetables in the same pot. Spinach doesn’t need a lot of room to grow.

The water spinach wants to put the plant in a sunny place in the fall, in temperate climates the time is shorter, and the sunlight is less intense, so the bright light does not burn the water spinach. In the spring or summer, you want to place the plant in partial shade. Since spinach is grown in a pot, you can move it around easily. You can also place the morning glory pot in a sunny place in the morning and the shade during the day. In tropical or subtropical climates, place the spinach pot in the shade.

Watering

When watering spinach with water in a pot, do not wet the leaves. Foliage can cause rot or fungal infections. Make sure the pot you are using drains well, as spinach doesn’t like standing water. Water the spinach regularly in a gentle bath. This is especially true for newly planted seedlings or seeds, where the strong environment can wash away the planted seeds.

Also Read: Why Are My Spinach Leaves Turning Yellow

Soil

Composting the soil is equally important when growing spinach. The soil texture should remain humid and brittle. Spinach hates soaking dense soil in water, so use well-drained soil for optimal plant growth. Keep the soil always moist, never soggy. Moisturizing the soil and protecting spinach from excessive heat, adding mulch. This is true even for potted spinach. Use organic coating materials.

Temperature

Sprout at temperatures below 40 degrees F or 4 degrees C. This vegetable also sprouts at high temperatures, but too much heat can cause burns. The ideal soil temperature for germinating spinach seeds should be maintained at 50 to 80 degrees Fahrenheit or 10 to 27 degrees Celsius.

 Spinach is surprisingly hardy and can withstand frost. Ripe spinach leaves will not freeze until the temperature drops to 20 degrees Fahrenheit. If the temperature is over 80 degrees Fahrenheit, the spinach needs to be protected from the heat. You can also add mulch to lower soil temperatures in summer.

Fertilizers

Growing spinach loves nitrogen, so enrich the soil with this nutrient before sowing seeds. Just mix compost or well-rotted manure with potting soil. You can also use timing fertilizer or liquid fertilizer; just make sure the nutrients enter the soil slowly. While the spinach is growing, enrich the soil with fish emulsion, cotton meal, compost, or compost tea.

If you use liquid or liquid fertilizers from time to time, add them at regular intervals to ensure sustainable growth. Spread the manure around the base of the water spinach and then gently fertilize the soil. Do this carefully because spinach has shallow roots extinction.

Soil pH

The pH value of soil should be maintained from 6 to 7. Otherwise, if the soil pH is below 6 then the leaves of spinach can turn yellow and wilted. So, maintain the pH above 6.5 which leads to slow growth.

Harvesting spinach from pots

After germination for nearly 50 days, the spinach is almost ready to harvest. Generally, the spinach plant has grown in a pot with 4 inches in height and at least 6 leaves then you can harvest it. You can remove the leaves with scissors. Cut off the outer leaves first and leave the new inner leaves to grow a little longer. You can also cut off the entire plant from the base. The tree will grow again.

You want to start harvesting. The spinach leaves before the plant blooms, otherwise, the leaves will become too bitter to eat. Flowers can bloom in hot and humid weather. The spinach will grow into a straight stem and produce yellow or green flowers. The flowers grow, the leaves thicken and taste bitter. This is called bolting.

Conclusion

As you can see, growing spinach in a pot is surprisingly easy. But to enjoy a bountiful harvest, remember all the gardening tips above.

11 Best Tomato Varieties for Hanging Baskets

Plants that are kept small and survive in smaller baskets are perfect for small spaces. When browsing the seed catalogue or talking to a helpful person in the garden centre, look for plants that can tolerate smaller containers, have smaller mature growth sizes, and have dwarf, shrubs, or definitive names.

For urban gardens small tomato varieties are ideal because they don’t need much space. Many people are heard about cherry tomatoes but there are several small tomato varieties are available.

Tomato is one of the best and essential vegetable grown in garden, even small or non space gardener can enjoy the hanging basket tomatoes. Tomatoes are the vegetable that flourish when grown in containers with their different varieties and pair them with my 11 tomato varieties for growing a rich crop of delicious tomatoes in pots.

When you are planting the tomato plants for first time, it is mostly recommends to purchase the tomato seedling from nursery preferably starting from seeds. With your seeding in your hand, you are very close to enjoy your own home grown tomatoes.          

Here are 11 types of small tomato varieties are planting in your garden. They all are suitable for containers and pots also.

 Black Pearl

Black pearl tomatoes are rich in colour gets from anthocynanins, which are powerful antioxidants and it has a sweet, tangy flavour. The black pearl can grown in 5 feet height and it need a stack or cage for support. They are ready to harvest within 65 days.

Also Read: Growing Tomato for Your favorite Cuisines

 Roma

Roma tomatoes are one of the most popular for cooking and also known as Italian tomatoes. They are ideal for making pasta sauces and canning. If you want to cook Italian recipes you will definitely need to plant Roma tomatoes in your garden.

 Sweetie

Sweetie is one of the sweetest tomatos than most of the other tomatoes. It is small and has higher sugar content. It has a lengthy fruiting season and you can start harvesting from 65 days after planting.  

 Yellow Currant

A tiny yellow tomato variety which is add to salads, it makes a perfect bite size snack and you can also pop them into kids lunch box.

 Super Sweet

Super sweet tomato plants starts production from summer and continue until the first frost.

 Baby Red Pear

It is a small juice red tomato which grows to 1.5 inches in length. The fruit became ripe in a cluster. It has along fruiting season and they are climbers need stalking.

Green Grape

Green grape tomatoes grow small and they turns yellow/ green colour when ripe. This plant may need support due to surplus yield of small tomatoes.

 Tumbling Tom

Tumbling tom tomato plants ideal for hanging baskets because of cascading or trailing habit. Especially if they are located in full sun, they need consistent water and you will harvest the tomatoes in about 70 days.

 Golden Grape

Golden grape is another type of small yellow tomato; it is an ideal snacking tomato that is low in seeds. These plants are high in yield and produce surplus of tomatoes.

 Golden Nugget

Golden nugget tomatoes are yellow in colour; because they are lower in acidity their taste is milder than regular tomatoes. It looks great on the vine and they are especially used for salads and snacks.

Also Read: How To Hand Pollinate Tomato Flowers To 3x Tomato Yield?

 Cherry Cocktail

Another small tomato variety is the cherry cocktail, which produces small tomatoes full of flavour. Plants are uncertain (climbing), so cuttings are needed, and the maturity period is about 70 days. More fruit is produced on the vine.

Growing small tomato plants

Growing small varieties of tomatoes is very easy, even for inexperienced gardeners and children.

Before planting tomato seeds, bury some compost in the soil.

 You can plant seeds indoors in early spring and transplant them into your garden as soon as the weather gets warmer. There is no more frost.

 Small tomatoes can also be grown in large containers, using stakes or tomato cages to support the plants.

Tomato can grow good in full sun, so select the spot which receive at least 6 hours daylight each day.

Tomato need compatible moisture to avoid splitting and for growth.

Tomatoes grown in containers will dry out quickly, and may need to be watered once or twice a day in the hot summer.

Most small varieties of tomatoes can be harvested 65-70 days after planting.

Tomatoes will continue to ripen after harvest, but it is best to leave tomatoes in the bushes until they turn bright red or yellow to enhance the flavour.

You can choose a single tomato according to your needs, or you can cut the entire bouquet with a pruning knife or sharp scissors.

Advantages to growing tomatoes in hanging baskets

  • To extend the growing season, place the hanging basket in a sheltered place or indoors in cold weather.
  • Hang it in a suitable place flush with the line of sight to make harvesting easier.
  • Allows you to grow delicious tomatoes without consuming precious garden soil.

How to Grow Beans: Planting, Care, Yield, Harvesting?

The term beans generally refers to large seeded plants that include soybean, peanut and peas.  Beans are one of the evergreen vegetables that can be grown easily in your backyard, terrace garden and even in your balcony as well. They belong to the legume family and have enormous amounts of health benefits. 

Beans are a good source of protein and fiber and are also rich in iron, potassium and magnesium. 

How to Grow Beans and What Month do you Plant Beans:

Beans need warm weather to grow, so if you are planning to grow green beans then summer is best for growing, start it in summer as cold weather or frost can damage the seeds and make them rotten. Sow the seeds directly in the garden, if you transplant it later,  then the roots may get easily damaged as they are shallow. 

Before planting the beans make sure to know about the type of plant that it grows into, whether it is a bush bean or pole bean.

Bush bean: If it is a bush bean then sow the seeds one or two inches deep and apart. In case you are planting it in garden then the rows should be 2-3 feet apart. 

Pole bean: If you are planting pole bean then they need support of some stick or pole to grow. For every 3-4 seeds one pole is required with a space of 3-4 feet between each pole.

These beans grow when under full sunlight or at least look for a place where there is partial sunlight. The soil should be well drained but moist enough for the seeds to germinate.

Different Types Of Beans:

Beans come in large variety, some can be eaten raw while the other needs to be cooked. The green tender pods can be consumed as it is, where as the dried ones need to be cooked before consuming. 

They are considered nutritious as it contains large amount of protein, carbohydrates and minerals. The various beans cultivated through out the world are

  • French Beans
  • Soy Beans
  • Kidney Beans
  • Cluster Beans
  • Lima Beans
  • Broad Beans
  • Sword Beans
  • Garden Beans
  • Dolichos Beans
  • Navy Beans
  • Fava Beans
  • Pinto Beans
  • Cranberry Beans

In this article we are going to study about how to grow kidney beans, when to harvest beans, when to plant broad beans and how long do broad beans take to grow.

How To Grow Kidney Beans

Kidney beans are very healthy as they contain antioxidant properties, vitamin B6, folic acid as well as cholesterol lowering fiber. Kidney beans can be a good choice for vegan’s as well as the one having diabetes. Kidney beans need to be consumed only once they are dried and cooked, the raw once are toxic. 

Kidney beans can be planted when the temperature is about 18-26 degree Celsius. It is best to do the planting in the spring or after the last frost. It give good results when they are directly sowed in the garden instead of doing transplant, as it may damage the plant and it may not yield well. 

Kidney beans comes in two varieties-bush and vine. Make sure you know what type of seed you are using. The vine variety need some sort of support like a pole or trellis to grow.

The planting area should have full sun exposure or at least for about 6 hours daily. Kidney beans require humidity and warmth to thrive. Make sure that the temperature does not go below 16 degree Celsius. Sow the kidney bean seeds 1-2 inches below the soil surface, giving a space of about 4 inches between each seed. Water the plant daily once, when the soil is dried out, do not give over supply of water. The seeds will germinate in about 10-12 days. 

Unexpectedly if there is snow fall after the beans have sprouted , cover the seedlings with a canvas or cloth so that it doesn’t get effected by the freezing temperature. 

Harvest And Storage

If you have planted bush variety then it needs to be harvested only once at the end of the growing season. But if it is pole variety then it has to be harvested several times through out the season. The average harvesting time will be 3-4 months depending on the type of seed you use. 

If there are some unfavorable conditions like dropping temperature that may threaten your harvest then pull out the plants early. Keep the plants for the pods to dry out completely, it may take several days or weeks. As you dry the seeds keep them in a warm indoor location with lots of circulating air. 

How To Grow Broad Beans

 Broad beans produce high yields from the smaller area of garden. These can be grown in modest sized pots as well. This vegetable is easy to grow, especially a good activity for children. 

Lets learn about when and how to grow broad beans.

Before starting with the planting few things need to be kept in mind. Always choose a spot away from strong winds, sheltered spot, fertile land and a place where you can easily get sunlight.

When To Grow Broad Beans

Some variety of broad beans need to ne sown in spring while some are well grown if you plant them in autumn. If you sow it in November, that is autumn then it will germinate within 2-3 weeks. 

The germinated seeds will overwinter and start growing again in spring. In severe winters you need to protect the crops by covering it with fleece or cloches. 

How To Sow Broad Beans

The seeds of broad beans should be sown 2 inch deep into the soil. Each seed should have a gap of at least 9 inches. These can be sown in double row with a gap of 9 inches between each row. After sowing the seeds water them adequately. 

Now you will be concerned about how long does it take for the broad beans to grow. Well the answer is that these beans germinate in approximately 10 days. 

When To Harvest Broad Beans

Broad beans should be harvested and when they are 3 inches long. You can even wait for a little longer and harvest them later. But make sure that when you harvest the seeds should be soft and pots well filled. 

Best time to consume them is when the scar on the edge of the seed is white or green. If it has become black then the bean will become hard and chewy. 

The most important thing to keep in mind while sowing any seed is that don’t be in a hurry to plant the seeds, wait till the weather becomes appropriate as all the seeds may not be suitable for all typed of weather.

Take proper care after the seeds germinate and protect them from insects and mice attack.

How to Grow Litchi Tomatoes and Harvest?

A Morelle de balbis shrub is another name for Litchi tomatoes. It has been grown in small gardens and is now increasingly popular in heirloom gardening. Solanum sisymbriifolium is its Latin name which is from the nightshade family along with tomatoes and eggplants. It is native to South America. It will grow in tropical and warm temperature regions. It had an indigenous culture for hundreds of years as an important food staple. Litchi tomato plant appears like 5 feet tall and wide.

Take the prime example of Litchi tomato of a smattering of weird and beautiful traits, all in a single plant. It seems like a cherry tomato plant with its deep lobed green leaves, spreading habit, and similar small red fruits. When comes close the leaves of the Litchi tomato can be covered with spines like cactus and the fruits are hidden in tiny shell-like tomatillos.

The bigger and fluffy flowers look like squash plants. The Litchi tomatoes from the outside look red in color and when sliced they revealed a velvety yellow interior. If you pop one litchi tomato into your mouth feels like raspberries. The flavor of litchi tomato is slightly seemed like cheery with a subtle hint of tomato. Although many of them get different tastes like kiwi, watermelon, apple, pear and few of them said like creamy and sweet ground cherries with mixed tomatoes. The deeply lobed leaves with tooth margins appear as attractive when it blooms.

Also Read: Why Are My Tomato Flowers Falling Off?

Growing conditions for Litchi tomatoes

Litchi tomatoes like warm temperature and deep sunlight.

Hardiness

The litchi tomato doesn’t like cooler temperatures and is very sensitive. It can survive dips as 25°F and is remarkably tolerant to light frost. This is an invaluable trait that can squeeze to more harvest before winter.

Light requirement

It can be grown in full sunlight and can tolerate light shades also.

Soil 

The litchi tomato can prefer moist and sandy soils with a wide range of soil types and pH.

Watering

For every week give them at least 1 inch of water for better productivity and good health of the plant. 

 Fertilizers

Fertilize tomato plants as usual regular tomato plants. As fertile feeders, these plants will benefit from generous amounts of organic fertilizer applied regularly throughout the growing season. 

Pruning

Massive throne shrubs will grow from litchi tomatoes. Regular pruning will make it easier to manage. Litchi tomatoes have different growth habits than regular tomatoes. The flower buds emerge from the main stem and are leafless. You can trim branches with unwanted leaves, but try to leave young shoots and buds on the tree. It will not bear fruit.

Plant supports   

Likewise, using tomato cages and other plant supports can help maintain the restraint of litchi tomatoes. 

Pollination 

Litchi tomatoes self-fertilize but produce more fruit when more than single plants are planted together.

Where to buy litchi seeds?

Since litchi tomatoes are a unique heirloom variety, you are unlikely to find seeds for sale in garden centers or seed catalogs.

 Local seed libraries and seed exchanges are good places to look, as well as these online sellers: 

  • Baker Creek Heirloom Seeds,
  • Amazon
  • Etsy
  • eBay

How to grow litchi tomatoes from seeds?

Since litchi tomatoes are related to tomatoes, the growing instructions are somewhat similar. 

Sow seeds indoors approximately 7-8 weeks before the last spring frost. Draw one seedling per pot and transplant it outdoors when the frost hazard is over. Plant them 1/2 feet apart, leaving enough room to grow. 

The plant grows in dense vegetation, reaches 3-5 feet in height, and is often made in a trellis or cage, like a tomato. 

Grow litchi tomatoes in full sun, although they do well in partial shade as well.

Also Read: Best Potting Soil For Tomatoes?

How to harvest litchi tomatoes?

Litchi tomatoes take about 90 days to bear their first fruits (after transplanting), which means they will bear fruit even with our short growing season of 100-110 days in Vermont. Add to that the fact that they are frost-resistant and will allow you to work even in remote northern climates. 

To harvest, carefully remove the fruit from the stem. When the fruit is fully ripe, the thorns will bend away from the fruit and the fruit will easily fall off the stem. You are not ripe yet.

The longer you preserve them at the plant, the sweeter they may be. The fruit must launch without difficulty from the calyx; if it resists, wait some extra days.

Fruits that have fallen off the plant are a signal of height ripeness so acquire those as well.

Some gardeners record that it’s going to produce fruit extra abundantly closer to fall because the climate cools. Fruits harvested in cooler climates additionally tend to be very candy and feature an extra fruity taste.

Seed Preservation of Litchi tomato

Tomatoes fruits are riddled with tiny flat seeds that are easy to preserve from year to year by fermenting and drying. These plants are also easy to self-sow too.

 Diseases and Pests of Litchi Tomatoes 

Another notable feature of litchi tomatoes is their impressive resistance to most pests and diseases. 

The leaves and stems of the plant contain solasodine, a substance that is very toxic to fungi and insects.

 Tomato leaf beetles are affected at all stages of life, which reduces the overall survival rate of adults, pupation, and metamorphosis of leaf larvae.

 Look for tomato hornworms and potato beetles. These two vicious enemies do not appear to be affected by the chemical solasodine.

Grow Asparagus Easily: Plant It Once and Harvest for 30 Years

Asparagus is a one of the earliest plant that greets us in spring time! Once it will habitual the tender hearted spear will come back year after year. Its ferny foliage will make magnificent ornamental. Now how to grow asparagus plant through harvest.

In high temperature regions asparagus can grow as well as it will have grown actively in long winter seasons also. The young stem shoot is the edible part of the asparagus plant which appears the soil temperature increase above 50F in spring.

If you are starting asparagus bed as a dedication, but this dedication will worth it later. The important point about asparagus is to know that during couple of seasons it should not be harvest. You need to root these plant before they can be harvested. Once entrenched, it will produce for 15 to 20 years but you need to well maintained the beds to produce 30 years and more.

HOW LONG DOES IT TAKES TO GROW?

As I mentioned above the newly planted asparagus require 2 to 3 years to start and produce, so forbearance is needed! Once established, it can be productive for decades.

Asparagus is a fast producer, once it starts its productivity new spears were send up for every few days in a spring.

Also Read: Organic asparagus farming techniques

WHEN TO PLANT ASPARAGUS?

Asparagus plant can be plant in early spring; the soil works as soon as possible. Most of the gardener plant the asparagus at the same time when the potatoes go in the ground.

Asparagus can be grown from seed but if you take 1-year-old plant called “crowns”, it eliminates the year that comes with starting from seed, it will speed up the production.

  • Before sowing seeds soak them in water for up to 24 hours.
  • In peat cups sow seeds can be moistened in flats.
  • If the plant reached 12 inches harden them off outdoor for a week.
  • At last spring frost, transplant the young plant to temporary garden, once identify the male asparagus plant and transplant it to permanent site.

CHOOSE AND PREPARE A PLANTING SITE

Asparagus is a perennial plant that return year after year in the same location, although it’s important to select a proper site for planting where it will flourish.

  • Select the site with full sunlight.
  • Place the asparagus bed at the corner of your garden whether it not be disturbed by various other planting activities.
  • Make sure about the bed will drain well, Asparagus does not like its roots get too wet.  If you don’t get any with good drainage facility, then you can consider raised bed for asparagus.
  • Asparagus in lightly acidic soil develop in neutral condition.
  • From planting site remove all the weeds digging over it. Make a layer of compost, soil mix or aged manure is about 2- 4 inch.
  • Allow the asparagus crowns to root properly in a loosened soil up to 10 -15-inch depth.

HOW TO PLANT ASPARAGUS?

  • Plant crown can be protected from the cultivation need annual weed control.
  • If you are digging a trench more than one, 3 feet space should be maintained among them. Dimensions of the trench must be 12 to 18 inches wide and 6 to 8 inches deep.
  • In lukewarm water soak the crowns before planting
  • At the Centre of trench make a 2-inch-high spot of soil and place the crown on top and spread the roots evenly.
  • Some gardeners just cover the trench with soil and compost. Although it is believed that traditional methods usually produce stronger plants, gardeners rarely have any problems with the all at once method. The ground is quite loose, and the spear can easily slip to the surface.

Also Read: Bitter Gourd Farming: Basic Process And Diseases

CARE

  • From my side I recommend that when trench is filled with soil then add 4 to 6-inch layer of mulch.
  • The big issue with asparagus you have to manage weeds for first two years. it should not get disturb its roots while hand pulling the weeds. Mulch with compost or grass clipping helps to keep soil moisture and decrease weed growth.
  • For first 2 years it requires 1 to 2 inch of water per week for per square feet. Use drip irrigation if required for watering purpose.
  • Use organic fertilizer in growing season and follow the instruction of labels whatever material should be used.

BEFORE HARVESTING

  • Asparagus take time to grow from its root system, so in first 2 years don’t harvest the spears and cut down the dead leaves in late fall and dressed with compost.
  • In early fall in spring dressed up with compost during second year and retain the bed thickly with mulch.
  • In third year, the bed will produce full production, then you can start harvesting spears all over the season.

TRANSPLANTATING ASPARAGUS

  • In early spring transplant the crowns when they are slumbering. With the help of garden forks dig and lift the crowns with careful not to be disturb roots. Make the clump into two are more pieces. In following year not to be harvest.

Pests/Diseases

Weeds are the biggest concern in the asparagus bed. Hand pulling must be done in regular basis in early summer and in spring. Slightly cultivate to avoid come out damages of asparagus spear.

HOW TO HARVEST ASPARAGUS?

  • Every day check your plant should be ready for harvest spear. The spear become woody while growing quickly. It is difficult to eat when spear starts to open.
  • Harvest spear will reach around 8 to 10 inches’ height, then simply cut it with sharp knife from ground level.
  • Stop it, when the harvesting spear diameter reduce to pencil size.
  • After harvest, fertilize it for the early summer, you can balanced weed free compost with decomposing mulch.
  • In summer do not cut the ferns which are remained, and allow it to grow and mature. This is a replacement for next spear production. Leave at least 2 or 3 spears for the growing current season.

Growing Different Types of Beans-Bean varieties

Beans are most common plants in the garden. They are easy to grow and produce that’s tasty and found in many recipes. There are different varieties of beans in that you were confused which beans to be grow? So, here we have simple difference that split beans into smaller groups that can be helpful to choose your best. Keep reading the article to learn more about varieties of beans plant in that which one is suits for your garden.

Beans are directly sown in the garden, as they dislike while transplanting. Their roots are shallow and easily damaged. If you want to begin the bean inside plant them in biodegradable containers and transplant the whole container into the garden. The important condition of growing bean is not to plant the seeds too early. After all danger of frost has passed then sown the seeds too early to rot in cold, damp the soil and the plants required warm weather to flourish.

How many types of beans are there?

While there are several types of beans are there, the majority of beans plants can be divided into different subgroups. One of the most differences between pole bean and bush beans are-

Pole bean

Pole beans need a structure to climb up, like trellis or a fence. Few of them are quite long. Hence this plant offers the advantage of small footprints; so if your backyard space is limited then any vegetable can be grown vertically and still producing huge yield is a good choice.

Bush bean

Bush beans are easier to grow because they can be planted anywhere and it is shorter and freestanding.

Bean is the common name for the seeds, which are used for human consumption. Human are planting beans from centuries for the use as either shelling beans or dry beans, snap beans.

Growing different types of beans

  • Growing black beans

Black beans are plays integral role in human health due to rich in vitamins, fiber, minerals and proteins, it is also known as turtle beans.

It has two varieties bush and pole, for bush variety need more space among plants and harvested all at once. But for pole beans need stake support and it produce a greater yield vertically.

Plant black beans if the danger of frost passed in 15 inches containers keep the pots. Place them at the site where the sunlight directly receives 6-7 hours. Use fertile and add compost before planting, maintain the soil moisture and water it frequently.

Also Read: How to Grow Beans: Planting, Care, Yield, Harvesting

  • Vanilla beans

Vanilla beans are native to tropical Mexico. It will grow in vanilla orchid and take 3-5 years for production of beans. For productivity hand pollination need for vanilla beans plants.

Vanilla beans grow in rich humid conditions and in moist soil. They cannot withstand the temperature below 12°C and needed warmer condition. You can easily grow in pots in your balcony.

  • Lima beans

Another name for Lima beans are Chad, butter, sieve, and Madagascar beans. The beans are flat, off-white and kidney shaped, it consumed shell for tasty flavour.

Lima beans need warm and sunny conditions, so start sowing seeds early in indoor before the last frost hits or outdoors when the temperature is nearly 15°C for a week.

The ideal temperature for growing is nearly (21-25) °C. Grow the plants where the sunlight receive throughout the day.

  • Fava beans

Another name for the fava beans is field beans, horse beans, and board beans. This beans have inside the pods-flat, bright green in colour with soft skin which is removed while consumption. If you harvest them early you can easily consume it.

It is a cool season crop, seed are sowed in late summer or early fall or during winter season. This fava bean grows in full sun to partial sun shades. They are hardy at -6°C temperature. 

  • Kidney beans

This type of beans is native for Mexico and Central America. They are crucial source of vegetable protein. These nutritious beans are used to cook in different dishes around the world.

Sowing the seeds after the last frost in a well draining soil with receives full sunlight in that area. Follow the average water and it doesn’t like soggy soil.

  • Mung beans

This bean are native to India, it has small green beans from legume family. It has a lightly sweet taste and eaten in dals, soups, salads, and stir-fry recipes. Also, these high level nutritious beans are crucial source of vitamins and minerals.

Also Read: Soybean Farming: A Complete Guide to Cultivation and Production

  • Yard long beans

It is also a member of legume family, the asparagus beans are easy to grow and they are native for southern Asia, grows in warm climate. You can also consume fresh leaves and young pods and beans can be cook.  Plant seeds ¾ inch deep under the ground and use stake for support, harvest when it will reach 12-16 inches in length. 

How to Grow Organic Potatoes in Your Garden?

Growing organic potatoes in your backyard need to take few cautious attention while soil preparation, selecting early producing disease resistant potato varieties with the usage of natural fertilizers, row covers, crop rotation and if needed, the careful applications of organic pesticides for the growth of your garden.

Organic potatoes can be grown without pesticides or synthetic fertilizers. Potatoes can be grown neither in cool weather or freeze nor above 80 degree Fahrenheit which decrease tubular production. Early producing varieties can give a good crop before enhance the diseases and insects. Best varieties to start with include Irish Cobbler, Red Duke of York, Norland, Orla, and Yukon Gold.

Site and soil

In the area where the sunlight can falls at least six to eight hours in that potatoes should be grown with a basic fertility and well drained. Planting plants in well drained soil rich in organic matter can avoid few diseases such as green manure are sown earlier in autumn, sowed in the field before sowing, or composted during sowing.

In acidic soil potatoes can grow well and not easy to get sick. Soil can be more acidic due to natural sulphur. To know your soil pH test contact your county extension office (ceo).

Potato plant needs fertilizers but not too much which cause leggy, disease prone growth. Add basic required amount of compost, or while planting dig in a small amount of natural fertilizer or organic poultry manure. After planting, second application of fertilizer can improve yields.

Full size tubers can be difficult to form heavy clay soil. It should be the spot where from past 2 years there is no crop of potatoes, pepper, tomatoes and eggplants to prevent the soil borne diseases.

Planting

Early season varieties can be planted as soon as soil can be worked when its temperature reaches 40 degree Fahrenheit. Mid and late season varieties can be planted before the last weeks of late spring frost. You can plant only those seed potatoes which are certified disease free. These are available in garden centres, nurseries, and catalogs.

For early potatoes, laying your tubers eye side up in a cool and dry place in a container for 1 to 2 weeks, until the eyes sprout. Just plant the tubers whenever you’re ready. The larger potatoes can be cut in the form of 1 to 3 eyes per piece and for smaller potatoes can be planted whole. Be sure that the cut pieces of potatoes can be place outside for at least 24 hours before planting due to that cut sides callous over and they don’t rot.

Also Read: Potato Farming Techniques

There many methods for planting potatoes in your garden

Planting in trenches: cultivate a trench of about 7 to 8 inch and place the potato in 12 inches apart and cover with four inches of soil.

Planting in individual planting holes: drill a hole of about 7 to 8 inch deep and wide, keep the potatoes in a hole cover them with four inches soil.

In containers place the six inches of soil mix them in a bottom, keep the potatoes in an upper layer of the container and cover with a four inches of soil.

Growing potatoes

Potatoes can be grown in your garden is very easy and it needs one inch of water per week. You have to hill your potatoes regularly to keep that area watered and weed free. If you’re altering your soil with compost, won’t require fertilizers. If you’re not amended the soil with fertilizer then use organic fertilizer while planting time and follow the instructions of the product how to use. When the foliage of your soil reaches 12 inches then add soil to the top of the trench or hole leaving behind 4 inches of foliage exposed. You have to do this for every couple of weeks.

Pests and diseases

Few common diseases and pests for potatoes are including:

Colorado potato beetle: larvae, handpick beetles, and eggs from plants

Flea beetles: make the area weed-free so you don’t provide cover for flea beetles, spray with insecticidal soap

Leafhoppers: burst with water from the hose

Aphids: burst with water from the hose

Scab: plant resistant varieties, crop rotation

Late Blight: clean up previous season’s foliage and tubers, plant resistant varieties, crop rotation

If you have above mentioned pests in your garden, it is preferable to cover your potatoes patch with a floating row cover to avoid problems.

Also Read: Growing Your Favorite Peanuts or Groundnuts

Harvesting

At any time of the year, as long as you see flowers on the plants, you can dig up young potatoes. If you are growing potatoes for storage, let the leaves turn brown. The best way to harvest potatoes is to use a digging pitchfork and start from the outer edge of a trench. Try to get the fork as deep into the soil and lift to collect potatoes as much as possible. You can save garden seed potatoes year after year, Just store healthy tubers in a cool, dry place.

The good news is that over time, you will end up with a variety of potatoes suitable for your garden environment. To store potatoes, store them in a dark, cool, but not frost-free place with little moisture. Do not wash them before storing, let them sit for a few minutes. A few days after harvest, allow the soil attached to the tubers to completely dry out.

Usually the one plant produces two to ten pounds of potatoes.

Also Read: Sweet Potato Farming Information Guide

How to Grow Squash – A Step-by-Step Guide

Squash is one of the easy veggies to grow in your garden or backyard. Squash can be grown easily in most of the regions of The United States. 

In this article, you will know everything about how to grow squash, varieties of squash, growing stages, and harvest period.  Before heading towards how to grow squash let us first know about its varieties.

Varieties Of Squash

Squash comes in many varieties which can be grown both in summer as well as winter. Few popular varieties of winter squash are as follows

Winter Squash Variety

Winter squash comes in dozen varieties, it can be kept for months after harvesting as it has tough exterior. 

  1. Butternut Squash

Butternut squash is a popular pick for cold weather dishes like soups and risotto. It comes in a shape of a bulb with tan yellow skin and orange fleshy pulp. Its taste is similar like pumpkin, sweet, and nutty. It grows on a vine and its taste becomes sweeter and richer as it gets ripe. 

  1. Spaghetti Squash

Spaghetti squash is the most trendiest among all the varieties. It has got shredded flesh that is the reason it is called as spaghetti squash. It is one of the healthy substitution of pasta, with low carbs. 

  1. Acorn Squash 

Acorn squash is also known as pepper squash. This squash has green exterior and yellow orange flesh. It can be used for roasting or stuffing and has mild sweet flavor. 

  1. Sweet Dumpling Squash

Sweet dumpling squash comes in much smaller size when compared to other squashes. It resembles a small pumpkin and can be used as a bowl for soups or stuffed with meat and other veggies. Its flesh is sweet and tender and tastes similar to sweet potato. 

  1. Red Kuri Squash

Red kuri squash has a tear top shape with orange skin which can be consumed once cooked. This squash can be best consumed when stuffed with rice, meat or vegetables.

Summer Squash Variety

Well, summer brings sunshine as well as new varieties of squash. These are harvested mush earlier than winter squash. The shelf life of summer squash is one or two weeks only. It is very soft and takes less time to cook. 

  1. Yellow Squash

It has a bright yellow exterior and comes in two varieties which can be distinguished by the shape of its neck, straight neck or crooked neck. It has tender and thin skin that can be easily peeled and chopped. 

  1. Zucchini Squash

Zucchini is the favorite squash of all the chefs as it is perfect for grilling, baking, sauteing, and much more. It is dark green in color and most loved summer squash. It is the best low-carb substitution for noodles and fries. 

  1. Chayote Squash

This squash is originally from Mexico and resembles a lot like pear. Chayote squash is low in calorie and tastes similar to that of cucumber. It can be made in various ways which makes it versatile. 

Also Read: How to grow cauliflower: All The Information Regarding It

Planting Squash

Let us know about squash growing stages, what month to plant, how long will it take to grow squash, and when to harvest as well. 

If you are planting winter squash then you must know what month to plant. The best time to plant winter squash is after the last frost is over. 

The first thing to be done is to make the soil ready for planting, you need quite open space as it grows in vine and spreads quickly. Spread at least 3 inch of compost and make the land ready. Make sure to provide nutritious fertilizer as well. Squash need full sun and good air circulation so choose the place accordingly. The condition for summer and winter squash are the same, except the harvest time. 

Here is the way on how to grow squash from seeds. Sow the seeds 1-2 inch deep in the soil and give a gap of at least 4-6 feet after every seed. The seedlings will emerge within 3-4 days of planting. 

After this is done now you will be eager to know how long will it take to grow squash. The plant takes 70-100 days to mature, but it depends on the type of plant and the weather as well. 

Harvesting Squash

Harvesting or picking squash is fun, its so good to see different varieties with different shapes and sizes. You can expect about 1-10 fruits from each plant, depending on the variety. Look for the below mentioned points before harvesting winter squash

  • Harvest after at least 50-55 days from the time fruit has set.
  • You should hear a hollow sound when tapped gently.
  • Harvest it before the frost arrive.
  • The rind should change from light green to tan.
  • Cut the rind with a short stub of vine attached. 

After harvesting the squashes need to be kept in a cool and dry place. Winter squash can be kept for as long as 1-2 months, they can even be used for decoration. Where as summer squash cant survive this longer. It needs to be cooked or consumed withing 2-3 weeks.