This scientifically-backed potato farming guide covers everything from planting to growing, harvesting, and storage. And, also, how to keep them fresh for very long!
Yes, the most common, our very own, very favorite, evergreen vegetable needs to be planted in early gardening season – as soon as the frost appears out of the soil, and you can work on the soil!
Different types of “best-days” are recommended by the folklores
- Old-timers in England used to plant potatoes when they noticed dandelions in the fields.
- Gertrude’s Day aka St. Patrick’s Day (March 17) is considered as the “official potato-planting day” by the Pennsylvania Dutch.
- A lot of Christians used to believe that Good Friday was the best day for planting potatoes because Devil could not do anything wrong on that day!
Isn’t it funny and interesting to know these facts about potatoes? Let’s start this detailed potato planting guide to know more about the farming of potatoes.
What is the best time to plant potatoes?
Cool-weather is suited best for the growth of potatoes. In Northern regions, farmers usually start potato farming in early to mid-April, 6 to 8 weeks before the expected end of the frost days. Potatoes do survive cold weather, but frosts are the real danger for them. If you feel the threat of frost at night, you can use mulch or any other artificial covering like plastic containers or old sheets to cover the sprouted foliage(s). But you must have to remove those covers in the morning.
Also Read: Sweet Potato Farming Information Guide
Here is how to properly fight frosts
Consider planting potatoes at least a couple of weeks after the last spring frost. Yes, you have the option to start it earlier, but frost or overly wet soil can damage some of the crops.
While deciding about the best potato farming season, follow the appearance of soil, instead of the calendar. If you follow the soil, it will tell you, when to plant the potatoes. The ideal temperature of soil for the proper growth of potatoes is a minimum of 50 degrees Fahrenheit (10 degrees Celsius). There should not be excessive moisture in the soil too. Because excessively wet soil will stick together, and you will find it difficult to work on it. If the soil is wet, give it some time to dry. Like most of the other seeds, potato seed pieces will start decaying if the soil is too wet.
In southern parts, the winter season is great for potato crops with September to February as the perfect window for planting. In central Florida, farmers prefer planting potatoes in January, while February is the month of potatoes farming in Georgia.
Preparing the site for planting
- As already discussed, cool weather is best suited for growing potatoes. And loose, well-drained soil with 50 degrees to 60 degrees Fahrenheit (10 degrees to 15.5 degrees Celsius as optimum temperature.
- Choosing a location with proper sunlight of at least 6 hours per day is important.
- If we talk about “plant potatoes how far apart”, potatoes are grown in rows with a distance of 3 feet between two rows.
- Use a round-point shovel or hoe to 6-inches wide and 8-inches deep trench to ensure proper potatoes planting depth, tapering the bottom with a width of 3-inches.
- Spread and mix in organic compost or fully-rotted manure in the trench bottom before planting.
How to plant potato slices?
- In each trench, put a piece of seed potato after cutting side down, maintaining 12 to 14 inches of distance between two seed potatoes, and then cover them all with around 4 inches of soil.
- If you have rocky soil in your field, place the seed potatoes all around the field. Add a little amount of compost to the soil, and cover them with leaves or straw.
- Starting the potato farming with seed potatoes is the best idea. And make sure, you don’t get confused with seed potatoes with “potato seeds” or grocery produce. Planting potatoes with sprouts or protruding buds (eyes) is always recommended.
- Use a sharp, clean knife to make slices of large potatoes, ensuring there are at least two buds in each piece.
- If you have small potatoes, plant them without cutting.
- If you are doing the cutting work yourself, do it a couple of days before planting. These two days will give enough “healing” time to the potato slices, and a protective layer will also form on each slice, making them resistant to rots as well as retaining enough moisture.
- After around a couple of weeks, when you see a few more sprouts out of the soil, fill the trenches with 3 to 4 inches of soil again, exposing out only a few inches of plants. Keep it repeating every 2-3 weeks, and keep the soil 4 to 5 inches above the ground level (this is usually called “hilling”).
- Once the potato plants flowering starts, add organic mulch in between the rows to ensure enough moisture. It will also help in keeping the soil cold, and will also protect from weeds.
Growing and hilling potatoes
Protecting the tubers from direct sunlight is a very critical part of growing potatoes. If the tubers are exposed to direct sunlight, they will produce solanine, a toxic product, making potatoes inedible, bitter, and potentially nausea-inducing.
“Hilling” is the way to protect potatoes from toxicity and to make them edible.
Hilling is not a very tough process: You will notice multiple main stems with flowering and leaves just where potatoes grow. And during this phase of initial growth, tubers are formed on secondary stems underground which branch off from the main stems. To protect shallow tubers from direct sun exposure and to ensure the production of more tubers, you should “hill-up” a few inches of more soil at regular intervals. For productive growth, hilling is done three to four times during a season.
Some important “hilling” tips
- You will notice that the plants are at their maximum height in the morning, and that’s the best time for hilling. Plants get drooped with an increase in atmospheric temperature throughout the day.
- Ensure maintaining enough moisture, especially at the time of appearance of sprouts till the several blossoming weeks. Potatoes growing roots require 1 to 2 inches of water every week. Excessive water in the beginning and then a drop in water quantity at the time of formation of potatoes will make tubers misshaped.
- You should stop hilling the soil when you see blooming of potato plants, and when the part of the plant is at least one foot tall above the ground. You can support the plant and cover the tubers by hoeing the dirt up.
- Yearly crop rotation is recommended for the regular growth of potatoes and also for maintaining enough life in the soil.
Pests and diseases related to the potato crop
Colorado potato beetles: You can hand-pick them and remove away from the field. Sometimes, predatory birds also feed on them. Food-grade diatomaceous earth is also effective in controlling when they are in a nymph state. Spinosad, an organic pesticide is an option when the beetles get uncontrolled. There are various types of insects that are beneficial for potatoes farming. So, avoid harming them by using beetles-killing products either at dawn or at dusk.
Potato scabs: Usually caused due to an increase in the pH of the soil. Always remember that potatoes like slightly acidic soil (with a pH of no more than 5.2). Dusting seed potatoes with sulfur is a good idea to avoid scabs. You can also add pine straw on the top of potatoes during planting.
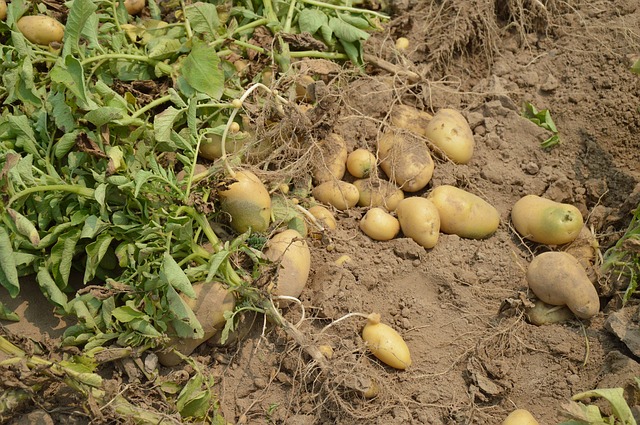
When to harvest potatoes?
“New potatoes” which are usually harvested early in the harvesting season purposefully to keep them tender and smaller, are ready for harvesting two to three weeks after cessation of the flowering period. New potatoes are not suitable for long storage and should be transported and used within a few days of harvesting.
You can harvest “regular potatoes” once the foliage starts to die back. The upper part of plants should completely die for timely and productive harvesting.
Don’t water the potatoes much after mid-August (usual end of potato farming season) to keep them tough and hard.
You can check the maturity of potatoes by digging up a test hill. If the skin is firmly attached to the skin and is thick enough, your potatoes are mature and are ready for harvesting. If the skin is easily removable with hands, they are still new and are not yet ready for harvesting especially for long-time storage.
Light frosts are still not very harmful to potatoes, but once there is the beginning of first hard frost, the waiting time is over, and you should start digging the field and get the potatoes out.
“How” to harvest
First of all, cut down the brown foliage and leave the potatoes for a couple of weeks more before finally harvesting. If you follow this method for potato cultivation, potatoes will get enough time to develop a thick skin. But, don’t leave them for more than a couple of weeks, as they may rot.
Choose a dry day to dig the potatoes up. Dig up slowly and gently, avoiding any injury to the potatoes. If the potatoes are damaged while digging, don’t keep them for storage, and use them as soon as possible.
If there is excessive moisture in the soil, leave the potatoes in the air for long enough to dry them properly. Transfer them into containers only when they are completely dried.
Once the potatoes are out on the surface, don’t leave them under the sun exposure for so long, as they may turn green. And green potatoes are bitter due to the presence of solanine. And if eaten regularly, can cause stomach upset, diarrhea and vomiting, etc. You can of course trim off the small green spots, but if half of the potato is green, you should throw it away.
How many potatoes per acre?
It depends on a lot of different factors including soil, weather throughout the season, caring, hilling, irrigation, use of insecticides and pesticides, and diseases, etc. A potato farming yield per acre is considered as “good” if you get 10 tons of potatoes per acre.
Curing Potatoes
- Freshly dug potatoes should be stored in a cool, dark, and dry place with the temperature between 45 to 60°F/7 to 15°C for a couple of weeks. It will ensure proper curing of skin and will make potatoes ready to store for longer.
- After a couple of weeks of curing, don’t forget to brush off any soil on the potatoes.
- Don’t wash potatoes unless you are going to use them. Washing potatoes reduces their life span, and can’t be stored for long.
- After curing, don’t store potatoes near apples, as apples leave ethylene gas which can spoil the potatoes.
Storage of potatoes
Proper storage is the biggest challenge after the end of potato farming season. Ideal temperature, high humidity, no light, and ventilation, etc. are some of the important aspects of potato storage. You can’t store potatoes just anywhere. Storehouses with root cellars are preferred storage places for potatoes. Potatoes need cool temperature otherwise they may get affected from sprouting – and you are of course storing them for selling, not for farming again 😉
Recommendation for storage
- There must be high humidity in the storeroom. Potatoes contain as much as 80% of water, and if there is dryness in the atmosphere, they will start drying out. Having a damp cellar is a perfect option. Otherwise, you can also increase humidity by storing perforated bags with tubers. Placing large pans of water near the air source is also a decent idea to maintain humidity.
- Greening of potatoes is one of the major problems after the end of potato farming season. To avoid greening, store potatoes in dark storerooms. If that’s not possible due to any reason, you can pack potatoes in large, dark, perforated plastic bags to ensure darkness, and at the same time, to ensure proper, inside out air movement.
- Ventilation is a must for potatoes. They use oxygen and give carbon dioxide even when they are harvested. Avoid putting potatoes in air-tight containers. Use perforated bags as already mentioned above to keep them fresh for long enough.
So, that’s all about our guide on potato farming. You can follow these steps to ensure productive and beneficial farming of perhaps the most evergreen, and the most commonly used vegetables around the world. In addition to “how” and “when” related to potato farming, you must have to be sure about where potatoes grow. So, choose the farming area wisely, follow the soil instead of the calendar to know the right time to start cultivation, and go with the above-mentioned steps to kickstart your potato business in the right direction. Don’t forget to write back to us, if you liked our guide. Happy farming, healthy farming! Cheerio!
Reference:
https://www.almanac.com/plant/potatoes