Best Potting Soil For Tomatoes?

Do you searching for the best potting soil for tomatoes, then this article can help you to find out the best soil for the growth of tomatoes.

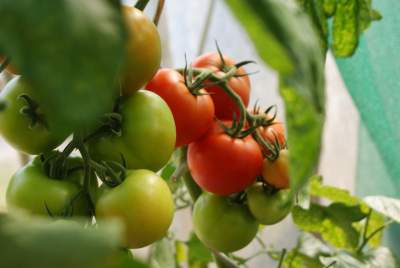
Tomatoes are grown in pots or containers can prefer a moist environment to flourish. They are unable to perform in heavy soil. So, know about the best potting soil for tomatoes go through this article!

Best potting soil for tomatoes?

Soil condition is one of the main reasons for growing healthy tomatoes. Regardless of how you tend your plants, if you want to ensure a good tomato yield for the next growing season, you need to choose the best soil for planting which is sprouted into seedlings and flower products.

Types and textures

Tomatoes cannot be grown in heavy clay soil. It loves the well-drained loose soil such as loam or sandy loam soils which are best for the growth of tomatoes. In your soil, there is a high quantity of clay is there then you can improve the texture by tilting the soil and adding the peat moss, sawdust, and mix sand or other amendments before planting. And the tomatoes cannot grow well in dry soil and avoid planting them in waterlogged soil, excessively wet and anywhere standing rainwater gathering after rainfall.    

Soil pH

The acidity or alkalinity of a soil is measured by its pH. pH 7 is considered neutral, any lower value is acidic, and any higher value is alkaline. Tomatoes grow best in neutral to near-neutral soil, so you may need to adjust the soil pH for the best results. If necessary, you can increase the pH by adding agricultural lime to the soil before planting. You can lower the pH by adding elemental sulfur or a fertilizer containing ammonia sulfate.  

Also Read: Why Are Bottom of Tomatoes Turning Black: Blossom End Rot

Fertility

Tomatoes grow well in moderately fertile soil rich in organic matter. You can add compost while preparing the soil. It may also be helpful to add an all-purpose fertilizer containing potassium and phosphorus. Avoid fertilizers that are high in nitrogen, as they can thicken the plant which bears less fruit.

 A good starting point when preparing your garden is to test the soil. Soil test kits are available at most garden shops and your nearest university office. Soil analysis results will show nutrient content and pH, and provide recommendations for soil improvement.

Growing Tomatoes in Containers

Tomatoes are usually grown in open gardens, but you can also grow them in containers. The advantage of growing in a container is that it gives you complete control over your environment. The ideal potting mix for tomatoes includes soil, perlite, sphagnum peat moss, and compost.

Please note: If you mix it yourself, it will change the composition of the peat compost as indicated on the manufacturer’s label. The amount of soil pH varies, if the nutrients contain will vary, and can lower the pH by affecting the nutrients available to the plant.

 Tomatoes have lowered the pH of the soil produced by the roots, so you should fertilize your tomato plants with garden compost. Garden composts are generally slightly alkaline and therefore resistant to the natural drop in pH. Also, in this context, it would be nice to add a little lime. You will be adding 50 grams (loamy soil) to 100 grams (sandy soil) per square meter of soil, so a heaped teaspoon should be enough for one of your 10-liter plant pots.

To feed tomatoes as they grow, choose fertilizers that are high in potassium and phosphorus (K, P) and many micronutrients. At your garden center, you will likely find one of a range of tomato or flower fertilizers. Avoid herbal fertilizers as they contain too much nitrogen.

Just a little advice on planting quantity: If you are not an avid tomato consumer, six tomato seedlings are usually enough for a family of two, twelve for four, and sixteen for six …

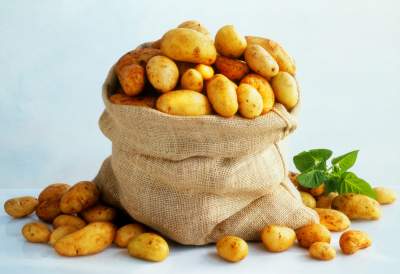
Is Garden soil is good for tomatoes?

The gardening soil does not use directly for growing tomatoes because it is heavy and has harmful pathogens, fungi, and pests that can destroy the plants. Another issue is that the garden soil becomes more compact with each watering cycle and decreasing its oxygen levels and water-absorbing capacity.

What are potting mix and potting soil?

Potting soil is also simply called ordinary garden soil. It is naturally rich in nutrients and thanks to existing minerals and bio-degradable organic matter. It is cheap and most efficient for container gardening.

Potting mix

On the other hand, a soil mixture of organic matter, peat, and other materials provides better aeration and makes it lightweight, which promotes easy root growth. It can be made to order for a specific plant, so it will be more expensive than potting soil.

Homemade recipe of potting mix for tomatoes

Here is the homemade recipe for making a potting mix that is cost-effective while overbuying from the store.

Recipe no.1

  • Sphagnum peat moss
  • Garden soil
  • Perlite, vermiculite, or sand

Combine the three ingredients in a pot with equal proportion.

Recipe no.2

  • Crushed eggshells
  •   Bone meal
  • Compost
  • Garden soil

Mix all of the ingredients in equal amounts and it will have a great pot mixing for planting tomatoes!

Recipe no.3

  • Vermiculite
  • Vermicast
  • Compost
  • Pre-soaked coir peat

Mix all the ingredients with the same quantity and store them mix them in a container and use them as per the requirement.

Tips for growing tomatoes indoors

Use a container that is at least 12-18 inches deep with wide drain holes. Place the pot on any sunny windowsill where it can receive 6-8 hours of sunshine. Prefer south- or west-facing windows so the inside of the container dries up faster than the backyard.

The soil should be watered regularly and thoroughly. Keep the soil moderately moist, but allow the top 1-inch soil to dry before re-watering.

Feed your tomato plants with organic or slow-release fertilizers during the growing season. Use fertilizers with high nitrogen content which stimulate less fruit setting and more leaves.

 Turn the houseplant periodically to get even sunlight and Supports farms and cells when mature.

Common mistakes are done while growing tomatoes in containers

Small containers

Here you have to use a big container because growing tomatoes is a large harvest. I use a small container it cannot hold more soil and water which is not enough for the growth of the tomato plants. So, a bigger container should make a large space and holds more soil and water. It will provide more nutrients for the growth of your plant. Water and food are the most important elements for healthy plant

Too much water

The key to the success of your tomato plant is proper watering. If the excess of water to the plant can cause blossoms to end rot. So keep the soil in the container should moist but not wet.

Maintain water levels in the container 1 inch above the surface of the soil. Please check the soil moisture before watering the container. Add water when the soil must be dry while touching at your fingertip.

Don’t be forgetting about drainage make the hole at the bottom side of the container which helps to drain well.

Too little water

The amount of water your tomato plants need depends on several factors, including the weather: wind, heat, humidity, pot size, and the type of pot used. often you water. Large tomato plants may need to be watered at least once a day, and sometimes twice.

Also Read: How long can a tomato plant go without water?

Not enough sun

Tomatoes love the sun and require full sun, which means they need direct, unobstructed sunlight for 6-8 hours a day, without trickery or jumping around. Many people often overestimate the amount of sunlight entering an area. Sunlight meter before putting on the light bulb. Also, the amount of sunlight entering an area can vary significantly during the growing season, so double-check each week to make sure nothing is blocking sunlight.

Under-fertilizing

Tomatoes are high in nutritional value and should be fertilized regularly unless you are using pre-fertilized potting soil.1 Most potting soil contains very few of the nutrients your plants need to grow and stay healthy, so you will need to add those nutrients into the soil or add nutrients to your mixture, which has a high compost content.

You have a variety of fertilizers to choose from, but good options are either universal slow-release organic fertilizers or those specifically formulated for growing tomatoes or vegetables that can be mixed with potting soil is Emulsion / Liquid from algae once or twice a week or calcium in the form of lime or liquid calcium. Black areas on the lower end of tomato fruit indicate possible rot of the flower heads, which can be caused by irregular watering and/or lack of calcium in the soil.

Caging too late or staking

Waiting too long to stake or cage a tomato is a chronic mistake. Tomatoes grow quickly and are best caged during planting before they get large and bulky.

Conclusion

Tomatoes are easy to grow vegetables. Choose the best soil, container, and fertilizer for your tomatoes. Sow deep, water regularly, fertilize. You will definitely get better and tastier.

How to Turn Green Tomatoes Red in the Fall?

Are you looking for red tomatoes and how to turn your green tomatoes into red in your backyard? 

I hope it will be bright, cherry red color tomatoes ripening on the vine.

And yet, the experienced gardeners have time when their plants are still hard and green.

At any instance in the growing season, but when killing the frost is bearing down, your stress increases by the moment. What can be the gardeners do?

Here, I’m helping you with different factors to encourage tomatoes to turn red on the vine. 

Also Read: Why Are Bottom of Tomatoes Turning Black: Blossom End Rot

Why are ripe tomatoes commonly red?

If your tree is not bright red in color, it is good to know that many gardeners have complained. After all, we all need red tomatoes! How desirable are reds? 

There is a scientific explanation, and knowing this can help you grow your own fruit that stays firm green when you want it to have a beautiful red color.

When the fruits are green, they get this color from chlorophyll. As they move from maturity to ripening, they release a natural hormone called ethylene, which triggers the ripening process, causing the fruit to turn red and soften.

 According to the schedule in which this happens, it usually takes about three weeks for the tomato plants to grow tall enough and bloom after transplanting, about 12 to 18 inches in height for most crops.

When they reach full size, it takes an average of 20 to 30 days to mature and change color from green to yellow and red.

Cherry and grape varieties can often produce small, ripe red berries for a total of 25-30 days from flowering to harvest. 

If you are counting, and the wrong thing is happening in your garden, it’s time to do some more research and determine why your plants are not growing to full maturity.

Few reasons your tomatoes won’t ripen on the vine 

Once survey your plant if one of the reasons might be affecting the ability of your plant to ripen the tomatoes into the red.

Temperatures are too warm

If your tomatoes become green permanently and still it’s warm, then heat could be the cause.

It’s hard to believe that the easy-growing garden vegetables are temperature sensitive, if the pigment will begin to change then temperature dictates along with ethylene.

The optimum temperature for tomatoes to show red is 68-77 ° F, slightly hotter is normal, however, once temperatures exceed 85-90 ° F, ripening stops, or a minimum of slows down or orange-green or light green on the vine, up to almost white, but unfortunately not red.

Temperatures are too cool

As usual cooler weather also stops to keeps change as they turn your crop rosy shade. Once more time you are getting the temperature about 68-77 ° F range for them to ripen a sporty red hue.

If temperatures drop to 55 ° F, add at least a week or possibly two to the average ripening time of the fruit if 65 ° F, depending on the seed packaging or botanical label. 

If your area has night-time temperatures below 50 ° F and daytime temperatures below 60 ° F, and it lasts two weeks or more, the stunning red transition you’re looking for will stop. 

The frozen fruit of the tree will also not ripen when the air is colder than 50 ° F. You may get some green if your tree tries to bear fruit in a climate of 50–55 ° F, but trust them. Strange shapes also develop at the weak point. 

Protect the tree with a bedsheet, old cardboard, or even a plastic tarp. 

You may not be able to get any fruits back at this point, but if it is unlikely that they will end up in cold temperatures, or if reliable sources predict freezing, you can still sort the fruits on your tree. If anyone has begun to show signs of softening or a change in color towards maturity. 

Before that happens, analyze the possible reasons your fruit doesn’t ripen on the vine, and try to address those issues before the frost hits.

Stressed or overgrown vines

Tomato plants also like every living being have so much energy. If the plant using more energy to grow the leaves and flowers then it may not have any energy left behind to turn green fruits red.

To prevent this from happening to your vine, it is recommended that you prune it six weeks before the first expected frost in your area. Cut the vines with scissors or scissors until the stems are ripe.

 Improve airflow, can prevent contamination of fruits and crops. You can also stimulate the redness of green berries by pruning the roots.

5 Tricks to Ripening Tomatoes on the Vine Faster

We are unable to force the plant to ripen tomatoes on the vine, but few things that can help you to ripen them.

Therefore, fall is early approaching and you’re struggling with how to turn green tomatoes to red, hence we have 5 tricks try these to get better results! 

1. Cut off the new growth 

when the growing season comes to end, therefore your plant does not require to waste energy anymore for their new growth

Topping the plant which can distribute growth hormones from the main stem to the branches and cutting off the new leaves produce in the plant which redirects its energy to ripening the tomatoes faster growth.

2. Trim the flowers

After the pollinated flower, it takes few months to ripen the tomatoes but new flowers are not going to amount to anything. Therefore, pick the flowers. 

Also Read: Why Are My Tomato Flowers Falling Off?

3. Pinch the suckers

Suckers are the part which is produced between branch and leaf joint. It sucks energy from the plant so it is called the sucker. Pinch off all the suckers you see on your tomato plant.

4. Pluck off tiny tomatoes

I know that any of the tomatoes remove from the plant is very hard but the little babies don’t have time to mature before frost. So, pull them off then it can focus on the larger green tomatoes to ripen.

5. Prune some of the leaves

Don’t remove all the leaves from the tomato plant. De-leafing the tomatoes is not a good thought. Therefore you can trim a few of them if your plants have huge and healthy green leaves for vigorous growth.

Tomatoes sometimes take a while to ripen, but that doesn’t mean you can’t help but speed up the process. If you’re tired of tomatoes not ripening on your plants, try these simple tricks to make green tomatoes turn red in no time.

How to Store Potatoes So They Last For Months – 5 Methods

Potatoes can be stored last for months on the kitchen counter than most fruits and vegetables, but the green sprouts will start to sprout and lose their freshness and flavor. Can you know how to store them properly, they will store for weeks or even months also.

All you need to keep them fresh for a longer period like a cardboard box, paper or mesh bag, or basket. When stored properly, potatoes will last four to six months.

So, here are the 5 methods to store potatoes so they last for months:

Step 1 Root cellar storage

The traditional method of storing potatoes is to place them in a cool, dark place where they don’t risk freezing, such as in a cellar. If your home is not fully furnished, an unheated garage or a cold corner in the basement will do.

It is not enough to just throw the potatoes into the cellar; you will need to prepare them in advance during the multi-day curing process.

What are the conditions to sort and cure fresh potatoes?

The first step after harvesting potatoes is sorting them to separate the ones that are best for storage.

Freshly harvested potatoes do not have tough skin to protect them from rotting, so be careful when handling them to avoid cutting or damaging them.

You want large potatoes without large punctures or bruises, although small cuts can harden during storage.

Any overly damaged potatoes should be eaten within a few days or otherwise preserved.

Some types of potatoes keep better than others. You will get better thick-skinned red potatoes and other brown potatoes than tender fingerlings and red-skinned varieties.

As a result of this process, the skin hardens and the potatoes are stored longer. Although you can wash it first, the potatoes will last better if you let them dry and get dirty.

Also Read: How to Grow Organic Potatoes in Your Garden

Step 2 Rebury potatoes outdoors

Let’s say your storage goals are a little less ambitious and you just want your potato crop to last until late fall. In such a case, an easy way to preserve is to put the potatoes back into the ground immediately after harvest.

Until the last late fall, if you want to store your potato harvest. Dig a trench about 6 cm deep, place the potatoes on the bottom, cover with loose soil and straw or folded newspaper to cover the rain. This keeps the potato very cool until you dig it up in the fall, and it will start to rot if you let it hold onto the dying plant for a few more months.

Step 3 Slice and Blanche potatoes for freezer storage

After peeling and slicing, raw potatoes quickly discolor in the air because they contain an enzyme called polyphenol oxidase, which reacts with oxygen to give the flesh a gray or brown color. You can prevent discoloration by applying a layer of water to the peeled and cut slices and refrigerating them before use. Now they can absorb too much.

For longer storage, consider vacuum packaging, a method in which all air is removed from the packaging and sealed up to a week in the refrigerator.

Step 4 Pressures can potatoes

Your potatoes can also be store on a long-term basis, independent of the refrigerator. You will need to use pressurized cans as water cans cannot reach the high temperatures required for safe storage.

 Mason’s jar can store about 20 pounds of potatoes, and salt to taste. Peel the potatoes and remove the eyes, then halve and place in a large bowl filled with cold water. Boil a pot of water, then blanch it three times, remove the potatoes and rinse them to remove the starch before placing the potato balls in a sterilized glass jar.

Fill them with hot water, leaving a distance of 2.5 cm between the edges. You can add about a teaspoon of salt per liter if you like. Clean the rim before putting on a clean ring and cap, and the pressure can be 10 pounds for forty minutes.

Step 5 Dehydrate for potato flakes

If you’re willing to put in the effort as early as possible, you can save your potato plants almost indefinitely by dehydrating them into flavourful flakes. Wash and peel the potatoes first before cooking them on the stovetop until they are easy to cut with a knife.

Blender is better!

 Let the water cool and then mash the potatoes directly in the water, use a stand mixer to blend until smooth, or use a hand blender to mash the potatoes directly into the pot and then gently place the potatoes in dehydrating foil. The thinner the layers, the faster they dry.

 Set the temperature to 140 degrees and after about 12 hours check if the potato pieces are dry. The potatoes are ready when they are broken, not bent, but be patient. The whole process can take 36 hours or more. Once dry, grind it into a powder by placing it in a food processor and placing it in an airtight container.

You can spice them up by making mashed potatoes. Put a tablespoon of butter in 2/3 cup water and bring to a boil before turning off the heat and adding ¼ cup milk and 2/3 cup flour. Moisten the potatoes, add butter or milk to taste.

Eating fresh potatoes is equally enjoyable, and you will surely appreciate your efforts even more if you can continue to enjoy your harvest in the middle of winter. Store potatoes properly and they can last for a long time.

Also Read: How to Grow Potatoes in Tires?

Conclusion

Knowing how best to store potatoes can extend their shelf life and reduce food waste. Raw potatoes store in a cool, dark place with good air circulation, and not in the refrigerator.

Avoid browning of slices and skins or vacuum sealing. Boiled potatoes can be stored in the refrigerator for up to 4 days or in an airtight container in the freezer for up to 1 year.

 Home-grown potatoes should be briefly stored at higher temperatures and higher humidity before long-term storage.  Regardless! How they are stored potatoes that will last longer if they are fresh and healthy when purchased, so look for tubers that are firm, smooth, undamaged, and free from sprouting.

Why Are My Tomato Flowers Falling Off?

My tomato plant grew to be over 5 feet tall and produced many flowers, not a single flower turned into any variety of tomato. I was very disappointed because these are the only vegetables I like to eat fresh. 

They are not lacking in water as I have made sure that they are always looked after. I also gave them Miracle-Gro tomato fertilizer and bought a special soil to plant when I received them. As I said, I look forward to it every year. Find out why I never got tomatoes. Once the flower has fallen and the tomato begins to grow, nothing will come out.

Causes of tomato flowers falling off

Flower drop is a common problem when growing tomatoes that can be extremely frustrating for the home gardener. Healthy-looking tomato plants produce flowers. However, they merely wither and fall off the plant before a fruit forms. There can be many causes for flower drop, but the most common are temperatures that are too high or too low.

#1.High or Low-temperature ranges

The high temperature in summer is a common cause of the fall of tomato flowers. When the daytime temperature exceeds 85 degrees Fahrenheit for several days, tomato flowers will usually fall off the vine without fruiting. On the cool spring and autumn nights are temperatures below 55 degrees Fahrenheit can also cause the flowers to fall off.

 Low temperature can interfere with the normal development of tomato flowers and may lead to the formation of sterile pollen. High temperatures can cause defects in tomato pollen, which prevents fertilization and eventually forms unfertilized flowers. Dry and fall from the vine. The sudden temperature change from high temperature during the day to low temperature at night can also cause tomato flowers to fall off. 

#2.Shortage of water

Due to the lack of water or under watering to the tomato plant can be the cause of your tomato flower falling off is the most common reason and simply fix it with properly watering your tomato plants at least about 3 inches of water for a week provide with natural rainfall or with the manual concept. 

Also Read: How long can a tomato plant go without water?

#3.High winds

You can’t control the wind, but plant your tomatoes in reasonably sheltered areas. 

#4.Foliar diseases

Plants infected with foliar diseases can cause the tomato flower to fall. Some of these diseases include severe bacterial stains, botrytis fungus, and dot pressure.

#5.Improper pollination

If several plants aren’t properly pollinated, they’re going not to be able to bear fruit or produce new seeds to grow new plants. On a small scale, a lack of pollination can lead to an unsuccessful tree. In general, this can mean food shortages.

#6.High or Low humidity

Extremely dry or humid air will affect the fertilization of tomato blossoms. Tomato flowers exposed to dry or humid air with a relative humidity lower than 40% or higher than 70% may not be fertilized properly. Dry air causes pollen to stick to the stigmas of flowers, while moist air causes pollen to accumulate. Pollen cannot properly fertilize the flower, causing it to dry out and fall off the plant. 

#7.Pests 

Insects can cause tension to a tomato plant inflicting flowers drop. However, you have to keep away from the use of insecticides that can harm pollinators along with bees which might be essential in your vegetable garden.

#8. Heavy fruits set with too many blossoms

A tomato plant may have too many flowers competing for resources, causing the plant to drop several flowers, but once the first tomato is harvested, this problem should go away.

#9.Over pruning of tomatoes

If you remove those inevitable suckers from tomatoes that emerge from the branch unions. 

When you let them grow, they will become branches and stick to the plants, blocking light and flow of air. These branches will produce fruits, but the results may be too good. 

All these extra tomatoes are competing for the limited available nutrients, resulting in smaller fruits and lower quality. You need to remove the sucker by squeezing it with your fingers on the day of planting the tomatoes. 

If not, it may be best to abandon those that have become branches; but continue to remove new suckers, because they seem to limit future branch growth.

#10.Lack of nutrients

Poor soil can face a lack of nutrients due to this poor growing condition. Roots cannot get a sufficient amount of nutrients. So, the roots can be injuries because of mechanical, insects, and disease.

Make sure that test your garden soil and if you get a lack of nitrogen use tomato fertilizer which is balanced the nutrients deficiency and you can also add compost to your soil for better results.

#11.Overfertilizing

Too much nitrogen on tomato plants can cause flowers to fall off. Nitrogen application to tomato plants can promote the rapid growth of their stems and leaves. Tomato plants that are over-fertilized with nitrogen gas typically have slender stems that can’t support the burden of the tomato.

When planting plants, it is best to use fertilizers with high phosphorus content but moderate nitrogen content, and then avoid re-applying fertilizer before the fruit is set. 

#12.Inadequate irrigation

Tomato plants have a branched root system that is sensitive to dry growing conditions. If the soil around the tomatoes dries out, the flowers will dry out and fall off the vines before they bear fruit. Evenly moistened soil a few meters deep around the plant promotes a healthy root system and ensures that your plant gets the moisture needed for successful results.

Why does my tomato plant have flowers but no fruit?

It’s one of the defeats when you have tomato flowers but not fruits or only tomato plants but no flowers at all. Earlier, you could be produced tomatoes with a little extra from the normal harvest.

Also Read: 11 Best Tomato Varieties for Hanging Baskets

#1.Blossom drop

Air temperatures will play an essential role in the production of tomatoes which are sensitive to low temperatures and extremely high temperatures. In early spring fall flower, drops can occur due to slightly warm daylight and temperature will fall below 55 degrees Fahrenheit at the night as well as the same phenomenon will occur in summer also.

Here we use a shade cloth to block the direct sunlight that falls on the tomato plant at high temperatures.

For cold temperatures use red plastic mulch sheeting or organic mulch enough to promote fruiting.

#2.High humidity

Tomatoes multiply when pollen falls from the stamens and pollinates the stigma. Usually, this pollination occurs due to the wind, movement, and vibration of the bee’s wings. 

High humidity can interfere with this process by making the pollen too wet and unable to move freely in the desired location. 

If you live in high humidity climates, you can help pollinate tomato plants by lightly touching flowers or flower stems. Another option is to gently brush the pollen from flower to flower with a small brush.

#3.Poor air circulation

As I mentioned earlier, flowers self-pollinate and immobilize pollen grains through movement. If the airflow around the tomato is obstructed, the pollen will not be able to fall and pollinate the stigma. To improve air circulation, try some of these options. 

Remove some of the foliage.

Don’t plant tomatoes too close together.

Trim the tomatoes.

Plant tomatoes vertically to improve air circulation and don’t plant behind the building or structure.

Instead, plant tomatoes outdoors on all sides.

#4.Too many flowers

Too many flowers on tomato plants will cause competition between flowers for nutrients because as a conservation method, tomato plants will automatically wilt and fall flowers

 After your plants set fruit, this problem needs to be solved without long intervention for good soil.

What can you do to prevent tomato flowers from falling off?

#1. Use natural pesticides

Use natural pesticides which are environmentally friendly and it will pick out the affected buds from the plant before spreading the problem.

#2. Keep soil evenly moist

Be sure about the soil should be kept moist and not be retaining a huge amount of water and getting soggy, it shouldn’t dry as well. So, mulch can help to regulate the mulching process.

#3. Check soil pH level

Check the soil pH value and maintain it as per the requirement of the seed. If you feel a lack of nutrients in your soil then add a layer of compost to fulfill it. 

#4.Monitor temperature fluctuations

First of all, monitor the temperatures and maintain between 12 to 29 degrees Celsius. If you build wooden or plastic containers which can control the shade for your plant.

How long after flowering does the tomato appears?

The first ripe tomatoes (Solanum Lycopersicum) seem within the garden concerning 45 or over 100 days once transplantation the seedlings outdoors.

The appearance of yellow tomato flowers indicates that the plant has begun the fruiting process. Once opened on a tomato vine, the time it takes for the fruit to ripen depends on the tomato variety and various environmental factors.

  • The right temperature
  • Water properly
  • Use fertilizers
  • Flowers will appear
  • Tomato pollination
  • Tomato growth
  • Look out for pests 

Conclusion

There is no difference to uptake contemporary tomatoes picked from your vegetable garden.

The key is to understand the problems that are causing your tomato flowers to deteriorate and prevent them from happening in the future.

Hopefully, you’ll be able to scale back your tomatoes from dropping flowers by following these methods. 

Why Eggplant Flowers Falling Off?

Eggplant, also known as Solanum melongena, grows in hot weather, healthy growth requires direct exposure to sunlight for most of the day. Eggplants are also tropical or subtropical, so they grow best at high temperatures.

 In cold weather, these plants grow more slowly. Eggplant is a self-pollinating plant because it has male and female organs. Most gardeners get annoyed when the flowers fall. Eggplant falling flowers are a common problem for many gardeners. Let’s take a look at the causes of eggplant flower shedding and find a solution together.

Also Read: How Often to Water Egg Plant?

Why are the eggplant flowers falling off?

Eggplant is a tropical plant that grows in high-temperature areas. They need well-drained soil to grow. The falling off eggplant flowers maybe the combination of many factors, but there are several reasons for the fall of eggplant flowers are:

Lack of nutrients in the soil 

Eggplant is a tropical plant that grows in high-temperature areas. You need well-drained soil to grow. Eggplant flower falling off can be the result of a combination of many factors as follows:

The reason the flowers fall without producing fruit is likely to frustrate the gardener. Every gardener goes out of his way to take care of the plant they have grown with all the information they have and it is perfectly obvious and understandable.

To prevent this from happening, let’s take a look at the steps and add precautions that every gardener should follow to keep flowers from falling off.

High temperature

Eggplants are tropical plants and grow best at high temperatures, but if the temperature rises above 32 degrees Celsius, the eggplant should be covered with a shade cloth to protect it from possible damage from the extremely high temperatures and cover your eggplant with the shade cloth if necessary.

In case you have grown your eggplant in containers, temperature control will be easier for you as you can move the eggplant to a place that won’t get direct sunlight during the days.

Improper fertilizers

Insufficient fertilization can also cause eggplant flowers to fall off. Improper fertilization means a lack of nutrients needed for eggplant growth. This lack will put pressure on the eggplant and cause the flowers to fall off without fruit.

 It is important to add horse manure or cow manure to the soil regularly as this adds nitrogen to the soil. Nitrogen is essential for the production of plant protein. Adding organic fertilizers is also important because they add phosphorus to the soil, thereby stimulating the growth and development of healthy flowers and fruits.

Climatic conditions

Unsuitable weather conditions may be one of the possible reasons for eggplant flower shedding. Eggplant grows well at high temperatures but grows slowly at low temperatures.

If your eggplant does not receive at least 6 hours of sunlight during the day, the flowers may fall off or fail to develop. Therefore, it is important to grow eggplants in sunny places during the day.

Absence of pollination

Eggplants are self-pollinated because they contain male and female organs. They do not rely on insects or bees for pollination, but people often find it difficult to self-pollinate eggplants.

Eggplants are usually pollinated by wind. But there may be problems with pollination when the weather is very humid or humid. In very hot weather, pollen becomes inactive because it thinks that it cannot withstand the pressure of extra fruit in very hot weather.

It can also be said that the eggplant interrupts its fruit in order not to bear greater pressure. In a humid climate, the pollen becomes very viscous, so it becomes very viscous due to excessive moisture in the air. He cannot reach the pistil to pollinate the flower.

 If the eggplant flowers fall off due to lack of pollination, you will need to act as a pollinator and try manual pollination.

In addition to eggplant blooms, there may be other factors related to the above two points. Let’s take a look at them too.

Shortage of water

Eggplant is a very nutritious plant and requires constant watering to keep it healthy. Lack of water puts pressure on plants because they have to withstand extremely high temperatures.

Due to this lack of water pressure, the eggplant will lose its flowers, believing that it cannot meet the demand for new fruits. Therefore, if you find that the flowers of your plants are falling off, make sure to water them regularly. Eggplants need at least 18 inches of water in the soil to prevent moisture loss from their roots and thus prevent moisture loss for the entire plant.

 In addition, forming about 4 inches of mulch around the eggplant will help retain moisture in the soil, which is essential for a healthy harvest.

How to stop eggplant flowers from falling off?

The falling eggplant flowers indicate that something is missing, whether it’s nutrients, fertilizer, or water. To avoid falling flowers, you must take care of your eggplants and make sure that they are nothing is lacking.

Read on to learn how to prevent eggplant flowers from falling off.

As mentioned earlier, eggplants are tropical or subtropical, so warm temperatures and direct sunlight are needed to get a healthy harvest at least six hours a day. In the container, choose a location in your home that is exposed to direct sunlight most of the time.

Second, you need to add water to the soil regularly. The roots of eggplant go deep into the ground, so you should add water at least 18 inches below the ground. Since eggplant grows at a higher temperature, it is obvious that heat will quickly evaporate water. Lack of water puts pressure on plants, so the flowers will fall off early and bear fruit.

Therefore, if you want a healthy harvest, start watering the plants regularly. It is also recommended to form a melting layer at least three inches around the eggplant, as this will help the plant and retain moisture in the soil during long periods of weather. If the climate is very hot or very humid, the eggplant will not self-pollinate and cause falling flowers. In this case, damage to the crop can be prevented; you need to pollinate the eggplant flowers. This is a very simple process that does not take a long time, and the result is well worth it with minimum effort. Later we will discuss how to pollinate eggplant manually.

Plants feed on available nutrients, and the next important step that you must not skip is regular soil fertilization. Add compost and regularly add nitrogen to the soil, which is necessary for plants to make protein.

In addition, use organic fertilizers regularly, as they will help your plants meet their daily nutritional needs, resulting in a healthy harvest. Sun protection is an important step that most gardeners do not consider. Hungry for sunlight and is known to grow better at higher temperatures, it is also important to note that when the temperature rises above 32 degrees Celsius, getting direct sunlight will do more harm than good to your plants. Use shade cloth to protect your plants from direct sunlight.

 Indoor growers should move the eggplant container to a place where the temperature is not so high. This step should not be skipped, otherwise, the flowers will dry out and fall off, and it will also increase the likelihood that the plant will dry out completely.

How to hand pollination done on eggplants?

Eggplant is self-pollinated, but if you find that the eggplant has fallen out, it may be due to lack of pollination. Self-pollination usually occurs due to the movement of the eggplant due to wind or rain in very hot or humid weather. Self-pollination usually does not occur during the temperature process, so you need to act as a proxy and pollinate the eggplant to get the fruit.

Artificial pollination of eggplant is very simple and can be done immediately. What kind of artificial pollination can be done?

Take the clean brush. Now use this brush to pollinate your eggplant. Move this brush into the eggplant flower. Repeat this process for all the flowers in the eggplant. This will help the pollen reach the pistil, which means it can act as a pollinator for the eggplant.

Another form of hand pollination can be to simply touch the plant to make it vibrate. These vibrations help the eggplant to pollinate and bear fruit. However, it is much more effective to pollinate plants with a brush. Remember all the above to get a healthy harvest and prevent premature flowering. Always pay attention to changes in weather conditions and their impact on your plant.

Also Read: Why My Eggplant Leaves Turning Yellow and Curling

Problems with eggplant

Your eggplant flowers can be dropping off if they do not get sufficient water or pollination of eggplant cannot occur. Lack of water can be dried your eggplant flowers and fall off, you can prevent it by watering your eggplant twice a week and moist the soil around 6 inches from the surface of the ground which can help the roots of your eggplant moist in the soil.

Another cause for flower dropping in eggplant is lack of pollination. So hand pollination can be done by vibrating each plant to transferring the pollen from male to female parts of the eggplant flower.

Conclusion

You have to take specific measures and control to protect the eggplant flower from falling off for better crop yield.

How Often to Water Eggplant?

Botanically classified as a berry, this fruit contains many small, soft, edible seeds that have a bitter taste because they are coated with nicotine alkaloids.

Eggplant is a delicate tropical perennial, usually grown as a mild or semi-annual plant. It grows in a temperate climate.

The stems are usually prickly. The flowers range from white to purple, with five-lobed corolla and yellow stamens. Some common varieties have shiny, purple, egg-shaped fruits, white flesh, and a fluffy “succulent” texture. The variety is white and elongated. After opening, the cut surface of the pulp quickly turns brown.

This plant is described as native to India, where it continues to grow in the wild, Africa or South Asia. Different types of plants produce fruits of different sizes, shapes, and colours, but they are usually purple. The less common varieties of white eggplant are also called Easter white eggplant, Casper, and garden egg.

Eggplant is used in dishes in many countries. Because of its texture and volume, it is sometimes used as a substitute for meat in vegetarian and vegetarian dishes. Eggplant has soft meat, and its many seeds are small, soft and edible, and cannot be picked with the rest of the fruit. Its thin skin is also edible, so there is no need to peel it, but when the eggplant is cooked, the green part on it should be removed, which is the Holy Grail.

Raw eggplant can taste bitter and sour, but when cooked it will become soft and produce a rich complex flavour. To remove the bitterness, rinse the cut fruit before cooking, drain the water and add salt. Absorption of fat and sauce can improve the taste of eggplant dishes.

How often to water eggplant?

Are you aware of eggplant if you not watered enough can flourish with bitter taste? It is a one of the best power packed vegetable with many health benefits. It is a common plant in vegetable home garden which is heavily loaded with nutrients. For perfect eggplant need a fix watering schedule. With the help of this article you can aware about how often to water egg plant?

Also Read: Radish Farming: Planting, Harvesting, & Diseases

How much water does eggplant require?

Especially during the growing period eggplant need a lot of water. This plant is a member of nightshade family along with other vegetables such as potatoes, tomatoes and green peppers. As like other vegetables it also consumes large amount of water to grow. If you provide more water, it can give high quality fruit as well as good size of fruit.

For every week you have to water it about an inch for safe side, as the weather gets warm increase the water level and the weather gets cool decrease the water level. To be follow the thumb rule to maintain the plant soil moist.

The eggplant loves fertile soil and good soak in sun along with regular watering. If the above needs have been fulfil to get good quality crop in no time.

When watering eggplants, it is important to take care of the soil. These plants like moist soil, but when it gets wet, the roots begin to rot and infect other diseases causing to plants to wither.

Secondly, it depends on where you plan to grow eggplants. If you plan to grow eggplant indoors in flower pots, you will get a larger flower pot with drainage holes at the bottom so that the excess water can be drained easily. We recommend that you use plastic basins for this plant.

Most of us avoid plastics for environmental reasons, but these pots help the earth retain moisture. Plastic basins are also very durable.

 For earthenware pots, water will be absorbed by earthenware pots. This makes it difficult to get wet and dirty. They are also heavier than plastic tanks, so they are difficult to move when needed.

How to water the eggplant?

It is depends on location of the eggplant where it should be planted. If you plant them indoors it needs water for every alternate day and check the moisture present in the soil before watering the plant.

You can easily check the moisture by sticking the finger in the soil and see the amount of potting mix stick to the finger or else you can do on a regular basis with the help of moisture metre.

With this moisture metre you can easily find out the amount of present in the soil, therefore you will know when to water the plant.

If the egg plant that are planted at outdoors, you have to aware about the climatic conditions before watering the plant.

Watering eggplants is not a difficult task, if done correctly. Because this plant requires good sunlight and dip in the water pool, so it is difficult to find a balance. Deciding how long to water the eggplant is sometimes difficult.

For this reason, most people turn to various methods to keep algae moisture, one of it is mulching which are nothing more than a form of insulation, with an organic or plastic layer on the surface of the ground. Therefore soil can breathe at the same time. Thus mulching will help to increase the time between watering.

 In this way, you don’t have to water the plants frequently in hot weather, because most of the water will be trapped.

When to water an eggplant?

The best time to water the eggplant is early in the morning or late at night when the temperature is low. Watering eggplants is less stressful because these plants like moist soil. Therefore, they should be watered in the early morning. There is enough time to soak up moisture before sunrise.

 When watering during the day, water will be lost due to evaporation. Experts suggest that it is best to water these plants in the morning to allow excess water to evaporate from the leaves during the day, thereby reducing the possibility of fungus growth.

During the day the plant looks little hydrated it may so happens then you could give watering to the plant at mid-day. With these decrease the chance of wilting and displaying curly leaves of the plant.

Overwatering eggplant

Too much watering of potted eggplants becomes a bigger problem because the water can only drain through the holes in the bottom. This combination with heavy potting soil allows the water to stay longer.

Eggplants that suffer from excessive water and drought ultimately die. The soaked eggplant roots will rot, preventing the plants from absorbing water and wilting. Eggplants need about an inch of water per week, in hot or windy climates, or if they grow in sandy soil, water plants about an inch long and then water again. Plants will develop small and fast-drying roots. If water collects on the soil surface and does not drain within 10 seconds, stop watering immediately.

Also Read: Why My Eggplant Leaves Turning Yellow and Curling

Underwatering eggplant

Plants can also wither underwater, grow poorly and produce compact fruits. Shortage of watering can promotes shallow roots. The roots growth will be stops due to lack of water in the soil.  If the root growth stops then the plant can’t produce quality fruits. Ultimately the eggplant will die. So, eggplant also required consistent water for their growth 1 inch of water once a week. Maintain the watering schedule regularly as per the climatic conditions and site of the plant plantation.

Soil preparation for eggplant

For planting the egg plant preparation of soil is important for the easy and quick growth and caring of. This plant requires the soil which keeps moisture and not undergoes soggy easily.

Eggplant likes fertile, well-drained sandy loam with a pH of 5.5 to 7. Remove all weeds and dig out the soil 6 to 10 cm deep. The higher the organic matter content in the soil, it is better for the growth of eggplant. Therefore, if possible, add a 3-4 inch layer of compost.

How to Grow Potatoes in Tires?

Growing potatoes in tires are seems to be different but it’s a controversial subject in gardening. Its looks as a marmite community, either love or hate it’s your choice! In this post we are providing information about how to grow potatoes in tires so you can breed more food in less space.

Potatoes don’t require large space in order to breed them effectively. If you have a space of about car tire to place flat on the ground. You can get four to five potato plants with large amount of potato on them. Use easy following instructions to make planter out of tires.

Supplies

To complete this recipe you need it:

  • 4 car tires
  • Required topsoil to fill the interior of the tires when stack four high.
  • 2 seed potatoes.

Planter construction

The planter construction in many stages over the course of the growing season as the potato plants grow.

Also Read: How to Grow Sweet Potatoes?

Building the planter foundation

  • Select the area where the sunlight will get at least 6 to 7 hours each day.
  • Keep the single tire in that area
  • Fill the topsoil inside the tire up to rim
  • Planting the potatoes
  • Cut two seed potatoes into thirds, be sure each potato has diverse eyes on it.
  • Plant the cut pieces of potato inside the tire around the edges, spacing them equally. Place the potato pieces as eye side faces up.

Adding a tire

  • Place one more tire on the top of the first tire.
  • Add dirt and compost to this tire interior, as the plant grows.
  • Retain the plants covered with dirt, as like 4 to 5 leaves showing in the planter.

Continue adding tires as needed

  • Add one more tire to potato plants when they reach the top of second one.
  • Simultaneously, adding dirt to tires to cover the 4 to 5 leaves of potato plants.
  • If necessary add the fourth tire to it.

Is it safe to grow potatoes in tries?

Although this seems to be a truly organic viable idea (growing potatoes in tires), this idea does not sound “good” if you are responsible for recycling a pile of tires. My cousin brother and I often talk about this issue. “Oh yes,” I replied, “My father planted many pounds of potatoes with previous tires!””Let’s go,” he said, “I will find him.” In fact, he brought me yesterday. So, I am studying and writing this article, and I am considering planting potatoes again. On the tires, once and for all. I don’t know why, but I want to ignore this concept and move on. This is a personal choice. Here are some reasonable ideas about growing mature potatoes…

In the short term, yes, tire planters are good, although the soil in black tire planters may be hotter than most plants want. In the long run, no, because tire rubber will slowly degrade and release carcinogenic zinc polycyclic aromatic hydrocarbons. (Polycyclic aromatic hydrocarbons) and other toxic compounds in the soil.

Also Read: How to Grow Organic Potatoes in Your Garden

Why grow potatoes in tires?

  • In urban areas tires are readily available to most people and in many places for disposing you have to pay for them.
  • It is easy to stack tires in a great way to grow potatoes, if necessary keep adding tires on top at the time the leafy stalks grow up over the tire.
  • Most of the permaculture gardens and sites are using tires as pathway compost, building material, and many other things.
  • Tires are able to keep water, soil, and mulch when it can be used as potato towers, worm farms, flowers, chicken dust bath, herb gardens and so on. It is also cheap and easy to come by plus at that time you can paint it.

Why not to grow potatoes in tires?

  • There are many adverse information about the safety and the gases evolved when it break down in which heavy metals might be present. As we mentioned below.
  • As we know the tires are manufactured with hazardous chemicals and they are maintained the OSHA standards which is applicable for safety to those manufacturing the tires. But we don’t have a lot well documented studies about the category if they are safe or not.
  • I have heard from few people who says that the potatoes taste of tires too. Finally you will decide to take a chance of potential for hazardous material draining into the soil and your food.

How to harvest potatoes grown in tires?

Once the leaves (called stems) turn yellow and start to die, you can use a large tarp to remove the tires and compost to collect compost and potatoes. The potato tubers should be in the lower tires and are easy to find on your hand. After the potatoes are harvested, you need to pickle them before storing them for the winter.

Storing the potatoes

  • Pull out the plants from the ground and separate the potatoes from roots of the plant.
  • Wash them gently.
  • In a cool and dark place spread them into one layer to dry.
  • Place it in dry and cool place to store up to 5 months.

Tire potatoes growing tips

  • Use only a certified potatoes seeds to become a disease free. If you want to introduce potatoes in your garden only use certified seeds of potatoes which are often sold at nurseries and feed stores.
  • From grocery store don’t bought potatoes because they sprayed to keep them for sprouting and it will not yield a better crop.
  • Water the potatoes twice a week. Ensure that it will reach all the way bottom of the tire. So then the roots are don’t dry out.
  • From the average last frost plant the potatoes about six week before the date. When they showed up in kindergartens and grocery stores near you.      

A Recycled Raised Bed

A tire planter is a good source to raise potatoes. It retains the effort of having dig trenches and potatoes contained while they grow easily with recycling the tires. Construct a number of beds for your family to grow potatoes in less expenses i.e., dirt and seed potatoes. Best of luck for growing potatoes in the green way.

How to Stop Your Herbs & Vegetables from Bolting?

Bolting can reduce your vegetable & herbs garden’s harvest. It will occur due to plants starts flowering and set seed early. It will triggered when plant face stressful condition. Here we are taken a few steps to prevent bolting and increase the chance plentiful harvest.

The first factor to recognize is that bolting is a hassle for you, now no longer for the plant. For the plant, bolting is flawlessly herbal and desirable. The leafy vegetables very cause for dwelling is to reproduce by forming seeds, which is basically what bolting is.

Also Read: Why Are My Spinach Leaves Turning Yellow

What Is Bolting?

Bolting takes place when a crop early grows flower stem and produce seeds, fend off the plant from bearing a healthy harvest and bolting is also called as going to seed or running seed. The plants energy from leaves and roots can be redistribute to produce seeds and flowering stem. Usually bolting is indication for the end of new leaf growth and for the annual plant it signals that the plant will die soon.

How to Identify Bolting?

Bolting is easy to identify but after identification on plants it’s too late to do much over it. you know the when the bolting occurs:

  • If you see a hard stem, spotted with a few leaves, suddenly grow out from plants foliage.
  • This stem starts from buds, become flowers and then seeds.
  • The growths of remaining plants are slow down.
  • The tastes of rest of leaves are becoming bitterer. 

Why Bolting Is Bad?

Unless you want to gather seed from the plant (for future crops) or let its flowers attract pollinators to your garden, everything regarding bolting is dangerous for you as a vegetable or herb gardener. To send up the stem that signals bolting, the plant is waste resources that might somewhat be place into nutritious its leaves and roots.

However the squandering of resources isn’t the only drawback with bolting. when a vegetable bolts, it stops manufacturing those nice, big, tasty leaves that you simply are growing it for. The remaining leaves are going to be smaller and tougher. Any further leaves made also will have such a bitter flavor that you simply won’t wish to eat them. Ultimately, once Associate in Nursing annual plant bears seed, it’ll die, your mission in life have been completed.

However, this goes against your own desire as a gardener that the plant produce as many of these delicious leaves as possible, rather than seeds. As soon as the plant is ready for sowing, this production is stopped. The challenge is to use your gardening skills to stack the deck for your purposes, thus frustrating that of the plant for as long as possible.

Also Read: 7 Houseplants that Reduce Dust and Particulate Matter

How to Prevent Bolting?

1. Plant seeding at cooler season

Depending upon the climatic conditions of your location planting should be decided. In an early spring climate should be quite warm for planting. In spring as an alternative, try to grow vegetables. In spring or fall you can grow brassicas like bok choy, cabbage, and kale at unnatural warm temperature.

2. Optimum growth plants need sunlight

Many plants which are respond to daylight especially spinach, radish and lettuce are programmed with rise in temperature. In too late spring don’t plants flowering veggies which are depends on daylight hours. If you shade these plants for the part of the day it will reduce their exposure and bolting.

3. Mulch heat-sensitive herbs and vegetables

Even in indoor or outdoor mulch the soil around the surface of your plant. It will helps to regulate the temperature in growing media. It keeps the roots cooler while recognizing high temperatures and slow bolting.

4. Keep the water up to your plants during hotter weather

If you maintained moist soil for the plants in a hot weather and in a hot day with dry soil is enough to trigger out a flowering cycle in heat sensitive plants.

5. Plant bolt resistant seeds

Especial seed are implemented to reduce bolting; it will develop to resist the condition that which cause bolting. Take onion set with heat treated, withstand in high temperatures and it reduce the development of flower buds in warm weather conditions. 

6. Use the right fertilizer

For all plants the same fertilizer can’t be used because one size not fits for all. So, the various fertilizers are used for the different spices. Some plants will be grown for flower, few for leaves and  stem and few for fruits or seed. If you use the same fertilizer for leafy green and for fruiting it will mix all the nutrients cheer them to flower. For growing green use the fertilizer will be rich in nitrogen and for flowering use high in phosphorus fertilizers.  

7. Direct sow your seed

Most of the herbs grow good when you sow them directly at outdoors rather than transplanting, it will allow the root system to grow without any inconvenience.

7 Houseplants that Reduce Dust and Particulate Matter

Having greenery at indoor which gives relaxation and keep air clean and healthy. Although do you know about the houseplants that reduce dust and particulate matter? Let’s find them below!

Can houseplant reduce dust?

Houseplants can capture the dust with extensive surface area provided by large and shiny foliage. Indoor plants can attract these dust particles through a process called as unambiguous process and release fresh and clean air.

What is particulate matter?

Particulate matter refers to a combination of solid dust particles and liquid droplets present in the air. Few of the particles are smoke, dirt, dust and soot which are seen by our naked eyes. Prolonged exposure can results in breathing and lung problems are held.

Houseplant can reduce dust and particulate matter

1. Pygmy Date Palm

Pygmy date palm is very effective while absorbing formaldehyde, toluene, xylene, and styrene, which results in sick house syndrome. The purification capability depends upon temperature and can be changes with light intensity. If the room temperature and humidity both are higher side then it becomes more effective. This palm is quite vigorous which provides a healing effect and purifying indoor air.

Also Read: 10 Houseplants That Will Thrive in Your Kitchen

2. Rubber Plant

The rubber plant absorbs the indoor air pollutant efficiently with the help of large waxy foliage. According to NASA, few plants clear the pollutants from the air in that rubber plant is also included.

The rubber plants leaves are quite large and have a waxy shiny surface. But its foliage is effective in attracting dust particles and particulate matters. For making it more effective you can haze the plant once a day as it will raise its efficiency to stick dust to its foliage.

3. Ivy

All varieties of ivy can effectively remove dust. For example, the most popular air purifier, English Ivy, not only looks good, but also removes VOCs such as toluene, octane, benzene, and trichloroethylene. Ivy plant in hanging pots to improve the air quality of breathing.

4. Spider Plant

Spider plant is very effective in removing pollutants in the air! According to this article by the National Wildlife Federation, spider plant can remove more than 95% of the toxic substances in the air. Spider plant can also effectively absorb nitrogen dioxide.

5. Peace Lily

According to this study, some VOCs were recorded from the indoor air of participants’ homes, and then formaldehyde and BTEX were quantitatively analyzed in the analysis laboratory of medical college Yonsei University. Lily was able to reduce the indoor benzene concentration from 2.24 to 1.61 µg/m3. In a controlled environment, toluene ranges from 62.02 to 19.27 µg/m3, ethyl benzene ranges from 1.56 to 0.27 µg/m3, and xylene ranges from 2.52 to 0.20 µg/m3.

This plant will absorb mould spores and alternative air pollutants through its shiny leaves. Lily is also very effective in absorbing harmful acetone fumes, which can cause slurred speech, headaches, poor coordination, lethargy and low blood pressure. Put a quiet lily in the big flowerpot in the living room to make it look great.

6. ZZ Plant

From the surroundings the low maintenance houseplants can absorbs harmful air pollutants with the help of dark green leaves which results clean indoor air. If you keep in a small pots looks great and also very easy to maintain.

The plants with small waxy and shiny leaves are quite effective in attracting the airborne dust and particulate matter. Place it in the bedroom and mist the leaves once a day to get better results!

Also Read: 15 Healing Houseplants That Can Improve Your Health

7. Bamboo Palm

At your home by growing 2 plants around 50 square feet area you can reduce dust and particulate matter. According to PBCST study reports shows that indoors plants such as Rhapis palm, ficus Alii, and bamboo palm can absorbs harmful gases, CO2 and VOCs from the atmosphere.

10 Houseplants That Will Thrive in Your Kitchen

Of all the design options you can think of for a kitchen, adding many colourful indoor plants is one of the best choices. But you cannot and expect to grow indoor plants in one of the warmest and driest rooms in the house. Grow well-some indoor plants can better handle moisture and heat in the bathroom, while others require more light than the kitchen windows can provide. You also need to use creative methods to prevent surface clutter, because kitchen countertops are always popular.

Easy and quick way to spruce your decors is adding a houseplant to a room. Growing plants indoor can have some benefits, when it comes to the kitchen. The right plant can help to purify the air and add a splash of colour and promote fresh air for year around.

It is important to note that no plant can thrive in absolutely every kitchen, because every room has its own set of light, humidity and temperature conditions. This should be taken into account because there are options to handle multiple levels of lighting, humidity, temperature fluctuations, etc. In addition, you can use a variety of hanging and hanging options on cabinets and plants such as B. grass that may fall on windows or counters. Not to mention, there are several plants that can help alleviate any damage. Pest problems you may encounter (goodbye, flies!). Hence, these 10 indoor plants are a good starting point.

#1.English Ivy

If you are looking for bold species or plants that can be placed in a closet and are easy to care for, ivy is another good choice. They thrive in humid environments, but are best suited for light kitchens. Is there enough natural light, enough bright or medium light, but not enough light? Not that much.

English Ivy

#2.Cactus

Use cacti to make your kitchen look south-western, especially when the kitchen becomes extremely hot and dry. Relatives of succulents, these spiny desert plants also like to bask in the sun. If you have short of Space, but you have a shiny window sill, cactus is the perfect choice.

Cacti can survive for several weeks or longer without water. Water once every two to three months and only when the soil is completely dry. In other words, if you are a careless factory owner, this is for you.

Cactus

#3.Pilea Peperomioides

This modern, must-have houseplant is ideal for a warm, sunny kitchen-not just because one of its nicknames is the pancake plant! Pilea peperomioides needs a lot of bright indirect light to thrive, so consider putting it on a lighter kitchen window sill.

Pilea Peperomioides

Take care of its leaves; if you find frizzy, you notice that it is not getting enough light and you need to move it closer to a window or a brighter place. Remember to flip the plant about weekly to help all the leave. The growth and distribution are uniform.

Also Read: 15 Healing Houseplants That Can Improve Your Health

#4.ZZ Plant

Zamioculcas zamiifolia

ZZ means its great botanical name Zamioculcas zamiifolia, ZZ plants are incredibly tolerant and can adapt to almost any reasonable environment, from rooms with lots of bright and indirect light to dark rooms. Drought-tolerant, which means you can put it in the corner of the kitchen without adverse effects, and forget it in the months between watering. At the same time, the spring composite brochure maintains a lush green colour, creating a jungle atmosphere for your kitchen.

#5.String of Pearls

This lovable, elegant houseplant combines the best attribute of hanging plant and a succulent is one. Thin stem grows at waterside of pea-sized pearls in an attractive green shade and as well as it’s happy, your plants are hang will keep growing in all the way to the ground.

String of Pearls

Hanging pearls is a great member for a high self at the top of the cabinet, but be sure you choose a spot it won’t be disturbed, as the pearls break off. Be careful not to overwater this pearls, as they kill your plant due to sure-fire way to cause root rot.

#6.Jade

These cute and versatile succulents can add a stylish desert flavour to any kitchen. They are perfect for decorating bright, sunny windows that have at least four hours of sunlight per day. Although they can grow in areas with less light, in the absence of sunlight, the tray-shaped green leaves will not form a distinctive red colour around the edges.

Jade Plant

 In winter, when your kitchen is prone to drafts, be sure to remove the succulents from the windows, because jade plants grow best at temperatures between 50 and 70 degrees.

#7.Aloe Vera

Aloe Vera

A warm and sunny place, hardy Aloe Vera has a good reason to live in your kitchen, this succulent plant is great for your skin. After washing the dishes, cut the sheets and apply the gel to dry or irritated skin. Like other succulents, Aloe Vera requires minimal water and plenty of sunlight, so place it near a warm window to get as much bright light as possible.

#8.African violet

If you are looking for colours, African violets will highlight their bright flowers, which have a variety of pleasant purple shades and last throughout the year. But keep in mind that this plant requires more maintenance than some of the other plants in this list.

African Violet

 If you get a lot of bright light, you will not be able to keep your flowers. It is also prone to under watering and overwatering; try to keep the soil moist at all times and water gently when the surface is dry.

Also Read: Lavender Farming Guide: How to Grow Lavender with Maximum Productivity?

#9.Heartleaf Philodendron

Often confused with Potos, Heartleaf vines are identified by their true heart-shaped leaves rather than teardrop-shaped Potos leaves. The care and growth habits of the two vines in the jungle are similar.

Heartleaf Philodendron

Heartleaf Philodendron flowers with heart leaves do not need much growth, only a little light and a sip of water every two weeks. Hang your things on the ceiling or stand on a high shelf, unknowingly, there are tendrils hanging on the wall.

#10.Air Plants

Air Plants

All you need to display air plants (also called Tillandsia) is a bright, sunny window sill. Because they get their nutrients from the air instead of the soil, you can even keep them warm anywhere in the kitchen-on plant stands, decorative panels, and even on glass bowl ceilings or wall frames. Suppose you have a lot of bright indirect light.

Take a ventilated plant bath every two weeks, then soak it in water for two to three hours, then release the water and let it dry again.