Why My Pepper Plants Leaves are Wrinkled?

Growing peppers is really science. It can be achieved with simple means soil, water and sun. It can be done in a complex greenhouse with precise nutrients and irrigation. However, as with anything that is alive, imbalances and stress can create problems.

With bell peppers, the plant gives clear signals when something happens. A common problem with bell pepper plant is when the leaves begin to wrinkle. This can happen for a number of reasons, and this article explains what to do when pepper leaves are wrinkled.

Pepper plant can be grown in neither too dry nor allowing to flooding, moist, rich in organic matter and well drained soil.

The plants are growing by cutting about 15 to 20 inches long, climbing to neighbouring tree at distance of about 2m apart. The rough bark trees climb more readily then smooth bark. Participating trees are cleared away, leaving few tresses to provide shade and permit free ventilation. The leaf mulch and manure can be covered the roots and the shoots are trimmed for twice a single year. The plant needs water for every other day during dry season for the first three years. The plant carries fruit from the 4 to 5 years and for the typically for seven years. The cutting plant require cultivator for both yield and quality of product.

A stem has 20 to 30 fruiting spikes. One or two fruits turn red at the roots of the spikes, but before the fruits are fully mature and have not yet hardened, the harvest begins.

If they are allowed to fully mature, the fruits will lose their sharpness and eventually fall off and be lost. Collect the spikes and place them in the sun to dry, and then remove the pepper from the spikes.

As we know, pepper can cause sneezing. Some sources say that piperine is a substance found in black pepper that can irritate the nasal cavity and cause sneezing. Black pepper is believed to treat various diseases such as insomnia, constipation, oral abscess, toothache and sunburn.

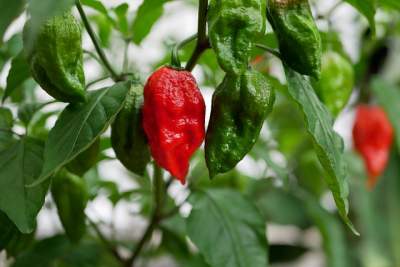
My pepper plants have wrinkled leaves

According to pathologist at the University of Florida, if the peppers in your garden grow wrinkles or wrinkled leaves, it may be the source of virus that numbs the growth and distort the fruit. Can be infect most sweet peppers, chilli peppers and ornamental plants, it is very common worldwide.

Also Read: Bell Pepper Farming: Bell pepper plant care, Pruning, Harvesting, Pest & Disease

Symptoms

Although the severity of symptoms may vary depending on the type of pepper plant you have, the first sign of infection is a slight frown or wrinkle on the leaves. Older leaves are mottled yellow or lighter green. In the striped form of the virus, yellow stripes appear along the main veins of the leaves, and then discoloured stripes appear on the outer veins. Growth retardation is common. The fruit is usually small, deformed and large in size.

Spread

The virus invades pepper plants through small scratches on the stem or leaves. Bell pepper fragile virus can be spread mechanically through contact or through infected soil tools, or seeds. Its cousin, spotted pepper vein virus exhibits similar symptoms in infected plants and is mainly transmitted by winged aphids. Although the severity of symptoms may vary depending on the type of pepper plant, aphids feed on certain weeds, such as woodpeckers and black nightshades, which can spread viral bites and infect nearby pepper plants.

Control

Because only a few pepper plants are resistant to the virus. If you suspect an infected plant, remove it and any nearby plants. Remove contaminated plant material from the soil. Before touching healthy plants or the surrounding soil, wash your hands and clean your nails with alcohol gel. Dis infects shovels and other tools with household bleach.

Overwatering

One of the failure things you can do with pepper plants is to keep the soil too moist. Pepper plants choose dry soil, and excess of water can cause many problems.

Over watering can cause pepper leaves to wrinkle. The leaves of pepper have shrunk because the roots cannot absorb enough oxygen and nutrients from the soil.  Excess of water also often to yellow leaves and plant growth retardation.

Water only when the soil is dry enough. Feel the weight of the plant by touching the soil below the surface or lifting the pot.

If the plant is allowed to dry, the leaves will begins to wither, but will fall off after watering. You can also try using water meter to check the soil moisture level.

Also Read: How to Germinate Chilli Seeds

Calcium deficiency

Calcium is a secondary nutrient for the growth of pepper plants. Among other things, it is used by plants to build strong cell walls. When plants lack calcium, the leaves do not develop properly and wrinkle or blisters appear.

There are brown spots on the leaves, there may be other signs of nutritional deficiencies, such as yellow leaves.

Use bone meal or other calcium supplements to supplement calcium. Calcium and magnesium are secondary nutrients that can be provided to inhibit growth of Irregular plants. Sometimes, but not always, they are added to general-purpose fertilizers, so please check the ingredients.

We like Fox Farm Fertilizer Trio because its feed is simple and balanced.

Many potting soils also contain calcium, but not all. Find out your soil to see what nutrients are added. If you are planting in soil, try to collect soil samples for analysis.

Excess of sunlight

It is very important to provide light to the pepper plants. This peppers plants like sunshine at all season. Therefore, if you grow outdoors, lighting is unlikely to be a problem.

A more common problem is caused by improper use of indoor plant growth lights. The brightness and intensity of plant lights varies greatly. These are necessary if you grow your own pepper seeds indoors, but you need to follow specific lighting instructions to understand how close they should be to your plants.

If your plant is too close to the light, you will see the leaves fold and block the bright light. Eventually, this problem can cause the leaves of the pepper to dry out and fall off, which usually turn brown and fall apart when pressed.

Please note that young plants tend to be more susceptible to this problem than mature peppers. Seedlings are softer than fully developed plants.

 If you think your plants have been slightly burned out, turn the light up a few inches. Keep our grow lights to be 10-16 inches from the canopy of leaves.

Make sure the lights are turned on for 12-16 hours on the timer and turned off for the rest of the day, because the 24/7 light is not good. If you are outdoors, please try to water at dawn or dusk to avoid scalding the leaves.

 Outdoor mild burns will be soaked in direct sunlight. Water droplets will destroy the leaves in direct sunlight. However, they look like dark burn marks on the leaves, not wrinkles. You can also see some wrinkles on the leaves for the first time. Move your plants outside. Make sure to adjust the temperature of the pepper properly and gradually allow it to adapt to direct sunlight.

Insect damage

Uncontrolled insects can be a nightmare in your garden. They are everywhere and can cause severe damage to your plants within a few days.

Wrinkled pepper leaves can be a sign of pest infestation, although they tend to be concentrated on individual leaves rather than on the entire plant. Wrinkled and bubbly leaves may be the leaves on which insects live.

Pepper plants have wrinkled leaves, and this is probably one of them. Other secretions mentioned. Unfortunately, pest control is more difficult than preventive measures. However, there are a few steps you can take to resolve the problem and eliminate most errors. If possible, burn the infected leaves, otherwise, because insects can spread easily, take them outside and discard them. You can also introduce ladybirds or other beneficial insects, which will feed on pests instead of pepper leaves.

Neem oil has a preventive effect, just apply the recommended amount to the soil before transplanting, or spray the diluted solution on the leaves.

Don’t expect the wrinkled pepper leaves to be completely healthy after treatment. The fact that plants are no longer beautiful does not mean that the problem is not solved. And understand that wrinkled sheets are still wrinkled.

Prevention and solutions

One form of PMMoV exists in the soil, usually in the seed itself, and cannot be cured after infection. Therefore, you should move the pepper plants to different parts of the garden each year. To avoid pests, PVMV is a portable form of growing peppers from plants that attract aphids, such as tomatoes and melons. Removing nearby weeds that can spread the virus will also reduce the risk infection. Experts recommend avoiding the virus, this is the best way to flight the virus, because very few pepper plants can resists the virus. In the common form of insects, peppers should be kept away from plants that attract aphids such as tomatoes and melons.

The best way to solve most landing problems is to learn from past mistakes and avoid them in the future!

How Often to Water Eggplant?

Botanically classified as a berry, this fruit contains many small, soft, edible seeds that have a bitter taste because they are coated with nicotine alkaloids.

Eggplant is a delicate tropical perennial, usually grown as a mild or semi-annual plant. It grows in a temperate climate.

The stems are usually prickly. The flowers range from white to purple, with five-lobed corolla and yellow stamens. Some common varieties have shiny, purple, egg-shaped fruits, white flesh, and a fluffy “succulent” texture. The variety is white and elongated. After opening, the cut surface of the pulp quickly turns brown.

This plant is described as native to India, where it continues to grow in the wild, Africa or South Asia. Different types of plants produce fruits of different sizes, shapes, and colours, but they are usually purple. The less common varieties of white eggplant are also called Easter white eggplant, Casper, and garden egg.

Eggplant is used in dishes in many countries. Because of its texture and volume, it is sometimes used as a substitute for meat in vegetarian and vegetarian dishes. Eggplant has soft meat, and its many seeds are small, soft and edible, and cannot be picked with the rest of the fruit. Its thin skin is also edible, so there is no need to peel it, but when the eggplant is cooked, the green part on it should be removed, which is the Holy Grail.

Raw eggplant can taste bitter and sour, but when cooked it will become soft and produce a rich complex flavour. To remove the bitterness, rinse the cut fruit before cooking, drain the water and add salt. Absorption of fat and sauce can improve the taste of eggplant dishes.

How often to water eggplant?

Are you aware of eggplant if you not watered enough can flourish with bitter taste? It is a one of the best power packed vegetable with many health benefits. It is a common plant in vegetable home garden which is heavily loaded with nutrients. For perfect eggplant need a fix watering schedule. With the help of this article you can aware about how often to water egg plant?

Also Read: Radish Farming: Planting, Harvesting, & Diseases

How much water does eggplant require?

Especially during the growing period eggplant need a lot of water. This plant is a member of nightshade family along with other vegetables such as potatoes, tomatoes and green peppers. As like other vegetables it also consumes large amount of water to grow. If you provide more water, it can give high quality fruit as well as good size of fruit.

For every week you have to water it about an inch for safe side, as the weather gets warm increase the water level and the weather gets cool decrease the water level. To be follow the thumb rule to maintain the plant soil moist.

The eggplant loves fertile soil and good soak in sun along with regular watering. If the above needs have been fulfil to get good quality crop in no time.

When watering eggplants, it is important to take care of the soil. These plants like moist soil, but when it gets wet, the roots begin to rot and infect other diseases causing to plants to wither.

Secondly, it depends on where you plan to grow eggplants. If you plan to grow eggplant indoors in flower pots, you will get a larger flower pot with drainage holes at the bottom so that the excess water can be drained easily. We recommend that you use plastic basins for this plant.

Most of us avoid plastics for environmental reasons, but these pots help the earth retain moisture. Plastic basins are also very durable.

 For earthenware pots, water will be absorbed by earthenware pots. This makes it difficult to get wet and dirty. They are also heavier than plastic tanks, so they are difficult to move when needed.

How to water the eggplant?

It is depends on location of the eggplant where it should be planted. If you plant them indoors it needs water for every alternate day and check the moisture present in the soil before watering the plant.

You can easily check the moisture by sticking the finger in the soil and see the amount of potting mix stick to the finger or else you can do on a regular basis with the help of moisture metre.

With this moisture metre you can easily find out the amount of present in the soil, therefore you will know when to water the plant.

If the egg plant that are planted at outdoors, you have to aware about the climatic conditions before watering the plant.

Watering eggplants is not a difficult task, if done correctly. Because this plant requires good sunlight and dip in the water pool, so it is difficult to find a balance. Deciding how long to water the eggplant is sometimes difficult.

For this reason, most people turn to various methods to keep algae moisture, one of it is mulching which are nothing more than a form of insulation, with an organic or plastic layer on the surface of the ground. Therefore soil can breathe at the same time. Thus mulching will help to increase the time between watering.

 In this way, you don’t have to water the plants frequently in hot weather, because most of the water will be trapped.

When to water an eggplant?

The best time to water the eggplant is early in the morning or late at night when the temperature is low. Watering eggplants is less stressful because these plants like moist soil. Therefore, they should be watered in the early morning. There is enough time to soak up moisture before sunrise.

 When watering during the day, water will be lost due to evaporation. Experts suggest that it is best to water these plants in the morning to allow excess water to evaporate from the leaves during the day, thereby reducing the possibility of fungus growth.

During the day the plant looks little hydrated it may so happens then you could give watering to the plant at mid-day. With these decrease the chance of wilting and displaying curly leaves of the plant.

Overwatering eggplant

Too much watering of potted eggplants becomes a bigger problem because the water can only drain through the holes in the bottom. This combination with heavy potting soil allows the water to stay longer.

Eggplants that suffer from excessive water and drought ultimately die. The soaked eggplant roots will rot, preventing the plants from absorbing water and wilting. Eggplants need about an inch of water per week, in hot or windy climates, or if they grow in sandy soil, water plants about an inch long and then water again. Plants will develop small and fast-drying roots. If water collects on the soil surface and does not drain within 10 seconds, stop watering immediately.

Also Read: Why My Eggplant Leaves Turning Yellow and Curling

Underwatering eggplant

Plants can also wither underwater, grow poorly and produce compact fruits. Shortage of watering can promotes shallow roots. The roots growth will be stops due to lack of water in the soil.  If the root growth stops then the plant can’t produce quality fruits. Ultimately the eggplant will die. So, eggplant also required consistent water for their growth 1 inch of water once a week. Maintain the watering schedule regularly as per the climatic conditions and site of the plant plantation.

Soil preparation for eggplant

For planting the egg plant preparation of soil is important for the easy and quick growth and caring of. This plant requires the soil which keeps moisture and not undergoes soggy easily.

Eggplant likes fertile, well-drained sandy loam with a pH of 5.5 to 7. Remove all weeds and dig out the soil 6 to 10 cm deep. The higher the organic matter content in the soil, it is better for the growth of eggplant. Therefore, if possible, add a 3-4 inch layer of compost.

How to Grow a Lemon Tree in Pot | Care and Growing Lemon Tree

Hot and bitter lemon adds flavour to every cuisine. With all the information you need in this article, learn how easy it is to grow lemon trees in pots!

Do you want to grow lemons but have limited space? So planting lemon tree pots is a good idea. Plant it on your terrace or even indoors, it will emit fragrant flowers and soft citrus yellow fruits. In the balcony can also be planted! See how easy it is to plant a lemon tree in a flower pot!

The Best Varieties of Lemon Tree to Grow in Pots

Planting lemon trees with seeds is a bad idea because it can take up to 4-5 years to bear fruit. Instead, check if your local nursery has dwarf varieties suitable for potting.

The most suitable varieties for containers are Modified Meyer, Lisbon Lemon and Dwarf Eureka. However, lemon trees do not grow very large, so almost any variety can be grown in pots.

 Buy a healthy lemon plant that’s a minimum of 2-3 years old therefore you do not have to be compelled to watch for it to bloom.

How can you grow lemon tree in a pot?

Choose a pot that is 25% larger than the root ball of the plant. The clay pot is ideal because, unlike plastic, it is porous and the water evaporates from the side. This will help the lemon tree grow well because it doesn’t like it.

The quality and type of potting soil is also an important factor. Use well-drained potting soil and a lot of organic matter, and deposit fertilizer for high-yielding plants.

For any other small spaces, take care of your thorns and place plants in the corners.

Also Read: 7 Common Lemon Tree Problems & How to Fix Them

Requirements for lemon tree to grow in a pot

 Location

All citrus plants like full sun and need 7 to 8 hours of sunshine. If you grow lemon trees indoors, place the pot near a sunny window. You can also replace the missing direct light with artificial light.

Soil

This plant prefers neutral to slightly acidic soil. You can also use garden soil, coconut peat and compost in equal parts.

 Watering

Lemon trees need constant watering to produce healthy fruits. Too much or too little water will cause flowering and fruiting in autumn, sometimes plants die. Before watering, make sure the top 2 inches of soil is dry. More frequent watering and slightly moist soil are needed on hot and windy days.

Humidity

If you grow a lemon tree indoors, it needs a certain amount of humidity to grow-50% is ideal. You can place it on a gravel bowl or use a humidifier to keep it moist.

Repotting

According to the scale of your tree pot size must be maintained. Avoid pots that are too large or too small; please note that you need to use a container that is one size larger than the pot you used before.

Lemon tree care

Planting potted lemon trees in USDA Zones 9-11 does not require you to be so careful in severe cold, but you need to be extra careful in these areas during severe winters. Temperatures below 30°F (1°C) are fatal to lemon trees, aside from the Meyer lemon variety, which may face mild cold up to 24°F (4°C).

 Low temperature will kill citrus plants. The best temperature is 10°C to 28°C (50°F to 82°F). When the temperature is below 35°F, put the plant in an indoor pot or greenhouse for the winter (2°C).

Pruning and pinching lemon tree

Pinches can promote lusher growth-pinch the plant tree to grow at the beginning of new growth in spring (February to March) and in fall best or late winter in a frost-free area.

Be careful before pruning, and only cut off diseased or dead branches, or branches that reduce airflow, because lemons will store excess food in the leaves, and excessive pruning will cause the quality of the fruit to decrease. In addition, please keep looking for the suction cup and cut it as soon as you find it.

Fertilizers for lemon tree growth in a pot

All plants in the Citrus family eat a lot. Lemons need fertilizer to produce juicy fruits, lush leaves and fragrant flowers. Use a specific citrus fertilizer for each kinds of citrus plant; if not please use slow release fertilizer containing NPK 12-6-6 or 20-20-20.

Look for fertilizers that contain trace elements, especially iron, manganese, and zinc. If you do not use slow-release fertilizers, please apply water-soluble fertilizers once a month during the growing season to improve your lemon tree. Sprinkle chopped compost or fertilizer on the plants from time to time.

Also Read: How to Grow Lemon from Seeds

Pests and Diseases

Pests such as spider mites, aphids, mealy bugs and scales are periodically attracts towards. Apply neem oil or pesticides, insecticidal soap when you observed the infestation.

Harvesting

It depends upon the varieties which are growing and the climatic conditions. It stops ripening once cut off from the tree. To determine the fruit is ripened observe the fruit colour, weight and softness.

How to Grow Potatoes in Tires?

Growing potatoes in tires are seems to be different but it’s a controversial subject in gardening. Its looks as a marmite community, either love or hate it’s your choice! In this post we are providing information about how to grow potatoes in tires so you can breed more food in less space.

Potatoes don’t require large space in order to breed them effectively. If you have a space of about car tire to place flat on the ground. You can get four to five potato plants with large amount of potato on them. Use easy following instructions to make planter out of tires.

Supplies

To complete this recipe you need it:

  • 4 car tires
  • Required topsoil to fill the interior of the tires when stack four high.
  • 2 seed potatoes.

Planter construction

The planter construction in many stages over the course of the growing season as the potato plants grow.

Also Read: How to Grow Sweet Potatoes?

Building the planter foundation

  • Select the area where the sunlight will get at least 6 to 7 hours each day.
  • Keep the single tire in that area
  • Fill the topsoil inside the tire up to rim
  • Planting the potatoes
  • Cut two seed potatoes into thirds, be sure each potato has diverse eyes on it.
  • Plant the cut pieces of potato inside the tire around the edges, spacing them equally. Place the potato pieces as eye side faces up.

Adding a tire

  • Place one more tire on the top of the first tire.
  • Add dirt and compost to this tire interior, as the plant grows.
  • Retain the plants covered with dirt, as like 4 to 5 leaves showing in the planter.

Continue adding tires as needed

  • Add one more tire to potato plants when they reach the top of second one.
  • Simultaneously, adding dirt to tires to cover the 4 to 5 leaves of potato plants.
  • If necessary add the fourth tire to it.

Is it safe to grow potatoes in tries?

Although this seems to be a truly organic viable idea (growing potatoes in tires), this idea does not sound “good” if you are responsible for recycling a pile of tires. My cousin brother and I often talk about this issue. “Oh yes,” I replied, “My father planted many pounds of potatoes with previous tires!””Let’s go,” he said, “I will find him.” In fact, he brought me yesterday. So, I am studying and writing this article, and I am considering planting potatoes again. On the tires, once and for all. I don’t know why, but I want to ignore this concept and move on. This is a personal choice. Here are some reasonable ideas about growing mature potatoes…

In the short term, yes, tire planters are good, although the soil in black tire planters may be hotter than most plants want. In the long run, no, because tire rubber will slowly degrade and release carcinogenic zinc polycyclic aromatic hydrocarbons. (Polycyclic aromatic hydrocarbons) and other toxic compounds in the soil.

Also Read: How to Grow Organic Potatoes in Your Garden

Why grow potatoes in tires?

  • In urban areas tires are readily available to most people and in many places for disposing you have to pay for them.
  • It is easy to stack tires in a great way to grow potatoes, if necessary keep adding tires on top at the time the leafy stalks grow up over the tire.
  • Most of the permaculture gardens and sites are using tires as pathway compost, building material, and many other things.
  • Tires are able to keep water, soil, and mulch when it can be used as potato towers, worm farms, flowers, chicken dust bath, herb gardens and so on. It is also cheap and easy to come by plus at that time you can paint it.

Why not to grow potatoes in tires?

  • There are many adverse information about the safety and the gases evolved when it break down in which heavy metals might be present. As we mentioned below.
  • As we know the tires are manufactured with hazardous chemicals and they are maintained the OSHA standards which is applicable for safety to those manufacturing the tires. But we don’t have a lot well documented studies about the category if they are safe or not.
  • I have heard from few people who says that the potatoes taste of tires too. Finally you will decide to take a chance of potential for hazardous material draining into the soil and your food.

How to harvest potatoes grown in tires?

Once the leaves (called stems) turn yellow and start to die, you can use a large tarp to remove the tires and compost to collect compost and potatoes. The potato tubers should be in the lower tires and are easy to find on your hand. After the potatoes are harvested, you need to pickle them before storing them for the winter.

Storing the potatoes

  • Pull out the plants from the ground and separate the potatoes from roots of the plant.
  • Wash them gently.
  • In a cool and dark place spread them into one layer to dry.
  • Place it in dry and cool place to store up to 5 months.

Tire potatoes growing tips

  • Use only a certified potatoes seeds to become a disease free. If you want to introduce potatoes in your garden only use certified seeds of potatoes which are often sold at nurseries and feed stores.
  • From grocery store don’t bought potatoes because they sprayed to keep them for sprouting and it will not yield a better crop.
  • Water the potatoes twice a week. Ensure that it will reach all the way bottom of the tire. So then the roots are don’t dry out.
  • From the average last frost plant the potatoes about six week before the date. When they showed up in kindergartens and grocery stores near you.      

A Recycled Raised Bed

A tire planter is a good source to raise potatoes. It retains the effort of having dig trenches and potatoes contained while they grow easily with recycling the tires. Construct a number of beds for your family to grow potatoes in less expenses i.e., dirt and seed potatoes. Best of luck for growing potatoes in the green way.

16 Banana Peel Uses in the Garden You Should Try Once

After reading this article, you’ll never throw away Banana peels as like before. Bananas are a superb source of phosphorus and potassium for us, and their peels also do the same for plants. So, just cut it up and put it in the planting hole for tomatoes or peppers, it is one of the usages of banana peel in the garden. You can know more about the uses of Banana peels below!

Uses of Banana peels

1. Banana Peel Spray-On Fertilizer

Feeding banana peel to plants is an old wives tale. It can be used to make foliar spray to boost the nutrient to your plants. For making the recipe, you will need Epsom salt, eggshells, banana peels and water.

Take the dried banana peels and egg shells grind it in a blender until it becomes powder. Add Epsom salt to these banana peel and eggshells powder with water. Fill it in a spray bottle and shake the bottle until the salt and powder dissolves in water. You can use this solution in your household or in garden plants.

2. Make a Compost Tea

Drop few banana peels into a bucket which is filled with water and keep it for few days then you will get a rich amount of minerals in banana tea that will be enrich your vegetable beds and flowers with nutrients and promote aggressive growth organically.

3. Blooming in Plants

It contains high concentration of potassium which is the key nutrient to that plants need to form big and bright blooms. Potassium also promotes the transfer of nutrients and water among plant cells and protect them from diseases. To acquire benefits, cut it into small pieces and use it as mulch.

4. Fortify Your Soil

To your garden soil give a direct impact of nourishment by planting a banana peel or two in it. Simply dip up a trench three inches deep and long enough to accommodate the peels. Place them flat with inside facing up and cover them with some soil.

If you required fast decomposition, grind them in a grinder and follow the other steps. Over time, they release vital nutrients like calcium, potassium, and phosphorous.

5. Make a Fruit Fly Trap

If the flies are the major issue, and you are trying to deal with them in non-toxic way then use banana with its peel is your answer.

Simply chop it up, keep it in a plastic container, and pour some amount of apple cider vinegar. Then punch it with large holes in the lid to allow the entry of fruit flies. The scent of banana and vinegar will attract them and enters through the hole, finally drown to die in the liquid.

6. Aphid Control

Here we don’t have any solid proof yet, but you can try! Use dried banana peel pieces for this hack.Cover or bury dry pieces 2-5 inches deep in the soil at the base of the affected plant.

As they detest the smell of bananas then the aphids’ will be soon gone from the affected plants. 

7. Add to Compost

Banana peels are biodegradable and it also quickly breaks down. Here we have the best usage of banana peel is to add them to the compost pile. Be sure you only add chopped or soaked, or semi-solid slurry. If you add whole it will attract by raccoons and shunks.

8. Attract Butterflies and Birds

Encouraging birds and butterflies by keeping ripe banana peels on a raised platform in your garden. You can also cut them into pieces or make holes, which seem to be the most attractive and easily obtainable fruit for insects.It is quite likely to bring out the bees, wasps, and caterpillars as well. Ensure that you can place it on a platform above the plants.

9. Fertilizer for Air Plants

Regular air plants and epiphytic perennials like Elkhorn fern and staghorn fern are not form roots to grow in the soil like common plants. Instead, they acquire all its nourishment from their surrounding air.

In a smart way the banana water spray gives their requisite dose of nutrients for growth and survival. For this place banana peels in a blender or in a food processor to make a smooth consistency and then dilute the paste in water. Use this water to spray on air plants.

10. Feed Your Plants Banana Vinegar

Acid-loving plants like blueberries, rhododendrons, gardenias, and azaleas benefits from the application of banana vinegar.

If the brew has strong vinegar smell, then dilute it with equal amount of water to avoid burning the plant.

11. Prepare Your Garden Bed

For the preparation of garden beds banana peels fertilizing and nutritive nature make them perfect as asoil amendment substance. Simply chop them up and toss them into the farming soil.

It will improve the quality of soil and as well as boost the microbial growth and enable the benefits of worms to aerate.

Also Read: Custard Apple Farming Was Never So Fruitful – Read This Guide Till The End

12. Establish Air Plants with a Banana Peel

For the decorative air plants setting add a banana peel at the base, cover it with few amount of mulch and mount the entire plant over it. The peels act as compost and decay to release several nutrients that benefits the plants for further growth.

13. Fertilize Tomato Plants

Don’t forget add banana peels to your tomato plants because it will flourish the plants and produce the harvest prolifically. As banana peels upgrades the soil with the help of nutrients like potassium, iron, and calcium this will helps the tomatoes.

Also Read: How long can a tomato plant go without water?

14. Feed Seedlings

Few amount of banana peel cut into a tiny pieces and bury them in the soil, exactly below the topsoil of the garden bed or at the bottom of the container, at any time you plant seedlings. It will produce a much needed boost of nutrients to the young plants. You can also use it as a banana peel spray on them.

15. Amend Potting Soil

Composted Banana peel can be directly used as a soil amendment in the fall while you were preparing the vegetable and flower beds for winter. For this, chop banana peels up and add it with potting mix.

Make sure about to conceal them deeply under mulch if you want to add the peels to avoid attracting any mammalian nocturnal invaders.

16. Boost Blooms in Roses

Banana peels are the best source of minerals like phosphate, magnesium, sulfur and calcium that roses require to grow with their potential. These minerals not only help to boost the plants but also produce brighter flowers.

There are several ways to do this: you can hide the banana peel pieces in the rose container or bed, or side dress of rose bushes with dried banana peels on it and mulch is also an another option. Banana peel spray will also work as well.

Also Read: How Long Does it take a Kiwi Plant to Produce Fruit

How to Stop Your Herbs & Vegetables from Bolting?

Bolting can reduce your vegetable & herbs garden’s harvest. It will occur due to plants starts flowering and set seed early. It will triggered when plant face stressful condition. Here we are taken a few steps to prevent bolting and increase the chance plentiful harvest.

The first factor to recognize is that bolting is a hassle for you, now no longer for the plant. For the plant, bolting is flawlessly herbal and desirable. The leafy vegetables very cause for dwelling is to reproduce by forming seeds, which is basically what bolting is.

Also Read: Why Are My Spinach Leaves Turning Yellow

What Is Bolting?

Bolting takes place when a crop early grows flower stem and produce seeds, fend off the plant from bearing a healthy harvest and bolting is also called as going to seed or running seed. The plants energy from leaves and roots can be redistribute to produce seeds and flowering stem. Usually bolting is indication for the end of new leaf growth and for the annual plant it signals that the plant will die soon.

How to Identify Bolting?

Bolting is easy to identify but after identification on plants it’s too late to do much over it. you know the when the bolting occurs:

  • If you see a hard stem, spotted with a few leaves, suddenly grow out from plants foliage.
  • This stem starts from buds, become flowers and then seeds.
  • The growths of remaining plants are slow down.
  • The tastes of rest of leaves are becoming bitterer. 

Why Bolting Is Bad?

Unless you want to gather seed from the plant (for future crops) or let its flowers attract pollinators to your garden, everything regarding bolting is dangerous for you as a vegetable or herb gardener. To send up the stem that signals bolting, the plant is waste resources that might somewhat be place into nutritious its leaves and roots.

However the squandering of resources isn’t the only drawback with bolting. when a vegetable bolts, it stops manufacturing those nice, big, tasty leaves that you simply are growing it for. The remaining leaves are going to be smaller and tougher. Any further leaves made also will have such a bitter flavor that you simply won’t wish to eat them. Ultimately, once Associate in Nursing annual plant bears seed, it’ll die, your mission in life have been completed.

However, this goes against your own desire as a gardener that the plant produce as many of these delicious leaves as possible, rather than seeds. As soon as the plant is ready for sowing, this production is stopped. The challenge is to use your gardening skills to stack the deck for your purposes, thus frustrating that of the plant for as long as possible.

Also Read: 7 Houseplants that Reduce Dust and Particulate Matter

How to Prevent Bolting?

1. Plant seeding at cooler season

Depending upon the climatic conditions of your location planting should be decided. In an early spring climate should be quite warm for planting. In spring as an alternative, try to grow vegetables. In spring or fall you can grow brassicas like bok choy, cabbage, and kale at unnatural warm temperature.

2. Optimum growth plants need sunlight

Many plants which are respond to daylight especially spinach, radish and lettuce are programmed with rise in temperature. In too late spring don’t plants flowering veggies which are depends on daylight hours. If you shade these plants for the part of the day it will reduce their exposure and bolting.

3. Mulch heat-sensitive herbs and vegetables

Even in indoor or outdoor mulch the soil around the surface of your plant. It will helps to regulate the temperature in growing media. It keeps the roots cooler while recognizing high temperatures and slow bolting.

4. Keep the water up to your plants during hotter weather

If you maintained moist soil for the plants in a hot weather and in a hot day with dry soil is enough to trigger out a flowering cycle in heat sensitive plants.

5. Plant bolt resistant seeds

Especial seed are implemented to reduce bolting; it will develop to resist the condition that which cause bolting. Take onion set with heat treated, withstand in high temperatures and it reduce the development of flower buds in warm weather conditions. 

6. Use the right fertilizer

For all plants the same fertilizer can’t be used because one size not fits for all. So, the various fertilizers are used for the different spices. Some plants will be grown for flower, few for leaves and  stem and few for fruits or seed. If you use the same fertilizer for leafy green and for fruiting it will mix all the nutrients cheer them to flower. For growing green use the fertilizer will be rich in nitrogen and for flowering use high in phosphorus fertilizers.  

7. Direct sow your seed

Most of the herbs grow good when you sow them directly at outdoors rather than transplanting, it will allow the root system to grow without any inconvenience.

7 Houseplants that Reduce Dust and Particulate Matter

Having greenery at indoor which gives relaxation and keep air clean and healthy. Although do you know about the houseplants that reduce dust and particulate matter? Let’s find them below!

Can houseplant reduce dust?

Houseplants can capture the dust with extensive surface area provided by large and shiny foliage. Indoor plants can attract these dust particles through a process called as unambiguous process and release fresh and clean air.

What is particulate matter?

Particulate matter refers to a combination of solid dust particles and liquid droplets present in the air. Few of the particles are smoke, dirt, dust and soot which are seen by our naked eyes. Prolonged exposure can results in breathing and lung problems are held.

Houseplant can reduce dust and particulate matter

1. Pygmy Date Palm

Pygmy date palm is very effective while absorbing formaldehyde, toluene, xylene, and styrene, which results in sick house syndrome. The purification capability depends upon temperature and can be changes with light intensity. If the room temperature and humidity both are higher side then it becomes more effective. This palm is quite vigorous which provides a healing effect and purifying indoor air.

Also Read: 10 Houseplants That Will Thrive in Your Kitchen

2. Rubber Plant

The rubber plant absorbs the indoor air pollutant efficiently with the help of large waxy foliage. According to NASA, few plants clear the pollutants from the air in that rubber plant is also included.

The rubber plants leaves are quite large and have a waxy shiny surface. But its foliage is effective in attracting dust particles and particulate matters. For making it more effective you can haze the plant once a day as it will raise its efficiency to stick dust to its foliage.

3. Ivy

All varieties of ivy can effectively remove dust. For example, the most popular air purifier, English Ivy, not only looks good, but also removes VOCs such as toluene, octane, benzene, and trichloroethylene. Ivy plant in hanging pots to improve the air quality of breathing.

4. Spider Plant

Spider plant is very effective in removing pollutants in the air! According to this article by the National Wildlife Federation, spider plant can remove more than 95% of the toxic substances in the air. Spider plant can also effectively absorb nitrogen dioxide.

5. Peace Lily

According to this study, some VOCs were recorded from the indoor air of participants’ homes, and then formaldehyde and BTEX were quantitatively analyzed in the analysis laboratory of medical college Yonsei University. Lily was able to reduce the indoor benzene concentration from 2.24 to 1.61 µg/m3. In a controlled environment, toluene ranges from 62.02 to 19.27 µg/m3, ethyl benzene ranges from 1.56 to 0.27 µg/m3, and xylene ranges from 2.52 to 0.20 µg/m3.

This plant will absorb mould spores and alternative air pollutants through its shiny leaves. Lily is also very effective in absorbing harmful acetone fumes, which can cause slurred speech, headaches, poor coordination, lethargy and low blood pressure. Put a quiet lily in the big flowerpot in the living room to make it look great.

6. ZZ Plant

From the surroundings the low maintenance houseplants can absorbs harmful air pollutants with the help of dark green leaves which results clean indoor air. If you keep in a small pots looks great and also very easy to maintain.

The plants with small waxy and shiny leaves are quite effective in attracting the airborne dust and particulate matter. Place it in the bedroom and mist the leaves once a day to get better results!

Also Read: 15 Healing Houseplants That Can Improve Your Health

7. Bamboo Palm

At your home by growing 2 plants around 50 square feet area you can reduce dust and particulate matter. According to PBCST study reports shows that indoors plants such as Rhapis palm, ficus Alii, and bamboo palm can absorbs harmful gases, CO2 and VOCs from the atmosphere.

7 Common Lemon Tree Problems & How to Fix Them

Really citrus tree is unique in the garden. It looks great and makes any space as a summer paradise. Lemon tree is a special to grow, because it is relatively easy to care. It can be grown in various climatic conditions with more benefits. Depending upon how quickly they produce fruits?

They are suspecting that long list of pest, diseases, and problems. If you not identified in time then you can’t get any fruit at all. Few of these problems have due to bad gardening habits.

Although, we have few preventive measures and solutions for making lemonade in no time.

Care guide to lemon tree

Before entering into the list of lemon tree issues, just revise the best way to protect for your lemon tree.          

Lemon tree should be planted in the sunniest spot in your garden. So, the sunlight falls on the tree is about 6 hour’s minimum for every day. Tropical and the semi tropical are the best climate for the lemon tree.

Most of the lemon tree need well drained, textured soil with lightly acidic in nature. Avoid mulching at the base of the tree and be sure that there is no pooling water when you water it. Maintain the moist soil throughout the summer. Sometimes younger plants need water twice a week. For older ones became more to drought-tolerant and don’t skip out on watering altogether.

Younger citrus tree needs more cutting back to encourage healthy branch growth. Cutting is also allow flowing air easily between branches and leaves and allows excess light to reach all areas of the tree.

Let’s enter into the problems of citrus tree and how to dive into them.

7 Common Lemon Tree Problems

#1.Lesions on Leaves – Citrus Canker

The most common devastating lemon tree disease is citrus canker. This disease occurs due to the bacterium Xanthomonas citri. In early nineteen century it was discovered in Texas and Florida. Many of them believed that it is originated in Japan and finding their ways to the states by shipping the citrus seeds.

It is first appears on your lemon tree leaves such as small lesions pop up are observed on both sides of the leaves and they are raised like a small carters. This spots have a yellow ring around them with water stains. It will spread all over the stems and fruits.

It is not harmful for humans but still devastate your lemon tree and their citrus family. Shoot dieback, defoliation, fruit drop are the symptoms of the citrus canker.

This disease can be spread through cross contamination of plants, winds and rains. Even birds also spread citrus canker. These citrus cankers survive for 10 months on leaves, plant debris, barks and it is difficult to control.

Prevention for citrus canker bacteria

When these citrus canker diseases appeared in agricultural lemon trees, the solution is to burn all the trees which are infected as well as around 50 foot radius trees also burnt too.

Also Read: How to Grow Lemon from Seeds

#2.Black Moldy Spots – Sooty Mold (And Aphids)

Many plants are effected by sooty mold disease especially for those who loved by aphids. It will grow on sticky substance secreted by aphids called as honeydew. While it is black and not harmful and it prevents photosynthesis having devastating results. With high infestation causes defoliation which leads to death of your lemon tree.

If you identified that your citrus tree have an aphid and sooty mold problem then you observed your lemon tree leaves and branches have been dusted in ash and covered with black grime.

The best way to prevent sooty mold from your lemon tree to get rid of aphids. Simply make soapy water in a bucket and allow the effected leaves to dip into the solution. Another way with trusty water spray bottle in that add aphid killer, horticulture oil, and alcohol thrown in the bottle then spray it over the effected leaves of lemon tree.

 #3.Fuzzy Gray Mold and Brown Spots – Botrytis Blight

Botrytis blight is a diseases caused by fungus, grow in high humidity and in long period of rains. It lives at plant debris and spread easily by rain and wind. Once it occurs on your lemon tree needs to germinate little bit of moisture. It is quickly effects the leaves, stems, small branches and lemons leaving back dark brown spot and gray fuzzy mold. The gray mold ends the covering a fruit that which already set causes the branches to die back.

It can be easily prevented. Citrus trees are planted at the maximum sunlight falls on the site in the garden and space them to eliminate correctly in which botrytis blight thrives in few conditions. Lemon trees dries in sun with good air circulation. For prevention of botrytis blight throw away dead foliage and plant debris near the citrus tree in the garden to avoid attracting diseases.

#4.Tan Spots with Dark Outlines – Anthracnose

Another fungal disease that needs attention is anthracnose. Like gray mold, it attacks lemon leaves, branches, and spots. Anthrax is easy to detect like most fungal diseases, it first appears strangely colour lesions on the affected area (e.g. leaves). These spots are tan with obvious black outlines and look like healing bruises.

The anthracnose of lemon fruit looks a little different sunken and dark brown. When it spreads in the fruit, the centre of these spores turns pink and the fruit begins to rot. Small branches and twigs are also affected, causing the leaves to die and fall.

Anthracnose thrives in cool, humid and humid conditions. It can spread quickly and easily, especially in the wettest season. Splashing water on the contaminated plant remains help to spread disease to your lemon tree. As destructive as anthracnose, it is easy to control. Just remove any plant debris from the roots of the lemon tree. From there you must prune and destroy all infected trees, branches and leaves.

Proper watering and special care for lemon tree will help to prevent the development of anthracnose. You can use copper and neem oil-based fungicides to prevent fungi from rooting, but they do affect beneficial insects.

 #5.Brown Scabs – Lemon Scab

This fungal infection does no harm to the fruits, you can still eat them, but they don’t look good. If you don’t take care of them adequately, the health and fruiting ability of your trees will deteriorate.

 They look like terrible brown shells. At first they look like small pustules, but as the disease spreads, they become very hard.

 Lemon scab can also affect branches and leaves

The branches and leaves became deformed and withered. When a lemon tree is infested with lemon scab, it will appear short and dense.

Like other fungal infections at wet and humid conditions are ideal places for disease to develop and spread.

 As always, your first line of defense is to maintain good garden hygiene and proper watering methods. Many people recommend removing infected trees to replace harmful fungicides that may harm other plants in the garden.

Also Read: Guava Farming: Planting, Spacing, & Cultivation Guide

#6.Yellowing Leaves – Chlorosis

If you notice a yellowish tint on the leaves of the lemon tree, you may have chlorosis on your hands.

Many factors can cause the leaves to turn yellow. Sometimes it may be due to poor drainage or too alkaline soil, compacted soil and damaged roots can also cause chlorosis.

However, sometimes you will notice yellow veins passing through the lush green leaves. This form of chlorosis, called yellow vein chlorosis, which can indicate your trees, has lack of nitrogen. Fertilize for one day, and your tree will take care of itself.

But yellow veins chlorosis may also be the result of trauma to your lemon tree. This phenomenon may be caused by physical damage or by gardening tools, pests and diseases.

Always use your gardening tools carefully, maintain a high standard of garden hygiene, and take care of your lemon tree. Make sure you also fight against pests and diseases. Chlorosis, especially caused by trauma which results to fall of fruit and leaves.

#7. Leaves with silver streaks – Citrus Leaf Miner

Citrus moths are native to Asia and the adults are concerning to larvae. The small pests get unique name due to the tunnel across citrus leaves. If the leaves are distorted growth of younger ones can be affected.

Adult citrus leaf miners are small and these silver moths have a black spot on their scaled wings. The larvae are also small, but green, similar to glass.

 Female butterflies usually lay their eggs under the leaves. It completed this operation in less than a month. In just a week, you will find their traces on all the leaves.

 It should be noted that these small pests will not affect the fruit itself, only the leaves. However, lemon trees are particularly fragile because small citrus fruits can infect young leaves.

The good way to deal with citrus leaf minors is to announce beneficial insects. So many insects destroy your plants. Spider and parasitic wasps are introduced into your garden which eliminate majority of larvae and pupae.

If you want to add more fruit trees in your backyard, check few of these great dwarf options. Or might be don’t have outdoor space, you can also grow fruit trees indoor itself.

Also Read: What is Mango Farming all about? A complete guide

10 Houseplants That Will Thrive in Your Kitchen

Of all the design options you can think of for a kitchen, adding many colourful indoor plants is one of the best choices. But you cannot and expect to grow indoor plants in one of the warmest and driest rooms in the house. Grow well-some indoor plants can better handle moisture and heat in the bathroom, while others require more light than the kitchen windows can provide. You also need to use creative methods to prevent surface clutter, because kitchen countertops are always popular.

Easy and quick way to spruce your decors is adding a houseplant to a room. Growing plants indoor can have some benefits, when it comes to the kitchen. The right plant can help to purify the air and add a splash of colour and promote fresh air for year around.

It is important to note that no plant can thrive in absolutely every kitchen, because every room has its own set of light, humidity and temperature conditions. This should be taken into account because there are options to handle multiple levels of lighting, humidity, temperature fluctuations, etc. In addition, you can use a variety of hanging and hanging options on cabinets and plants such as B. grass that may fall on windows or counters. Not to mention, there are several plants that can help alleviate any damage. Pest problems you may encounter (goodbye, flies!). Hence, these 10 indoor plants are a good starting point.

#1.English Ivy

If you are looking for bold species or plants that can be placed in a closet and are easy to care for, ivy is another good choice. They thrive in humid environments, but are best suited for light kitchens. Is there enough natural light, enough bright or medium light, but not enough light? Not that much.

English Ivy

#2.Cactus

Use cacti to make your kitchen look south-western, especially when the kitchen becomes extremely hot and dry. Relatives of succulents, these spiny desert plants also like to bask in the sun. If you have short of Space, but you have a shiny window sill, cactus is the perfect choice.

Cacti can survive for several weeks or longer without water. Water once every two to three months and only when the soil is completely dry. In other words, if you are a careless factory owner, this is for you.

Cactus

#3.Pilea Peperomioides

This modern, must-have houseplant is ideal for a warm, sunny kitchen-not just because one of its nicknames is the pancake plant! Pilea peperomioides needs a lot of bright indirect light to thrive, so consider putting it on a lighter kitchen window sill.

Pilea Peperomioides

Take care of its leaves; if you find frizzy, you notice that it is not getting enough light and you need to move it closer to a window or a brighter place. Remember to flip the plant about weekly to help all the leave. The growth and distribution are uniform.

Also Read: 15 Healing Houseplants That Can Improve Your Health

#4.ZZ Plant

Zamioculcas zamiifolia

ZZ means its great botanical name Zamioculcas zamiifolia, ZZ plants are incredibly tolerant and can adapt to almost any reasonable environment, from rooms with lots of bright and indirect light to dark rooms. Drought-tolerant, which means you can put it in the corner of the kitchen without adverse effects, and forget it in the months between watering. At the same time, the spring composite brochure maintains a lush green colour, creating a jungle atmosphere for your kitchen.

#5.String of Pearls

This lovable, elegant houseplant combines the best attribute of hanging plant and a succulent is one. Thin stem grows at waterside of pea-sized pearls in an attractive green shade and as well as it’s happy, your plants are hang will keep growing in all the way to the ground.

String of Pearls

Hanging pearls is a great member for a high self at the top of the cabinet, but be sure you choose a spot it won’t be disturbed, as the pearls break off. Be careful not to overwater this pearls, as they kill your plant due to sure-fire way to cause root rot.

#6.Jade

These cute and versatile succulents can add a stylish desert flavour to any kitchen. They are perfect for decorating bright, sunny windows that have at least four hours of sunlight per day. Although they can grow in areas with less light, in the absence of sunlight, the tray-shaped green leaves will not form a distinctive red colour around the edges.

Jade Plant

 In winter, when your kitchen is prone to drafts, be sure to remove the succulents from the windows, because jade plants grow best at temperatures between 50 and 70 degrees.

#7.Aloe Vera

Aloe Vera

A warm and sunny place, hardy Aloe Vera has a good reason to live in your kitchen, this succulent plant is great for your skin. After washing the dishes, cut the sheets and apply the gel to dry or irritated skin. Like other succulents, Aloe Vera requires minimal water and plenty of sunlight, so place it near a warm window to get as much bright light as possible.

#8.African violet

If you are looking for colours, African violets will highlight their bright flowers, which have a variety of pleasant purple shades and last throughout the year. But keep in mind that this plant requires more maintenance than some of the other plants in this list.

African Violet

 If you get a lot of bright light, you will not be able to keep your flowers. It is also prone to under watering and overwatering; try to keep the soil moist at all times and water gently when the surface is dry.

Also Read: Lavender Farming Guide: How to Grow Lavender with Maximum Productivity?

#9.Heartleaf Philodendron

Often confused with Potos, Heartleaf vines are identified by their true heart-shaped leaves rather than teardrop-shaped Potos leaves. The care and growth habits of the two vines in the jungle are similar.

Heartleaf Philodendron

Heartleaf Philodendron flowers with heart leaves do not need much growth, only a little light and a sip of water every two weeks. Hang your things on the ceiling or stand on a high shelf, unknowingly, there are tendrils hanging on the wall.

#10.Air Plants

Air Plants

All you need to display air plants (also called Tillandsia) is a bright, sunny window sill. Because they get their nutrients from the air instead of the soil, you can even keep them warm anywhere in the kitchen-on plant stands, decorative panels, and even on glass bowl ceilings or wall frames. Suppose you have a lot of bright indirect light.

Take a ventilated plant bath every two weeks, then soak it in water for two to three hours, then release the water and let it dry again.

15 Healing Houseplants That Can Improve Your Health

Discover the names of 15 proven indoor plants that can improve your health and start growing indoors. There are some indoor plants that not only look good, but also promote a healthy lifestyle. Stress levels and improved sleep quality are some of these benefits.

  • Some houseplants are recognised to assist purify the air.
  • A horticulturist informed INSIDER that retaining a plant is likewise connected with healing benefits.
  • There are lots of low-maintenance plants you may hold that would suit your lifestyle.

Eating plants isn’t always the most effective manner to attain their benefits. Science has proven that retaining an easy houseplant can do wonders in your health.

Healing Houseplants That Can Improve Your Health

1. Jasmine

Jasmine plant can effect on your mental health and remove anxiety with the help few chemicals, treat mood swing, improve air quality, improve immunity in larger quantity, and improve sleep quality.

2. Spider Plant

It is good for fighting pollutants. One type of spider plant can absorbs 90% of carbon monoxide, formaldehyde, two chemicals found in cigarette smoke. This plant need to allow indirect sunlight and watered once a week for growth.

Also Read: Growing Spring Onions From Seeds

3. Peace Lily

The peace lily plant removes the formaldehyde, benzene, and other chemicals discharged from harsh cleaning products. It is a one of the best plant that can bloom indoors. Keep your peace Lilly in indirect sunlight near a window and water it only when the soil dries up and be cautious not to over water.

4. Snake Plant

In bedroom you can keep snake plant. It has a many benefits; it removes benzene and formaldehyde and also absorbs carbon-di-oxide and release oxygen at night.

5. Rosemary

Rosemary can boost the immune and circulatory system; it is used to ease of muscle pain and it is also known as an herb that improving of concentration and memory. The small fresh leaves of this Rosemary plant can be used in cooking.

6. English Ivy

According to Huff Post, English ivy has filtered out formaldehyde and other chemicals; it is one of the best air filtering houseplant.

According to CNN report especially it is best for the people who are sensitive to smoke.

According to spruce, ivy prefers indirect sunlight, and you shouldn’t let the plant dries out then it grows best.

7. Lavender

It is a plant which is used for relieves stress and insomnia; soothe restlessness, nervousness, anxiety, and depression.

8. Aloe Vera

This plant can do two functions, it removes formaldehyde from air and gel inside the plant can help sunburns and psoriasis. Place this plant in a sunny location and water for every three week.

9. Golden Pothos

According to the NASA clean air report though this plant is not good at removing formaldehyde but it removes other chemicals like trichloromethyl and benzene from the air. Benzene is present in glue, paint, and detergent.

According to Rodale’s Organic Life, making golden pothos as a great starter plant for horticulture newbie’s. Especially this plant is hard to kill.

According to spruce, this plant permits low-light conditions and irregular watering.

Also Read: How to Grow Beans: Planting, Care, Yield, Harvesting

10. Rubber Plant

Rubber plant can easily grow up though it is not difficult to care for, the big leaves are absorbs all bad things from air. So, don’t forget wipe out their dust from leaves.

11. Bromeliads

Bromeliads can absorbs the 90% of chemicals and purify the air of benzene. This plant grows in bright and sunny spaces which are ideal for the bromeliads and it can withstand in drought so be cautious while watering not to over water it. 

12. Gerbera

Recently according to NASA gerbera is the great plant in removing the benzene from air and produce oxygen at night. It also helps to those people who suffer from insomnia and sleep apnea.

13. Boston Fern

Boston fern can increases air humidity; this boost of moisture never dries up your air and your skin according to health essential reports. This plant soil should be wet but never humid and it flourishes in indirect sunlight

14. Azalea

Azalea is a one of the gorgeous colourful flower; it improves indoor air quality by absorbing the harmful chemical. Be sure to place azalea misted, because it likes humid environment.

Also Read: Blossom End Rot On Watermelons

15. Philodendron  

Are you looking for long lasting decorative plant, a philodendron, According to Huff Post this plant is better for  absorbing  xylene which is present in paint tinnier and gasoline. The plants need to grow some fruits then it requires some sun light and moderate amount of water.