Guava Farming – Planting, Spacing, & Cultivation Guide

Guava fruit is well known for its good flavor and aroma. Its scientific name is Psidium guajava. Guava is also called the ‘apple of the tropics’. Guava is rich in vitamin c and minerals. It is also rich in antioxidants. Guava has many health benefits. Guava is mainly cultivated in tropical and subtropical regions.

Guava Farming is a very profitable business. Guava helps in curing many diseases. Guava is also helpful in losing weight. In 2019 the production of guava all over the world was 55 million tonnes. Guava trees start fruiting after 3-4 years of plantation. Guava is mainly grown from seeds or by vegetative propagation. Guava trees are very productive and adaptable.

Guava Farming: 

  • Description of the guava plant:

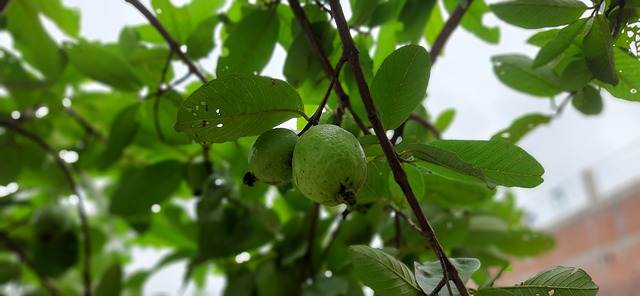
Guava tree has smooth, thin, and brown bark that peels off and reveals a greenish layer below it. The maximum height that a guava tree can reach is 33ft or 10m with a trunk of 10 in (25cm).

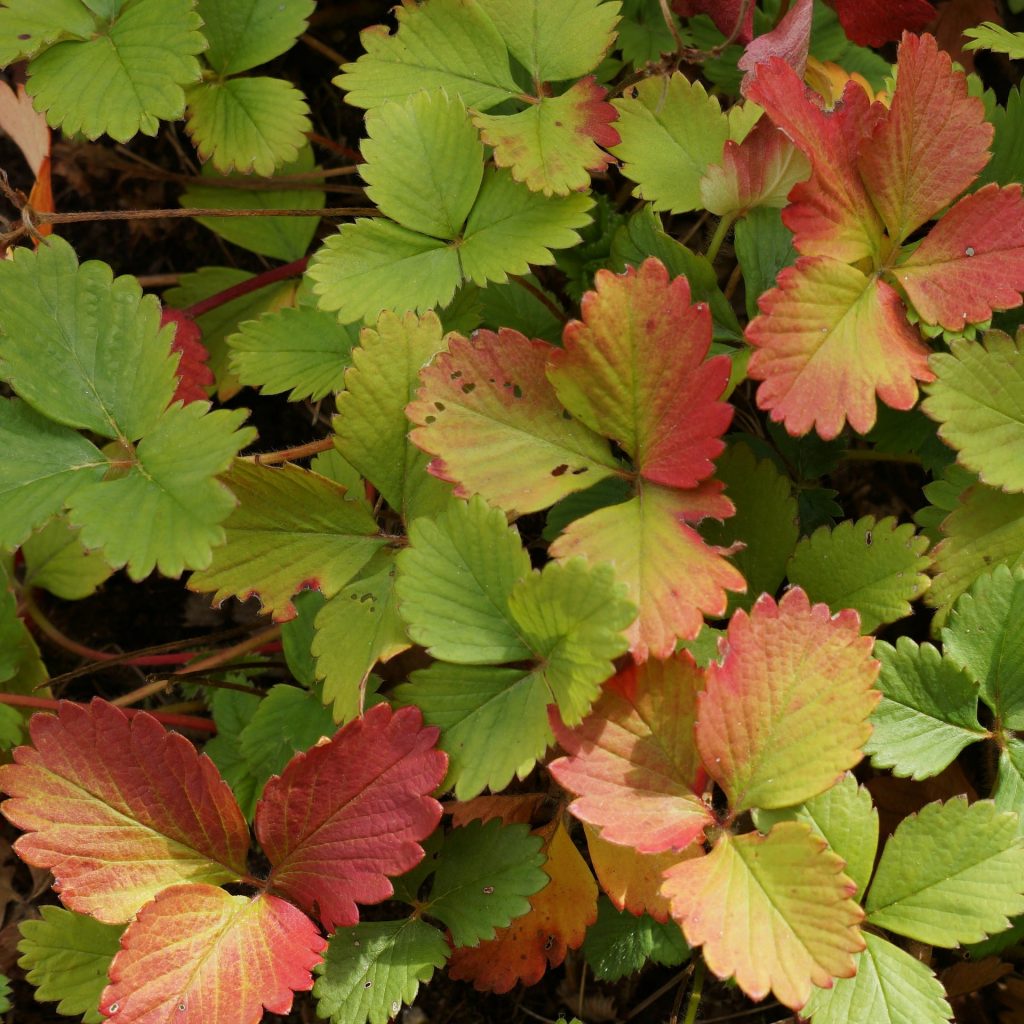
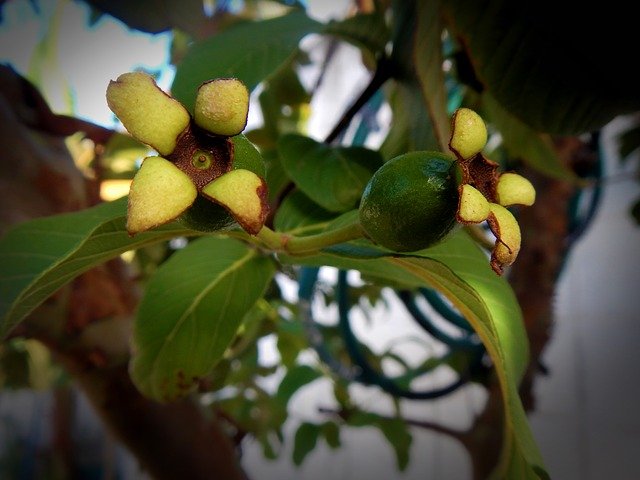
The leaves of this tree are evergreen. These leaves are oval and long, having a short petiole. These leaves are leathery in texture and when guava leaves are crushed, they have a nice aroma. The white flowers grow independently in the leaf axils. These flowers have 4 to 5 petals. 

  • Description of guava fruit:

The skin color of the fruit ranges from light yellow to pale green or sometimes pink. When you peel off the skin of guava, a layer of sweet flavor full and tangy flesh is present. The color of flesh can be white, yellowish, light pink, dark pink, red.

When the fruit is immature, it is very hard and astringent. When guava ripens, some of its varieties have custard-like consistency however the others are crispy. Mainly the central pulp is of the same color even if the surrounding flesh is lighter or darker. It is very juicy and has hard yellow seeds in it. 

  • Different types of guava fruit:

Guava fruit has many different varieties. Some of these common varieties are given below:

  1. Ruby supreme: This variety of guava is oval. It has a medium to large size. It has a pungent smell. Its flesh is thick and sweet. Comparatively fewer seeds are present in this variety. Ruby supreme guavas are excellent to eat fresh. This variety has good productivity.
  2. Red Indian: red Indian guavas are round in shape and have medium to large size. This variety has a strong odor. It has a sweet flavor and its flesh is red. It also has good productivity. 
  3. Beaumont: The fruit of this variety is large. Its color is either green or light yellow and has pink flesh. Beaumont guava fruit can weigh up to a pound. 
  4. Red Malaysian: This variety has very unique foliage and flowers that are deep red. These flowers are also used for decoration. This variety is frequently grown for ornamental uses. 
  5. Mexican cream: It is our next variety of guava fruit. These guavas have yellow skin and cream-colored flesh that is a bit spicy. It is mainly medium-sized. 
  6. Safeda: In this variety, the skin of the fruit is very thin however the flesh is thick and white. Fewer seeds are present in this variety. This is a very famous variety and grown widely. However, branches of safeda are brittle and can break continuously. 
  7. Bangkok apple: These fruits are large-sized and have thick flesh. It has fine color and taste.
  8. Lucknow: It is medium-sized fruit and round shaped. It has creamy white soft flesh with a sweet and pleasant flavor. It is a good quality fruit and has fewer seeds.

Propagation of the guava plant: 

Propagation of guava depends on the variety of fruit, the fertility of the soil, and the available irrigation provisions.

At what distance the trees should be planted?

A distance of 5to 8 m should be maintained between the trees. Standing spacing between them should be 6 × 6 m where 112 trees could be planted in one acre. High-density planting can lead the branches to grow towards the sky. This results in long compact trees that give a high yield in the initial years. 

Usually, seed propagation for guavas is not much preferred as the juvenile phase of seeds is very long. Seed propagation gives lower yields and poor quality of fruit.

However, if seeds have to be used for propagation, then these seeds should be sown immediately after it’s extraction from the ripened fruit. Soaking these seeds in water for 12 hours a day or soaking them in hydrochloric acid for 3 minutes gives 90% of germination. After one year the seeding is ready for budding.

Inarching is another way for the propagation of guava but this method gives a limited number of plants from the mother plant. Though budding is a very successful method of propagation it needs a large amount of labor. Another successful method is layering but again the condition is that a limited number of plants can be produced from a mother plant. 

The easiest and pocket-friendly vegetative method for the propagation of guava is marcotting. In this method, the parts of the hardened shoots of a selected variety are dragged. After this step, a mixture of moist earth, compost, rooting hormones is gathered at the spot. If this method is successful, roots will appear in 3 weeks. Seedbeds are also a good method for vegetative propagation of guava 

Must Read: How Long Does it take a Kiwi Plant to Produce Fruit

Fertilization of guava trees:

Different fertilizers are used in different regions. Fertilizers have to be provided regularly to produce high-quality flowers and fruit. Regular fertilization also helps the plant to grow faster. Nitrogen, phosphorus, potassium, and magnesium in the ratio of 6:6:6:2 are applied to the guava tree. 

Pruning of guava plants: 

Pruning of the plants is very important at younger stages as this helps to build a strong framework and avoid week crotches. Pruning if fruiting trees is important to prevent overcrowding. The plants are aimed as low headed trees as this makes the hand picking of fruits easy. Pruning is also helpful in increasing the size of the fruit and yield as well. 

Pest and diseases: 

Pest control is very important for good productivity and disease-free plants. Mainly fruit flies, stem borers, nematodes, thrips, mealy bugs, scale insects, and some more are the pests found in the guava field. These pests can be controlled by chemical spraying or using pesticides. 

Some other cultural practices can also be adopted to avoid fruit from getting destroyed. For example, removing the infected fruit or plant part so that it doesn’t infect the whole plant.

Diseases:

Some of the diseases of Guava plants are fruit canker, will, fruit rot, anthracnose, grey leaf spot, or more. More details about the diseases are given below:

Guava wilt:

The symptoms of this disease are: in the early monsoon, light yellow foliage starts appearing and loss of turgidity and epinasty can also be noticed. Later on, plants can show unthriftiness along with this, premature shedding and defoliation can also be seen.

Some of the small branches can become bare and may stop producing new leaves and flowers and eventually dry up. Fruits on all these affected branches are left underdeveloped, hard, and Stony. And finally, the plant dies at the end. In this disease, the roots also get rotted from the basal region. The bark also gets weak and can be easily removed. Discoloration can also be noted. 

How is it spread? This can be spread from the sick soil in Virgin areas. It can also be spread from water. Any root injury also promotes wilt diseases.

Fruit rot:

Symptoms of this disease can be mainly seen in the rainy season. White cotton-like growth can be noticed on the affected part that develops very fast. This pathogen can cover the entire surface within 3 to 4 days. When the humidity is very high, at that time the fruits that are near the soil get affected very easily. Below the white covering, the skin of the fruit becomes very slushy and its color becomes light brown to dark. 

How does it spread? This disease is mainly spread through wind or rain. It is also spread through pathogens. It can be also spread from the infected plant material like soil etc.

Fruit canker:

The symptoms of fruit canker can be seen mainly on the green fruit and rarely on the leaves. At first, brown-colored or rust like unbroken circular and harmful patches can be seen on the fruit that leads to infection. The crater-like thing can also be noticed. In some severe cases, a large number of cankerous stops can also be seen. The infected fruit doesn’t develop completely and is very hard. Sometimes tiny rusty spots can also be noticed on the leaves. 

How do fruit cankers spread? This disease is mainly spread through Pathogens. Anyone infected or injured by fruit or plant part can also be responsible for this. 

Also Read: How to Nurture the Dragon Fruit –An Exotic Tropical Fruit

Alga leaf and fruit spot: 

In this, the algae infect the Immature fruit and in this small brown velvety lesions can be seen on the leaves or leaf tip. The spots on the leaves may vary in size, there may be small tiny spots or big patches. The color of the fruit can change to dark green, black, or brown. In this, the size of fruit enlarges 

How does this disease spread? This disease is an air-borne disease and hence air and rain can be the carrier of the disease. Pathogens are another carrier of this disease. 

Stylar end rot:

The main symptom of this disease is a change in the color of the region lying just below and adjoining the persistent calyx. Such areas gradually increase in size and turn dark brown.

Afterward, the affected part becomes slushy. Despite these all symptoms of the discoloration of the pericarp, the mesocarp tissue also shows the change in color, and the diseased area is marked by being pulpy and light brown in color in contrast to the bright white. 

How does the disease spread? Again pathogens are responsible for this disease and these are spread through the wind. 

Irrigation if guavas: 

Usually, no irrigation is needed during the monsoon months unless and until there are long spells of drought. In the initial year when the plants are very young with a shallow root system, they should be irrigated even at 2 to 3 days interval in the dry season. Trees in the age group of 2-5 years should be irrigated at intervals of 4 to 5 days. 

How to harvest guavas? 

Fruiting starts after about 2 to 3 years of plantation. However, the yield of the fruit depends on the age of the trees, or how the trees are planted ( pattern ), and other cultural practices. The proper yield can be seen after 10 years. After 10 years 100 to 150 kg of yield can be seen every year. Guavas can be harvested at any time in the year. However if one wants the best taste, flavor, and aroma it can be obtained when the fruits are ripened. 

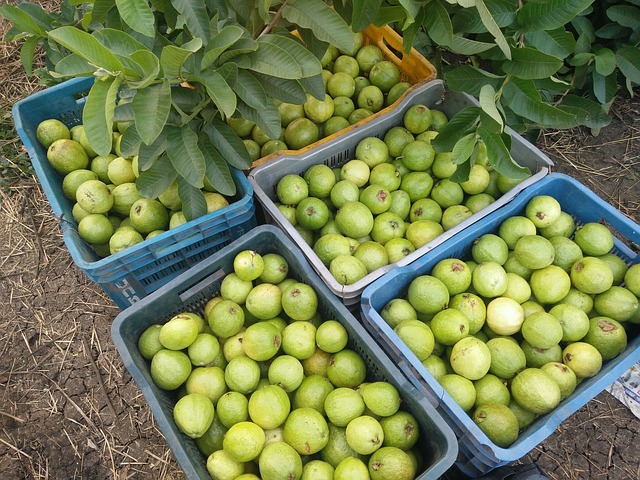
When these guavas are grown at a commercial level, the ripening can be noticed when the fruit starts turning yellow. If the fruits are to be transported to some faraway place, then they should be harvested when they are light yellow and yellow can be harvested for locals. 

Conclusion:

Guava farming is a profitable business but it needs a lot of hard work and time. 

With harvesting possible at any time of year, it can bring profits to you for a lifetime. All you need to do is beware of the necessities of guava plants and then you can get fruits whenever you wish.

Reference:

http://nhb.gov.in/pdf/fruits/guava/gua005.pdf

https://www.apnikheti.com/en/pn/agriculture/horticulture/fruit/guava

https://www-krishisandesh-com.cdn.ampproject.org/v/s/www.krishisandesh.com/guava-cultivation-guide/?amp_js_v=a6&amp_gsa=1&amp&usqp=mq331AQHKAFQArABIA%3D%3D#aoh=16109678432103&referrer=https%3A%2F%2Fwww.google.com&amp_tf=From%20%251%24s

How Long Does it take a Kiwi Plant to Produce Fruit

Kiwi (Actinidia deliciosa) is a berry fruit. It is mainly oval and with brown skin and green flesh. It also has tiny black seeds that are edible. Though it is a bit sour but doesn’t have citric acid in it. It has a sweet and tangy taste. This plant is mainly grown in the winter season as it requires a temperature of less than 7° C.

Kiwi farming is carried out in sandy and loamy soil. This soil should be rich and well-drained. Kiwi is grown at a depth of 800-1500 m. So now the question arises: How long does it take a kiwi plant to produce fruit? Fruiting mainly depends upon the age of vines.

However, the yield of the plant increases after 1 year. Kiwi has high nutritive values, it is rich in vitamins and minerals. It has vitamin c, vitamin k, fibers, and potassium. Hence kiwi farming is very profitable.

Mainly there are 3 types of kiwi fruit. It has several health benefits. These are the grocery store kiwi ( Actinidia deliciosa), the next is a hardy kiwi (Actinidia arguta ), the last type is (Actinidia kolomikta).  

Kiwi plantation: 

In this, first of all, one would require one male vine for eight female vines. These vines are vegetatively propagated so these vines will be made to reproduce when you buy. The growth of hardy kiwis is very very fast. 

Which type of soil is best for kiwi farming? 

The soil should be well-drained and should have a higher amount of organic matter in it. Sandy and loamy soil are best for kiwi farming. The pH of soil required is a little less than 6.9.

At this pH maximum yield has been reported however if the pH increases to 7.3 it can badly affect the yield. As the cropping starts, nitrogen, phosphorus, potassium has to be supplied at regular intervals. 200kg of nitrogen, 55 kg of phosphorus, about 150kg of potassium are the doses required per hectare.

Suitable climatic conditions for growing kiwi: 

As told earlier a cool climate is preferable for kiwi plantation however they can grow in almost every climate. The vines require a cold climate to set fruit. Less than 45° F is suitable for kiwi. These plants need to be protected from strong winds and frost.

Hence kiwi has to be protected from wind, autumn, and spring frost. The soil needs to be rich in moisture throughout the year. About 150cm of Rainfall is enough per year and it should be well distributed especially during growth periods. 

kiwi plantation

During summer the temperature is more and the humidity is very low and this can cause scorching of leaves. Usually, heat stress and sunscald are the main problems in kiwi farming. 

How to prepare the land for kiwi fruit production

A steep land with rows is required for growing kiwis. The land should be prepared in such a way that enough sunlight falls towards the rows. The land has to be prepared thoroughly for the cultivation of kiwi.

The land should be plowed about 2 to 4 times and then followed by two harrowings. It is necessary to keep the soil free from any type of weeds otherwise the crop yield would be poor. While preparing pits for the kiwis, a mixture of farmyard manures and upper soil should be added to get high quality and productivity of the fruit.  

Planting a kiwi fruit: 

For kiwi plantation, it is very important to plant the fruit at correct distances and suitable methods have to be followed. 

When the kiwi is grown at a commercial level, that time grafting method is mainly used for propagation. If this crop is grown at a proper distance then one can attain maximum fruit production. The distance between each row should be at least 3.5m whereas the distance between each plant has to be 6m. Usually, 2 main methods are used for plantation.

These two methods are: T- bar training system and the other is the Pergola training system. In the T-bar system, the above-mentioned spacing is required. In the Pergola system, the distance between each row should be 6m and the distance between the plants should be 5 to 6 m. 

Also Read: Guide for Beginners of Kiwi Farming

Procedure to grow kiwifruit from the seed: 

The first step is to get some kiwi seeds from the available kiwi fruit. Then place all these seeds in water and blend them to separate the gooey membrane from the seed. After this use a colander to water the kiwi seeds. Then soak these seeds by placing them smoothly on a paper towel. The next step is to put them in a ziplock and place it in a warm place.

kiwi fruit seeds

When you notice sprouting in the seeds, split the paper towel into tiny pieces and transplant them in the prepared put or the pot. Therefore take proper care of your plant for good quality fruit. 

Irrigation in kiwi farming:

For a good quality crop, from time to time irrigation is a must. Like other crops, kiwi also needs regular water supplies. The hard variety of the kiwi fruit takes 3-4 years to become mature. Hence water has to be supplied regularly for 3 years of the plantation. But don’t overwater the plant as this may lead to mulch in the crop.

In hot and dry conditions water has to be supplied at regular intervals. At commercial level kiso farming, irrigating at intervals of 10-14 days is best for maximum production.

Application of manures and fertilizers: 

The application of manures and fertilizers is also very necessary for high productivity. From time to time enough dose of suitable manure and fertilizers has to be supplied for a good yield. So one should use soil rich in organic matter like nitrogen, phosphorus, potassium, and other micronutrients and macronutrients.

Other than this a dose of farmyard manure should be added before planting it in the main field. After 5 years of plantation, adding these manures and fertilizers have excellent results. A high amount of Cl is also necessary for the crop as its deficiency can cause adverse effects on the growth of the crop and even on roots and shoots. On the other hand surplus amounts of boron and sodium can be harmful to crops.

Pruning and training of kiwi crop: 

For better production of the crop, pruning and training are very important. In training Wooden, concrete, or iron pillars are used to provide support to the vines. Adjust these pillars 5 to 6 meters apart. The pillars should be 1.6 to 2.1 m long above the ground. Fence or wire can be used to provide support to the pillars. 

Pruning: Along with proper training, pruning is also very essential for high yield. It is very important to remove or cut off the unwanted and undesirable parts that may suck the essential nutrients from the plant.

Hence canes from the making part of the flower have to be removed along the excessive wood grown along with the plant. Also, separate off the extra tangles from the plant.

As kiwi is not a self-pollinating plant, hence there’s a need for good pollination also. 

Harvesting of kiwi

Mainly kiwi attains its full size after monsoons however it still may not be ready for harvesting. It could be ready to harvest in early winter as till then the seeds become black and sugar levels also rise however after harvesting the kiwi, the starch turns into sugar. And finally, the fruit is ready to eat.

Harvesting of Kiwi Plant

Also, a refractometer can be used to determine if the sugar level is optional and the kiwi is ready to harvest or not. About 6.5 percent or more is the optimal sugar level. Vine-ripened kiwi has the best Taste however cannot be stored for much time.

When the kiwi is grown at a commercial level, harvesting has to be done all at one time however if one grows it in a home garden then they can harvest it according to their need in the harvesting period but harvest the large-sized kiwi first and let others remain inside to grow more. Kiwi has to be handled with care during harvesting and the kiwi that has been damaged cannot be stored.

Diseases: Armillaria Root Rot (4/13), Bacterial Blight (4/13)

Bleeding Canker (4/13),

Botrytis Fruit Rot (6/16)

Crown Gall (4/13)

Phytophthora Root and Crown Rot (6/16)

Water Staining, Juice Blotch, and Sooty Mold of Fruit (4/13) are some kiwi diseases whose symptoms are Vines may completely collapse; white mycelial mats may be present under bark close to the soil line,  there’s a change in the color of cortical tissue and white mycelial strands are also present; root-like rhizomorphs extend from roots into the soil.

These needed to be controlled as soon as possible. Make sure that land being used for new kiwi plantings is gotten rid of roots which have diameter greater than 1 inch; ensure kiwi vines are properly watered but not too much. Further, diseases can be controlled by avoiding injuries that lead a way for pathogens to enter the body. At this time, no chemical control strategies are available. 

Health Benefits of kiwi:

Kiwi has several health benefits and many nutritional values. Some of the benefits are as follows:

1. Kiwi is an incredible source of vitamin C, vitamin E, and antioxidants.

2. Kiwi fruit has anti-aging properties and is also very beneficial for the skin. It improves skin health.

3. Kiwi fruit also helps in enhancing the respiratory system of the body. 

4. Kiwi is very good for the eyes. It improves eyesight and is also helpful in protecting our eyes from several diseases.  

5. Kiwi fruit helps us to improve our digestive system from where a large number of disorders and diseases can happen if digestion is not proper. 

6. It is also very helpful in the improvement of cardiovascular diseases The kiwifruit possesses properties that lower blood pressure. By helping to maintain healthy blood pressure and providing a boost of Vitamin C, the kiwifruit can reduce the risk of stroke and heart disease.

7. Kiwi is a rich source of vitamin k that helps to make the bones strong. 

8. It has many antibacterial and antifungal properties. 

9. It helps with sleep disorders. 

10. Along with the fruit its roots also have good properties. 

It is also good for immunity asKiwi contains abundant amounts of Vitamin C, which stimulates the body’s immune response. The kiwifruit contains roughly 230% of the daily recommended intake of Vitamin C. This amazing fruit is loaded with immune-boosting nutrients in every bite.

In  kiwi fruit. high amounts of dietary fiber are present in skin as well as in flesh. Fiber aids reduction of constipation and  

 other gastrointestinal issues and discomfort.

Treatment of Asthma 

The presence of Vitamin C in kiwis has been proven to  reduce wheezing symptoms in some asthma patients. This is true in children, who are benefitted the most from the consumption of kiwis.

Ocular Health

The high levels of antioxidant vitamins and carotenoids found in the kiwifruit may help in preventing eye disease and promote ocular health but only if it is consumed with other healthy and mineral rich vegetables and fruits. 

Conclusion:

Kiwi is a very healthy profitable crop with high nutritive values. Kiwi is said to be a treasure of health benefits. 

Reference link:

https://www.agrifarming.in/kiwi-farming-information#

https://agriculturegoods.com/kiwi-fruit-cultivation-guide-for-beginners-of-kiwi-farming/

https://www.gardeningknowhow.com/edible/fruits/kiwi/harvesting-kiwi-fruit.htm

How Long Does Sugarcane Take To Grow

How Long Does Sugarcane Take To Grow

Sugarcane (Saccharum officinarum ) is a widely grown crop and is the main source of sugar. It is a well-known cash crop that is of great commercial importance. It has also provided employment to a large number of people directly or in an indirect way hence contributes to the national economy.

Sugarcane is mainly a tropical plant and hence it runs across all the seasons whether it’s raining, summer or Winters.

Before knowing how long does sugarcane take to grow, check out the essentials that you must know about for sugarcane plantation.

Different requirements for sugarcane plantation

  • Suitable climatic conditions : As we know sugarcane is able to grow throughout the seasons, but they best grow in tropical hot sunny areas. 

A long warm growing season with high frequency of solar rays and sufficient amount of moisture can be said to be the ideal conditions for proper growth of this crop. For ripening it requires a cool but frost free season. 

  • Soil type : sugarcane can be grown in different varieties of soil such as alluvial soil or the red volcanic soil or the soil that is a mixture of  silt , sand and clay particles along with some organic material can be the perfect soil for sugarcane plantation. This crop needs a well drained soil for which the land is ploughed and left to weather for some time before subsoiling. 

The pH range of the soil for sugarcane cultivation should be from 6.5 to 7.5 pH. The minimum depth of the soil should be 45 cm and the soil should have an adequate amount of nutrients. 

  • Seed Quality: Accessibility of good quality cane seeds is must for good crop yield. Firstly the seed is grown in the nursery  for 10-11 months and then that nursery crop is planted in the field. After that some other chemical treatments need to be provided to the seed which are 0.05% Bavistin, 2.5%KCl , 2.5% urea KCl +Urea etc. After the above chemical treatments , a hot water treatment is also given for prevention of seed borne diseases. 
  • Land Preparation for Sugarcane plantation:  Every single time a new crop is grown , it becomes necessary that soil should be brought to a properly cultivated land for proper germination of seeds and good root growth.

There are some  reasons behind land Preparation which are:

  1. Land Preparation includes the preparation of seedbeds that allows optimal soil water relations.
  2. This activity also provides good physical conditions for early root proliferation and penetration.
  3. It is also helpful in destroying weeds and hibernating pests.It also helps to knock down the diseases causing organisms.
  4. It also helps the land to absorb the previous crop residue and organic manures.
  5. Land preparation also  facilitates proper soil chemical and microbial activities.

Tillage is an important operation under land preparation. Tillage is basically agricultural preparation of the soil with the appropriate tools or implements to loosen the surface soil layer.

The main function of tilling is to mix up the organic matter into your soil properly , break down the crusted soil, and loosen up the tiny areas for plantation. Anything in excess is never good and so is tilling, excess tilling can also cause more damage to the soil.

The best time for tilling is the spring season but can also be done in autumn for cool weather crops. However tilling must be avoided when the soil is wet as it can cause damage to soil structure.

Plantation methods of sugarcane:

Mainly, there are a few different methods for plantation of sugarcane described below- 

Must Read: How To Plant Sugarcane – A Complete Beginner’s Guide

Ridge and furrow method:

It is one of the most common methods for sugarcane plantation. In this method the ridges and the furrows are opened with the help of a ridger by maintaining a distance of 120cm between the furrows in the heavy soils and and a distance of 105cm in the light and medium soil. After this step, the main and sub irrigation channels are opened at suitable distances.

Initially the sets are laid on the end of the top ridge and later on these are planted in furrows by dry and wet method. 

Dry method :

This method is adopted for heavy soils to avoid pressing of the setts very deep into the soil. These sets are arranged in the furrows  end to end by

 facing eyes buds on the sides and sheltering it with a layer of soil. After completing the steps of plantation, the field is ready for irrigation.

Wet method :

This method is adopted for light to medium soil. In this method of plantation the field is irrigated initially before planting the setts. Then the sets are planted at the depth of 2.5 to 5 cm in the furrows with hands or feet. These sets are placed end to end in such a way that they face the bus on the sides. 

Flat bed method:

Flat bed method is another method for sugarcane plantation. In this method firstly the land is ploughed, harrowed and then leveled and then flat beds are prepared. After that the cane stes are laid down in the flat beds in end to end rows. A distance of 60-90cm is maintained between the rows depending on the soil type.

Afterwards they are pressed into the soil with the help of a hand or foot , about 2.5-5 cm deep and then it is covered with a layer of soil. During the plantation by this method one must keep in mind that the buds should face on the sides otherwise it would not be possible for lower buds to germinate. This method of cane plantation is usually adopted in the areas where there is abundant moisture.

Rayungan Method:

This method of plantation is usually adopted for adsali sugarcane plantation. Rayungan Method is followed in Riverside fields or in the areas with heavy rainfall. In these areas the cane fields are usually prone to floods during the rainy season which affects the germination of the seeds and in such conditions the sets cannot be directly planted in the main fields.

So firstly the single bud sets are planted in the nursery in a vertical manner which are prepared in a high lying area of the farm in summer. After about a period of 6 weeks the sets that have been sprouted are shifted in the main field when the danger of floods is over. 

Trench or the Java method:

In this method trenches ( a type of deep and wide depression in the ground) are made that depth is about 22-30cm and maintained at a distance of 90-120cm. The deeper soil is loosened and mixed up with manures. Then the sets are placed in the middle of  these trenches and then covered with a layer of soil.

After the completion of planting irrigation is carried out. Large clumps of cane are produced  in this method that do not lodge  when tied together. The danger from wild animals is least.

Manures and fertilizers: Sugarcane is a long durational crop, as well as a heavy feeder thus the requirement of manures is quite high.

During the land preparation about 25-50 tonnes of  FYM/ha has been used. 

It is recommended that different sugarcane fertilizers have to be used according to the planting season, it even varies from growing track to track. So basically for Adsali 250:115:115 is used and for pre seasonal  340:170:170kg nitrogen , phosphorus and potash respectively are suggested.

Irrigation:

The water requirements for sugarcane generally range from 2000 to 2500 mm depending upon some factors like soil type, duration, and climatic conditions etc. Irrigation of sugarcane crops has been done during the different phases like  the germination phase, tillering phase, grand growth phase and the final maturity phase.

So firstly during the stage of germination, the soil needs sufficient moisture for better germination however water logging can result in rotting of sets. In this phase irrigation can never be done at intervals of a week however these intervals can be of 10 days in tillering phase.

Next comes the grand growth phase which is known to be a critical stage for water demand. This also needs to be irrigated at intervals of a week. It takes 12-14 months for sugarcane to grow. Now finally in the maturity phase, the irrigation has to be done fortnightly and has to be stopped about 15 days before harvesting.

Intercultural operations: These include mulching, hoeing, tying of the cane and earthing up.

In the initial period, spreading the paddy straw or sugarcane trash on the field can help to prevent more evaporation and hence the demand for water supply will also be less.

Hoeing and weeding is necessary in the first 3-4 weeks after plantation  for high yield and improved quality of sugarcane. After the germination phase two to three more hoeing and weeding may be required during the first three months depending upon the field conditions and frequency of irrigation.

The final earthing up has to be done before the monsoon rains and should be synchronized with the implementation of the last dose of fertilizers. This operation is helpful in keeping down the weeds.

Tying of canes is said to be a very desirable activity that prevents the canes to sway during wind. Bringing together the stalks from the adjacent rows and tying them all together along with their own trash and the old leaves  is considered as the best way of tying the cane.q

Sugarcane diseases:

There are a few plant diseases that can be controlled or cured with some simple methods. First comes the red rot disease which is a fungal disease. It’s symptoms are drying of top leaves, the leaves start withering, red lesions on the midrib of the leaves.

One should uproot and destroy all the clumps if you notice the above symptoms. Use diseases free and heat treated setts for plantation.

The next disease is whip smut which is also a fungal disease and the symptoms can be noticed before 1 month of harvesting season and to prevent this , diseases free and heat treated sets should be used.

Harvesting:

When the lower leaves start withering up and leaving progressively, and fewer green leaves are left at the top, it can be marked as the maturity phase. Even a maturity testing device call a refractometer can be used to test the maturity stage. If the hand refractometer shows a reading of 20 , it can be said that the cane has reached the maturity level. 

The harvesting of sugarcane generally begins in early winters as is continued for about 150 days. Nowadays the harvesting and cutting of sugarcane is done after receiving the cutting orders from factory authorities and these cutting orders are issued depending upon the date of planting of which the records are maintained. Harvesting of sugarcane is done with the bog machines that contain rotating knives which cut the sugar cane from the base of the stalks.

How long does it take sugarcane to grow:  

sugarcane takes quite a long time to grow, we can say that it grows through the entire season. Sugarcane plants produce several stalks and each one of them can grow well over ten feet and this usually takes 12- 14 months. The best time to plant cane crops is in early Winter so that the sprouting can happen in early spring. These os basically one harvest of the primary crop and then 3-4 harvests of the regrowth.

Yield: The average yield of the cane crop under the commercial cultivation of170 tonnes per hectare for Adsali  and 120 tonnes per hectare in the case of pre seasonal sugarcane and 100 tonnes per hectare for suru 

Conclusion:

Farmers that grow sugarcane want their farms to be sustainable and by using sustainable practices Farmers can keep the farms and crops healthy.

Why are my Strawberry Leaves Turning Red

Strawberries are a staple for numerous home gardens. These fleshy, sweet berries are so delicious to eat and are so versatile too. They can be used to prepare jams, sauces, desserts, and much more. Growing strawberries ourselves and then eating them bring so much pleasure. Even if you need them for business, it brings profit then too. But sometimes, diseases can effect growth of strawberries dramatically. If you are here, you might be thinking, Why my strawberry leaves are turning red. 

Yes, it is something that you need to pay attention to. Here we have all the reasons for strawberry leaves turning red along with preventive measures and solutions for you. So, do check these out. 

Strawberries have natural red pigment in them. The occurrence of red stems in strawberry plants is due to their genetic expression. Moreover, it is considered completely normal. However, in case leaves of your strawberry plant start turning red, you need to worry about them. Redness of leaves is a sign of a plant being affected by a disease or some nutrient deficiency. Whatever the reason might be, the redness of leaves is a disastrous condition. It basically implies that your plant is dying. 

Below we have mentioned all the possible reasons of reddening of leaves- 

Diseases in Strawberry plants 

There is not a single disease or ailment that results in red leaves in strawberry plants. Various diseases can lead to such conditions. In order to deal with ailment, you must be aware of what problem you are going through. Given below is the list of diseases which lead to red or purple leaves in strawberry plants. Match symptoms and figure yours out. 

1. Red Stele Root Rot

This is a very potential disease and is commonly seen in strawberry plants. 

  • Causing agent 

Red Stele Root Rot is caused by a pathogen named Phytophthora fragariae. This pathogen resides in soil. The soil which makes home to this pathogen is generally moist, poorly drained and clay laden. 

This pathogen generally spreads through planting equipment or soil like pot soil etc. The planting equipment gets contaminated and when it is used on strawberry plants, they get infected as well. 

  • Occurrence

This disease usually occurs in early spring, late winter and late fall. At these times of year, soil is more conducive to growth of this pathogen. Generally, this fungus is attracted to either poorly drained conditions or overly wet soil.

  • Symptoms

Strawberry plants get affected by this disease dramatically. Early symptoms include stunted growth and lack of shiny luster in strawberry plants. Further, leaves start turning red, yellow, blue in plants. 

Older leaves start turning yellow or red in plants. Also, they begin to wilt and die eventually. Rust coloured roots are also observed in plants. In advanced stages,fungi can kill the whole plant.

You can easily check if your strawberry plants are also suffering from this disease. First, dig out the roots of the plant. Then cut the root into two halves. If the centre of the root is dark reddish, it conveys that the stele of the plant has turned red. Therefore, it confirms that the plant has been infected by Phytophthora fragariae. 

  • Treatment 

Soil fumigation is an effective measure to remove fungus completely from the growing site.However, such a measure is difficult to carry out in a home garden. Metalaxyl fungicides can control this disease. But you need to follow proper cultural practices for better results.

Diseased parts of infected plants can be removed or pruned. 

For further growth of strawberry plants, you can purchase highly resistant plants from a good nursery. In addition to this, grow future plants in another area of garden for minimal risk of infection.

  • Prevention

This species of fungi is quite persistent. They can easily survive in soil for years even without host plants. Due to its nature, it is a little difficult to grow strawberry plants in such conditions. Red steel root rot occurs in most common and is very destructive for plants. 

Soil chosen for growing strawberry plants should be well drained, light and also not compacted so that diseases stay at bay. 

2.Black Root Rot

Black root rot is a disease seen in strawberry plants that results in redness of leaves. You can check these symptoms given below to check out if your plants are suffering from the same. 

  • Causing Factors

This disease is also caused by fungi. The reasons behind this can be- 

  • Over fertility 
  • Microscopic soil nematodes
  • Inconsistent irrigating
  • Damage due to frost 

These reasons can lead to black root rot in strawberry plants. 

  • Symptoms 

In this disease,black roots are seen clearly. Also, leaves turn red or purple in colour and growth is stunted. 

  • Treatment 

Improved cultural conditions can help in treating this infection and save our strawberry  plants. Furthermore, mulch is considered really effective in this condition. It retains moisture in the soiland is very beneficial for plants. 

3. Leaf Scorch 

  • Causing agent 

Leaf scorch is caused by fungus diplocarpon earliana. This fungus causes the appearance of dark brown, disk shaped lesions on the upper surface of leaves.

  • Symptoms 

As stated above, disk shaped lesions are seen commonly on the upper surface of leaves. There is an appearance of dark spots at first. These spots give a sense of burned look. The spots can be around ¼ inch in diameter. As these spots grow in size, they resemble small droplets of tar. It is due to production of minute, black fungal structures in abundance. 

When infection hikes up, leaves appear all red. They dry up and appear scorched. These lesions can also be seen on other plant parts like flowers or young fruits. Petioles, runners, fruit stems can also get infected in this condition.

  • Management

Strawberry plants should be grown in proper air circulation and good sun exposure. Treatment can be carried with fungicide in the flowering period, during late summer and late fall. Keep the level of moisture low and avoid providing too much water supply. 

4. Nutrient Deficiency

Giving proper nutrition to strawberry plants is necessary for proper growth of plants. Nutrients such as potassium, nitrogen, and phosphorus are responsible for various processes being undertaken in plant physiology. In case the levels of these nutrients are compromised so does plant health. It leads to purplish or red color in the leaves of strawberry plants. 

Along with the redness of leaves, fruit yield is also compromised in strawberry plants by one third due to deficiency of nitrogen. 

If potassium is supplied in minimal amounts to plants then red color appears on the margins of the leaves of plants. Strawberry leaves turning red at edges should also be treated to avoid complications.  Further, runner number and fruit production decreases dramatically. 

Control Measures for reddening of leaves in strawberry plants 

  1. Use disease resistant cultivars for growth of healthy and disease free strawberry plants. Resistant varieties are extremely resistant to various types of diseases. These  varieties require minimal effort and can be grown easily to produce delicious fruits. 
  2. Start your gardening with certified plants only. Do not just get them from any place you find them. But purchase certified and healthy strawberry plants from a renowned nursery of your area. Taking this step at start will ensure great results and fruits at the same time.
  3. Plant them in areas which receive good quality sunlight for maximum hours. Air circulation should also be very good in the gardening area. 

Prevent The growth of weeds by using chemical methods or cultural practices. In addition to this, space runner plants in matted row cultures. Overpopulation should be strictly abandoned in strawberry plants. It affects growth and stresses plants. Also, it has an obvious effect on fruit production. 

  1. You can apply nitrogen fertilizers at the time of renovation. Use a spray to cover a larger area with less amounts of products. These plants are very prone to fungi diseases. Using a fungicide is really helpful to keep those diseases at bay. 

Fungicide controls fruit roots and leaf diseases. Set a proper schedule for spraying. For June cultivars, starting fungicide should be sprayed at a gap of 7 to 10 days. After the primary fruiting period is over, gaps can be hiked upto 2 to 3 weeks. 

  1. Application of fungicide should be on all plant parts present above the ground. Leaf scorch is commonly seen on the surface of leaves so cover leads with fungicide carefully and properly. 

As Spray lasts longer and is more effective that dust so choose it for your plants. 

Also Read: Strawberry Farming Guide for Beginners

Prevention 

You can prevent your plants from.catching these deadly diseases by taking care of small things. You do not need to run any hard operations to fulfil the task. Small steps can ensure you healthy strawberry plants that give healthy and delicious fruits. Various ways for preventing are mentioned below- 

  • Soil must be drained properly with water. Water is essential for all living organisms and strawberry plants are not an exception. However, too much water can deteriorate the quality of plant and fruit yield. Therefore, use your judgment and provide a required amount of water to plants regularly. Inconsistent irrigation can lead to diseases such as black root rot as mentioned earlier. 
  • In case too much water is added to plants, then shallow roots suffer a lot. As plants get all of their food through roots therefore all of the plant will suffer from detected roots. 
  • Plants must be placed in a spacious area. Overcrowding can cause stress in strawberry plants and effect growth negatively. Plants must be placed 15 inch apart for best results. 
  • Air circulation should be properly taken care of. Due to air circulation, plants do not stay wet or moist and as a result occurrence of fungal disease can be avoided. This is because fungus grows in moist conditions. Dry leaves will ensure a non fungus and healthy environment. 
  • Strawberry plants grow best in bright and sunny locations. California, Florida and North Carolina are regions in the USA where strawberry growing conditions are very favourable. Kent, Sussex and Wales have the most suitable climate for strawberries cultivation. 
  • Use fertilizers to provide plants with required nutrients. 

You can even prepare fertilizers at home using organic materials. Such fertilizers are much more useful and safe for strawberry plants.

How to Make Homemade Fertilizers 

Homemade fertilizers are full of vital nutrients. They ensure overall good growth in strawberry plants. Preparing fertilizers at home is easy and requires you to take a few steps. Check out fertilizers mentioned below which you can create at home and are best for plants. 

  • Fertilizer Tea

All purpose liquid fertilizer can be prepared from organic compost and is called fertilizer tea. To make fertilizer tea, you need a large container and well aged manure or organic compost. Add material to the container and fill 5 parts of water in it. Keep the mixture away for 7 to 10 days to brew it. Once it’s brewed, pour into a spray pump and cover strawberry plants from top to bottom with this liquid. 

  • Fish Waste fertilizer 

Fish emulsion is highly enriched with nitrogen. Using this can help in proper growth and healthy fruit yield. It also repairs pale green leaves in strawberry plants. 

You can prepare this homemade fertilizer by adding 1 part of fish waste to 2 parts of water. Keep the mixture away for several weeks. Spray it on the ground in quantities of 3 gallons on 100 square feet.  

  • Plant based fertilizer

Plant based homemade fertilizers can be prepared from seaweed, nettle or chamomile.  Seaweed is enriched with mannitol. Mannitol is proven to increase nutrient absorption in soil. Add seaweed in 5 gallons of lukewarm water. Soak it in there for around 3 weeks. Cover it loosely with a lid. After 3 weeks, spray it onto the strawberry plants. In case of nettle or chamomile, take 5 gallons of water and put plant texture in  it. Rest it for 3 weeks and then spray onto plants. 

  • Manure 

NPK value varies ik cow, horse, rabbit and poultry pasture. After 4 weeks of planting, June bearing adds 8 pounds of cow or horse manure to plants. If you are using rabbit or poultry manure lower it down to 2 pounds only.

Strawberry plants can be affected by various diseases that lead to symptoms like reddening of leaves. But it doesn’t mean that those diseases cannot be recovered or prevented. All you need is to be careful while buying plants and at the growth or cultivation practices. Prevention and control measures described above provide you much needed insight.